Difference between revisions of "Understanding area and perimeter"
Jump to navigation
Jump to search
(Created page with "=== Objectives: === * To introduce students to the concepts of area and perimeter * To help students explore the meaning of area and perimeter, the units used for area and p...") |
(No difference)
|
Revision as of 07:29, 28 June 2024
Objectives:
- To introduce students to the concepts of area and perimeter
- To help students explore the meaning of area and perimeter, the units used for area and perimeter
- To help students understand how area and perimeter can be calculated for different shapes
- To explore the relationship between area and perimeter
Classroom transactions
- Begin by asking students what they have learnt/understood about area and perimeter in math, whether it has any use in everyday life and a few examples for the same. If students are unable to cite any examples, give them a few examples like fencing a field, carpeting a room, etc as examples and discuss how area/perimeter in relevant in those situations.
- Ask students to explain what would be the difference between the two. In their books, ask them to draw a random shape and mark the area using pencil and perimeter using a pen.
- Open the Area Builder simulation
- Place one square in the grid and ask students what would be its perimeter and area, and how it's calculated.
- Explain that area defines the space occupied by a shape, and perimeter is the length of its boundary. Point out to students that the perimeter would be measured in cm,m,km etc and area in cm², m², etc
- Place another square attached to the 1st one and ask students the new area and perimeter.
- Next, place another consecutive square and ask students to predict what the area and perimeter would be. Repeat with a few more instances and ask students if there is any pattern they notice and ask them to explain their observations in their own words.
- Once they have got a hang of how area and perimeter are calculated, arrange the squares in a random shape on the grid and ask them to calculate the area and perimeter. Ask one student to explain how they did it and whether everyone used the same method or if anyone used a different approach.
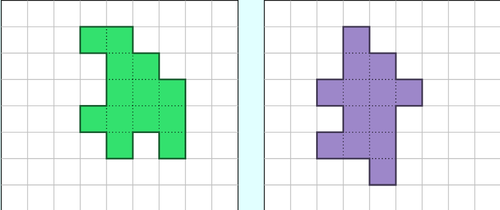
- Next, use the dual mode and create two different shapes having the same area and perimeter. Eg: I initially hide the Values from students and ask them to calculate it. Discuss how it is possible that both area and perimeter are the same for the two figures, and whether they can attempt to draw another one with the same area and perimeter.
- Specify a number for the area and ask students to draw at least 2 different shapes with the same area but can have different perimeters. Repeat with fixed perimeter and varying area. (Can be given as homework or as a task if lab available)
Area of a rectangle
- Next, create a rectangle using the squares and ask students to calculate the area. Discuss different approaches used by students, and any similarities and differences in the approaches. If most students are calculating area by individually counting the squares, discuss if there is a better/easier way it can be calculated. Establish that multiplying the number of squares on adjacent sides can be an optimal method, and introduce/connect it to the l×b or b×h formula.
- Have students work on a few examples
- Homework/additional activity: Specify a number for the area, e.g. 12, 24 or 36 and ask students to draw at least 2 different rectangles with the same area.
Area of a parallelogram
- Open the Area of parallelogram GeoGebra file
- Ask students if they recognize the shape, and
