Difference between revisions of "Sector of a circle"
| Line 447: | Line 447: | ||
# They learn that semicircle and quadrant are special types of sectors. | # They learn that semicircle and quadrant are special types of sectors. | ||
===Notes for teachers=== | ===Notes for teachers=== | ||
| − | ===Activity No # | + | ===Activity No # Different sectors of a circle=== |
*Estimated Time : 15 minutes | *Estimated Time : 15 minutes | ||
*Materials/ Resources needed : Laptop, geogebra file, projector and a pointer. | *Materials/ Resources needed : Laptop, geogebra file, projector and a pointer. | ||
Revision as of 09:25, 9 December 2013
| Philosophy of Mathematics |
While creating a resource page, please click here for a resource creation checklist.
Concept Map
Error: Mind Map file CIRCLES BASIC TERMS..mm not found
>
Textbook
To add textbook links, please follow these instructions to: (Click to create the subpage)
Additional Information
Useful websites
- maths is funHere you get description of terms of circles
- Intersting facts this web link is full of circle facts.
- sparknotes Gives some more details about properties of circles
Reference Books
NCERT BOOKS
Teaching Outlines
Concept #1 CIRCLE CENTRE
Learning objectives
- The students should understand that centre is that fixed point in the circle from which all points are at equal distance.
- They should be able to give examples for circles
- They should understand that a circle is drawn using centre as a reference point.
Notes for teachers
Define circle and centre with the help of a diagram.
Activity No # 1 To locate centres for circles
- Estimated Time : 20 minutes
- Materials/ Resources needed: Coloured papers, compass, pencil, scale and scissors.
- Prerequisites/Instructions, if any
- Multimedia resources
- Website interactives/ links/ / Geogebra Applets
- Process/ Developmental Questions
- How to mark the centre of a circle ?
- How do you label it ?
- How do you draw a circle ?
- Evaluation
- How many centres does a circle have?
- Where does the centre of the circle lie? (inside/outside)
- Question Corner
- Can a circle be drawn without locating its centre ?
Concept #2 Radius and Diameter
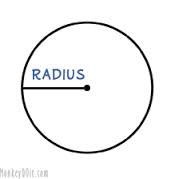
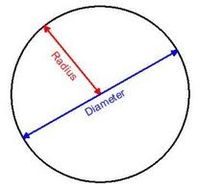
RADIUS:A straight line drawn from centre to the circumference
DIAMETER:A straight line drawn through the centre and terminated both ways by the circumference.
Learning objectives
- The students should understand that radius is a straight line joining centre of a circle to any point on the circumference.
- They need to learn the use of compass.
- Skill of drawing the circle accurately.
Notes for teachers
Explain the concepts using requisite diagrams.
Activity No #1 Marking radius and diameter
- Estimated Time : 20 minutes
- Materials/ Resources needed: Different coloured papers, compass, scale, pencil and scissors.
- Prerequisites/Instructions, if any
- The student should have knowledge of circle and radius.
- The student should have skill of paper folding.
- Multimedia resources
- Website interactives/ links/ / Geogebra Applets
- Process/ Developmental Questions
instructions to the teacher:
- The teacher distributes the paper to the students.
- Shows them how to use compass and draw a circle.
- Ask every student to make 2 equal parts by folding.
- What happens if it is folded again to get equal parts?
- Ask the students to identify the folded lines/marks
instructions to the student:
- Draw a circle of given radius.
- Cut out the circle.
- Fold the circle into two equal halves.
- Again fold into further equal halves.
- Oserve and mark the folded line.
- Identity the diameter and radius.
- Evaluation
- Was the student successful in marking radius and diameter?
- Was the student successful in folding and marking?
- Was the student able to relate radius and diameter.
- Question Corner
- How many such radii and diameters can be drawn to a given circle?
Activity No #
- Estimated Time
- Materials/ Resources needed
- Prerequisites/Instructions, if any
- Multimedia resources
- Website interactives/ links/ / Geogebra Applets
- Process/ Developmental Questions
- Evaluation
- Question Corner
Concept #3 CIRCUMFERENCE
Learning objectives
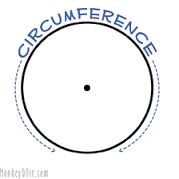
- The students should understand that the circumference is the outer boundary of a circle.
- It is equivalent to perimeter.
Notes for teachers
- Explain that every point on the circumference is at equidistant from the centre.
Activity No # Marking circumference
- Estimated Time :10 minutes.
- Materials/ Resources needed: white paper, compass and colour pencils.
- Prerequisites/Instructions, if any
- The student should know to use the compass.
- The student should understand the circumference as outer boundary which is defined.
- A circle is drawn using radius as a measure.
- Multimedia resources
Geogebra
- Website interactives/ links/ / Geogebra Applets
- Process/ Developmental Questions
Instructions to the teachers
- Ask the children to draw circles.
Instructions for the students
- Colour circumference by fitting small colour pencil in compass itself.
- Evaluation
Observe for the skill in using compass and drawing the circle.
- Question Corner
- Is the distance between the centre of the circle and its circumference constant ?
- What is the distance between the center of a circle and its circumference called?
Concept #4 SEMICIRCLE
Learning objectives
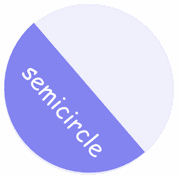
- The students learn that a diameter divides the circle into two equal halves and each such half is a semicircle or hemicircle.
- The students learn how to form a semicircle by joining any two points on the circumference through its centre i.e. by drawing a diameter.
Notes for teachers
- Show children semicircle by drawing diameter.
Activity No # 1. Semicircle
- Bring cut circles of different sizes.
- Fold them into exact halves.
- Recognise semicircles. Let them colour each half with different colour.
Materials: White paper circles, crayons.
- Estimated Time: 10 minutes
- Materials/ Resources needed: White paper, crayons.
- Prerequisites/Instructions, if any
- The students should have prior knowledge of circle and diameter.
- Multimedia resources
Geogebra
- Website interactives/ links/ / Geogebra Applets
- Process/ Developmental Questions:
- Identify the centre, circumference, diameter and semicircle of the circle.
Instructions to the teacher:
- Ask children the previous day to cut circles of given radius and bring.
Instructions to the students:
- Instruct them to fold circle into exact half.
- Draw diameter on folded line and colour each half with different colour.
- Evaluation
- Were the students able to draw and cut perfect circles?
- Was the folded line (diameter) passing through the center of circle?
- Question Corner
- In how many different ways can you draw semicircles for a given circle?
Activity No #
- Estimated Time
- Materials/ Resources needed
- Prerequisites/Instructions, if any
- Multimedia resources
- Website interactives/ links/ / Geogebra Applets
- Process/ Developmental Questions
- Evaluation
- Question Corner
Concept #5 Interior and Exterior of a circle
Learning objectives
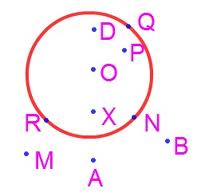
- The student learn that any points on the planar surface of the circle within its circumference are said to be interior points and points on the outside of circumference are said to be its exterior points.
Notes for teachers
- This knowledge is important to understand secant and tangent to the circle.
Activity No # A game of tiger and goat.
- Draw a circle on the playground.
- Make children stand on its circumference.
- Call one student inside the circle to be a goat and other student on the exterior would be the tiger.
- The tiger tries to get into the circle interior to catch the goat.
- All other students on the circumference defend the entry of tiger.
- If tiger forces itself inside, the goat is let out.
- If the tiger succeeds in catching the goat, the student enacting goat becomes out.
- Next two more students come forward to be the next goat and tiger and hence the game continues.
Sub units of activity:
This is an outdoor group activity
Instructions to the teachers:
Let this be a fun filled activity and during the game use the terms circle, circumference, interior and exterior.
Instructions to the students:
Identify who is in the interior of circle and who is in the exterior.
- Estimated Time: 30mins
- Materials/ Resources needed
A meter length wool nailed to ground (to be centre of circle) and tied to stick on the other side to help draw a perfect big circle.
- Prerequisites/Instructions, if any.
- The students need to know that the circumference of the circle is its boundary and understand the terms interior and exterior of the circle.
- Multimedia resources
- Website interactives/ links/ / Geogebra Applets
- Process/ Developmental Questions
- Evaluation
Guage if the students have understood the meaning of the terms interior and exterior.
- Question Corner
- Are the students standing on the circumference of the circle considered to be in the interior or in the exterior ? Justify.
=
Concept #6 Chord
Learning objectives
- The students learn that the chord is a line segment joining any two distinct points on the circle
- The students learn that the longest chord in any circle is its diameter.
- Any number of chords can be drawn in a circle.
Notes for teachers
- Explain the concept by drawing chords of different sizes.
- Make the students understand that the length of the chord increases as it moves closer to the centre and decreases as it moves away from the center.
Activity No # 1.Chord
- Fold the cut-circular paper at different points. Draw folded lines with different coloured pencils and observe the length of chords.
- Estimated Time : 20 minutes.
- Materials/ Resources needed :Circles cut from white paper, colour pencils, scale.
- Prerequisites/Instructions, if any
- The students should have the knowledge of circle, diameter, circumference and line segment.
Instructions to the teacher:
Instruct the children to get cut circles ready:
Instructions to the children:
- Fold the circle at different points and try to form the smallest and biggest chords.
- Multimedia resources:
- Website interactives/ links/ / Geogebra Applets
- Process/ Developmental Questions:
- What is the difference between the chord and diameter.
- Evaluation:
- Observe to see if the children are able to fold and mark the chord accurately.
- Question Corner:
- Name the chord that passes through the center of the circle.
- What happens to the length of the chord as it moves away from the centre?
Activity No # 2 The longest chord passes through the centre of the circle
- Estimated Time
- Materials/ Resources needed
- Prerequisites/Instructions, if any
- Multimedia resources
- Website interactives/ links/ / Geogebra Applets
- Process/ Developmental Questions
- Evaluation
- Question Corner
Concept #7 ARC
Learning objectives
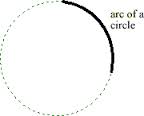
- The students learn that an arc is a part of a circle included between two distinct points on the circumference of the circle.
- The students learn that the the larger arc is called major arc and the smaller one is called minor arc.
Notes for teachers
- Explain the concept of arc by drawing a circle and two points on its circumference. The part of the circumference within the two points in either directions are called its arcs.
- Show the labelling of arcs.
Activity No # 1. Arc
- Estimated Time : 10 minutes
- Materials/ Resources needed : White paper, pencil, compass, scale and colour pencils.
- Prerequisites/Instructions, if any
- The students should know to draw a circle using compass.
- They should know that arc is part of the circumference.
Instructions to the teacher:
Instructions to the students:
- Multimedia resources
- Website interactives/ links/ / Geogebra Applets
- Process/ Developmental Questions
- Evaluation
- Question Corner:
- What is the longest arc of a circle called?
- What are the arcs called when both major and minor arcs are of same size?
Activity No #
- Estimated Time
- Materials/ Resources needed
- Prerequisites/Instructions, if any
- Multimedia resources
- Website interactives/ links/ / Geogebra Applets
- Process/ Developmental Questions
- Evaluation
- Question Corner
Concept #8 concentric circles
Learning objectives
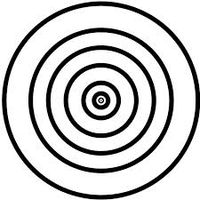
- The students learn that concentric circles are circles with same centre but different radii.
Notes for teachers
Activity No # Drawing concentric circles
- Estimated Time: 15 minutes
- Materials/ Resources needed: White paper, compass, pencil, colour pencils, scale
- Prerequisites/Instructions, if any:
- The students should have the skill of drawing circles accurately for given radius.
- Multimedia resources
- Website interactives/ links/ / Geogebra Applets
- Process/ Developmental Questions:
- What is the centre for differrent circles.
- Evaluation:
- Are the students able to understand that the centre is same for concentric circles.
- Question Corner:
- What are equal circles (congruent)?
- What determines the size of the circle ?
- Give examples for objects similar to concentric circles.
Activity No #
- Estimated Time
- Materials/ Resources needed
- Prerequisites/Instructions, if any
- Multimedia resources
- Website interactives/ links/ / Geogebra Applets
- Process/ Developmental Questions
- Evaluation
- Question Corner
Concept #9 Congruent circles
Learning objectives
- The students learn that congruent circles are the circles that have same radius but different centres.
- Congruent circles can also be called as equal circles.
Notes for teachers
Activity No # 1. Cutting congruent circles without using compass
- Estimated Time: 3 minutes for video and 30 minutes to actually cut.
- Materials/ Resources needed :
- Laptop, video link.
- Cardboard, a stick, nails, scale, pencil.
- Prerequisites/Instructions, if any
- The students should know what are congruent circles.
- Multimedia resources
- Website interactives/ links/ / Geogebra Applets
- Process/ Developmental Questions:
- Ask the students to watch the youtube clip
- Was the compass used here?
- What types of circles did he cut?
- What type of stick can be used ? (straight)
- How many nails are fixed to the stick and for what purpose ?
- What does the fixed nail depict ?
- What is the trace made by moving line called ?
- Evaluation
- Were the students able to conclude that there are alternatives for compass?
- Can you suggest some more methods of getting a circle?
- Question Corner
- Find out which methods are used while drawing circles in rangoli designs ?
Activity No #
- Estimated Time
- Materials/ Resources needed
- Prerequisites/Instructions, if any
- Multimedia resources
- Website interactives/ links/ / Geogebra Applets
- Process/ Developmental Questions
- Evaluation
- Question Corner
Concept #10 SECTOR
Learning objectives
- The students learn that a slice of a circle enclosed between any two radii is called a sector.
- They learn that semicircle and quadrant are special types of sectors.
Notes for teachers
Activity No # Different sectors of a circle
- Estimated Time : 15 minutes
- Materials/ Resources needed : Laptop, geogebra file, projector and a pointer.
- Prerequisites/Instructions, if any
- The students should know a circle, centre, radius,circumference and a sector.
- They should know that circle is a planar figure.
- Multimedia resources
- Website interactives/ links/ / Geogebra Applets :
- Process:
- Show the geogebra file.
- Move the endpoints of the sector and help them understand the types of sector.
- Developmental Questions:
- Name all the points on the circumference.
- Name the endpoints of the sector.
- Name the major and minor sectors.
- What can you say about the two straight lines of the sector?
- Evaluation
- Name the special types of sector?
- Question Corner
- Give some examples of sector.
Hints for difficult problems
Project Ideas
- Collect different types of circular objects
- Collect different PIE CHARTS.
- Collect different photographs of tools of cutting circles
- Collect different coins of circular shape
- Collect different images of medals
Math Fun
Usage
Create a new page and type {{subst:Math-Content}} to use this template
