Electromagnetic induction introduction to electromagnetic induction activity 2
Revision as of 08:43, 26 August 2014 by harishksmandya (talk | contribs) (→Process (How to do the activity))
Activity No #2 - Electromagnet and electromagnetic induction experiment
Estimated Time
45 minutes
Materials/ Resources needed
- A large iron nail(about 3 inches)
- Coated copper wire or enameled copper wire or threaded copper wire 2 mts
- D.C. Source (Battery or cells of 9 to 12 volts)
- Iron pieces(Feelings or pins)or other small magnetic objects
- A strong bar magnet
- Copper coil with 500 turns
- Galvanometer
Prerequisites/Instructions, if any
- students should not touch the bare portion of the wire. The current being used is low and not dangerous, but the wire will heat up.
- Students should not try this experiment in home A.C. Source.
Multimedia resources
Website interactives/ links/ simulations
Process (How to do the activity)
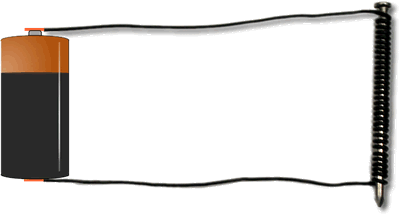
Cut the wire (if needed) and loose at the other end too. Now remove about an inch of the coating from both ends of the wire and attach the one wire to one end of a battery and the other wire to the other end of the battery. See picture below.

Now you have an ELECTROMAGNET! Put the point of the nail near the pins or iron feeling and it should pick them up.
Show the connection of copper coil and galvanometer. Show the electromagnetic induction using galvanometer and copper coil. Observe the changes of galvanometer deflections.
Developmental Questions (What discussion questions)
- Inside the coil kept wooden stick instead of nail, can it become magnet?
- How does iron nail become magnet?
- Can it reverse to get electricity from the magnet?
- What are the instruments to check current?
- Inside the copper coil, I kept the bar magnet. Is current produced ends of the copper wire?
- I remove the magnet from the coil Quickly, what do you observe in Galvanometer?
Evaluation (Questions for assessment of the child)
Question Corner
To link back to the topic page
Go Back