How do we see
| Philosophy of Science |
While creating a resource page, please click here for a resource creation checklist
Concept Map
Error: Mind Map file How_do_we_see.mm not found
Textbook
To add textbook links, please follow these instructions to: (Click to create the subpage)
Additional information
Useful websites
- Web interactives and additional information on Human Vision; Source: Olympus Microscopy Research
This website has a lot of information on the structure of the eye, the mechanism of vision and eye problems. - TED Video on "How do we see colour"
Reference Books
- NCERT Textbook Chapter Light
- NCERT Textbook Chapter Reflection and Refraction
- NCERT Textbook Chapter Human Eye and the Colourful World
Teaching Outlines
Concept #1 - The process of vision
Learning objectives
- We see because of the eye and the brain
- The eye has a lens, it processes images and the brain interprets
- There are colour and depth sensors in the brain
Notes for teachers
What is vision
- The human vision is a very complex process. Vision is a result of the two eyes working almost simultaneously with large portions of the brain to produce the sensation of vision.
- The first step in the process is the stimulation of the light sensitive receptors in the eye. This information of the image is then converted into electrical signals which are transmitted by the optic nerve to the brain where it undergoes a lot of pre-processing before reaching the visual cortices in the cerebrum. It is at the end of this process that we have a sense of vision.
- We must remember that the eye is actually an extension of the brain and is only one tool in the entire process of vision.
For more information click here
Activity No #1 Our eyes can confuse us
- Estimated Time - 20 minutes
- Materials/ Resources needed - None.
- Prerequisites/Instructions, if any - None. This is a set of two activities - not a full fledged experiment but a way of introducing the way our eyes can confuse us.
- Multimedia resources
- Website interactives/ links/ simulations
- Process (How to do the activity)
- Ask the children to bring their index fingers together in front of their eyes at a distance of about 5-6 cm from the eyes. They should focus on a distant point in front of them and then move their fingers towards and away each other.
- They should be able to see a finger in the middle that seems to wiggle as they move the finger front and back or up and down!
- Get the children to look at an object first with one eye and then the other. They will see the image shift slightly – this is because the angle at which we see with each eye is slightly different.
- Developmental Questions (What discussion questions)
- How is it that illusions are able to fool us? Why do we see an extra finger when we know there is no extra finger?
- We do not see only with our eyes –the eyes are only a part of the things that we need to see. We see because of our eyes, because of the nerves that connect our eyes to our brain and the brain itself.
- The brain makes sense of all the information that the eyes have given to it. Of course as we see in the case of the optical illusions the brain can be fooled sometimes. But most of the time it makes complete sense of what we see.
- Why do we have two eyes? They provide the brain with two different images which are separated by a small distance
- The two images go to the brain and the brain is able to get a 3D image of the object because of this.
- Remind them how we can fool the brain – we did that on the first day when we grew an extra floating finger!
- Evaluation (Questions for assessment of the child)
- Question Corner
Activity No #2 How do we see colours
- Estimated Time - 50 minutes
- Materials/ Resources needed - Computer, projector
- Prerequisites/Instructions, if any - An introduction to nature of light, colour and wavelength
- Multimedia resources
- Website interactives/ links/ simulations
- Process (How to do the activity)
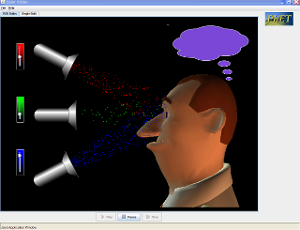
- Run the simulation - using one bulb at a time
- Have the students record what the man sees
- Discuss the following.
- Developmental Questions (What discussion questions)
- When only one bulb is used, what colour does the man see? Why?
- When more than one colour is used, what colour does the man see? Why? Does this change if I move the sliders on each of the bulbs the man sees? If it changes, why does it change?
- When all the three bulbs are used, what is the colour that the man sees? Where else do we see white light? If R,G,B when mixed give the white light, what can you say about the nature of the red, green and blue.
- When does the man see any colour and when does he see black?
- What is the filter doing? Explain the difference in colour between the source being monochromatic (single colour) and white.
- Evaluation (Questions for assessment of the child)
- Question Corner
- Estimated Time - 50 minutes
- Materials/ Resources needed - None.
i. Our eyes have one kind of light sensor that can make out the extent of brightness and 3 different kinds of colour sensors. These colour sensors are most sensitive to what we call the colours red, green and blue. For the other colours the three sensors will react differently. These colours are called primary additive colours because these colours are the ones to which our eye reacts most. We will see why they are called additive colours.
ii. We can receive a sensation of a particular colour either because light of that wavelength is shining into our eyes or because a mix of suitable primary colours is shining into our eyes. In either case we will see that colour. This is what we saw in the programme ‘colour vision.’ We also notice that mixing up all the colours makes white light. These primary colours cause their effect by adding to each other - that is why they are called primary additive colours.
iii. In the programme we can also see that different colours are produced by different mix of the three primary colours. Our eyes react this way whether we get these mixtures of primary colours or we get light of the wavelength appropriate to that colour – We will see yellow when we get yellow light. We will also see shades of yellow when red and green light are mixed.
iv. Please note that some of the colours we get – magenta which is a mix of blue and red for example - are not visible in the white light spectrum. These colours are produced only by mixing up primary colours.
Concept #2 - The physiology of eye and vision
Learning objectives
i. They should be able to recognize that the eye is shaped like a ball – hence eyeball. Most of the ball is hidden inside but we can get a general feel when we put our eyes under our eye socket and gently feel it. How big is it? The answer is - about as big as a table tennis ball or a large marble. This can be mentioned after getting them to discuss it. ii. The image is formed on the retina. iii. The image is formed by the focussing action of the cornea and the lens. iv. The children should get familiar with the following words – Retina, Iris, Pupil, Cornea and Lens. It is not necessary that they must remember them or know exactly what they mean. v. The lens shape is adjustable and this adjustable shape is what causes a sharp image to be formed on the retina – the lens adjusts its shape until a sharp image is formed in the lens. How does the lens adjust itself? Let us find out by the experiment in Appendix E. vi. The retina is connected to the brain through the optic nerve. We can talk about the blind spot and the fovea. When time is available we can give them printouts of the blind spot sheet and get them to try it. See Appendix F.
Notes for teachers
These are short notes that the teacher wants to share about the concept, any locally relevant information, specific instructions on what kind of methodology used and common misconceptions/mistakes.
Activity No #
- Estimated Time
- Materials/ Resources needed
- Prerequisites/Instructions, if any
- Multimedia resources
- Website interactives/ links/ simulations
- Process (How to do the activity)
- Developmental Questions (What discussion questions)
- Evaluation (Questions for assessment of the child)
- Question Corner
Project Ideas
Fun corner
Usage
Create a new page and type {{subst:Science-Content}} to use this template