DSERT Text Book for Computer Literacy (CL) and Computer Aided Learning (CAL)
Resource Book to learn Computer Literacy and Computer Aided Learning'
Introduction
This resource book has two parts - computer literacy skills and computer aided learning. The section on computer literacy introduces the learners to various aspects of the computer, the use of internet and different methods of creating documents in the form of in text documents and mind maps. The section on computer aided learning will discuss how computers can be used to integrate the learning of different subjects, namely, Mathematics, Science and Social Science by using relevant ICT tools and educational software.
This exercise has two broad objectives of integrating the computer lab into the school education process and enabling the use of computer as a curricular resource. We have attempted to put together this resource book based on the recommendations of the National Curriculum Framework (2005).
The objective of the high school textbooks is to enable teachers and students to acquire a positive mindset about the use of computers for their learning and daily life and also develop a working knowledge of computers and the ways of using them to represent information. It is my hope that every teacher will be able to start using the computer lab in the schools effectively for their own growth and for the classroom teaching – learning processes. Please do share your experiences in using this book. Your feedback is welcome.
The innovation in this book is the integration of ICT into the regular subject teaching-learning. The second section of the book explores some lessons from the mathematics, science and social science subjects that can be taught using the computer, thus integrating the computer as a pedagogical tool. This will help the subject teachers in the school integrate ICTs into their teaching-learning processes as well as use it for their own professional development.
ICTs can offer a rich and diverse learning environment through the use of free and open digital resources, both content and software and this resource book aims to bring that world to the learner by exploring the use of different audio visual resources as well as the educational software that are freely available and bundled with the GNU/Linux platform Ubuntu including GeoGebra, Marble and PhET, apart from free content on wikipedia and several other free educational websites. Since these are free to share, students and teachers can also copy them on their home computers and continue their learning beyond school.
How to use this book
Welcome to this resource book on Information and Communication Technologies (ICTs) !
ICTs are changing the way we do things, how we communicate and how we
learn. There are many areas of our society and work where we use
ICTs in extensive ways. This resource book is meant to introduce you to the ways
and methods of working with ICTs, including how to use them for
exploring various subjects. This book is for the student to work
along with the teachers. Different sections of the textbook will
require you to work with different teachers.
There are two sections in this book, Section 1: Computer Literacy
and Section 2: Computer Aided Learning.
Computer Literacy is
learning about what ICTs are. This section introduces you to a
computer. You will also learn how to use the computer to create
documents in a text format as well in the form of a mind map. This
section will also include information on how to use the internet and
email. In this manner, you can start using computers in your daily
life. In this section, you will mostly work with your computer
teacher, on both theory and practice.
Computer Aided Learning is using the computer to learn in different ways about what you have been to taught in your subject (mathematics, science and social science) classes. There are chapters that will introduce you to various lessons in different subjects and you will work with the respective subject teachers, on both theory and practice.
How is each chapter organised
Each chapter has the following sections
- Chapter objectives: which will tell you what you should know after working through the chapter.
- Theory: This is the explanation of the topic covered in a particular chapter. For example, “Introduction to computers”, “Science and Technology” and “What is a mind map” are chapter titles. There will be further discussion and explanation of this topic in the chapter. Your teacher will explain this part for you, in the classroom.
- Lab exercises: This part of the chapter must be done in the computer lab. These could include different activities like watching a video, examining the parts of a computer or working with different educational software applications.
- Chapter summary: This section summarises whatever you have learnt in the chapter. After completing the chapter go through the summary. You can also use this to check your understanding and go back to your teachers if you need help with any of them.
- Exercises: These are end of chapter exercises that you should do in the lab with your teachers help to help you use what you have learnt in the chapter.
- Additional Resources: This is a section which will give further extension of some of the ideas discussed in the chapter. If you are curious to know more about the topic you have studied in a chapter, see this section. These resources are a preliminary list – you can add more resources to your computer by using the Internet.
You will see boxes with a picture throughout the textbook. These
pictures are called icons, and the box inside contains information
for a specific purpose. The following icons have been used in this
textbook and their purpose is described below:
|
Icon/Picture
|
Purpose
|
|
|
When you see this icon, the information in the box gives you extra hints and tips for using the computer and the different educational software.
|
|
|
This icon tells you that the information provided in the box is extra and can be referred to for additional understanding. Going through this box is not essential for the understanding of the rest of the chapter.
|
|
|
This icon is asking you to think a little bit more about the question or information provided in the box.
|
|
|
For many of the sections in this book you will need your teachers' help. Wherever you see this icon please do not hesitate to ask your teacher. Different subject teachers will work with different chapters.
|
We hope you enjoy using this resource book. At the end of using the book and completing all the exercises, our belief is that you will develop a very positive and confident approach towards ICTs as well as have built knowledge and skills to work with new powerful tools - the computer and the Internet.
1.Introduction to Information and Communication Technologies (ICTs) – The Computer
Chapter objective
In this chapter, you will learn about
- ICTs and Computers, in particular
- History of Computers
- Uses of Computers
- Classification of Computers
- Hardware : Parts of a computer and system unit
Introduction to ICTs and computers
You must have heard of radio programmes like Keli kali in your school. You can see that radio, televisions, telephones, mobile phones are being used by everyone in their daily lives. Television and radio are used for giving (broadcasting) information while telephones including mobile phones are used to talk to (communicate with) your friends and family even if they are far away. Now you can carry a phone in your pocket. All these are Information and Communication Technologies (ICTs) tools.


In this chapter you will learn about computers, a new ICT tool. A computer is a device which takes input, processes it and gives output which can be stored and shared. When you enter data into your computer, it is called as input. An input can be data like text or picture or an instruction(what to do with the data). This data is processed (process means to perform a series of operations on a set of data) and you will get the output. Data or information that the computer generates is called the output.
 Suppose
you want to add two numbers, 2 and 5. Any
input has two parts, data and the instruction
“2 + 5” is the input. The numbers 2 and 5 are
called the 'data' and
the '+' is called the instruction. A CPU (or a software to add the
numbers) will do the addition, it is called the process. The answer
“7” is the output or the result from the input and the process.
Suppose
you want to add two numbers, 2 and 5. Any
input has two parts, data and the instruction
“2 + 5” is the input. The numbers 2 and 5 are
called the 'data' and
the '+' is called the instruction. A CPU (or a software to add the
numbers) will do the addition, it is called the process. The answer
“7” is the output or the result from the input and the process.
A
computer lets you to do many tasks like writing a letter, watching a
educational film, playing games, listening to music and more. You can
also look for information on the Internet.
History of computers
 World's
first computer
World's
first computer
 Punch
card
Punch
card
Did you know, the first computer was as big as your classroom! 60 years ago, computers were very big, costly and used lot of electricity. The processors of the first computers were made using something called 'vacuum tubes' -which used tubes in which electrons were moving. Punch cards were a input method. After the vacuum tubes, came the transistors which could turn electricity in a circuit “on” or “off”. This turning “on” and “off” could be used to instruct computers to do calculations.
 Integrated
Circuit (IC)
Integrated
Circuit (IC)
During the early 1970s, with the invention of Integrated circuits computers became faster,cheaper and smaller.
Many
transistors were connected together to form one IC. These
computers had keyboard and monitor as input-output devices.(You will
learn about input and output devices in the next chapter).
 Microprocessor
Over the last decade, the computers became so small that it could fit in a hand. This was possible because of many integrated circuits on one small square called a microprocessor or a chip which became the main part of the computer. Mouse, an input device was developed. These small and powerful computers were connected together to share information between computers and this period saw the birth and growth of Internet (you will study in detail about Internet in one of the chapters).
Now-a-days, we see smart phones
and tablets (which are small touch screen computers).
Uses of computers
Can you think of all the places where you have seen computers?
Computers
are used in many places like banks, schools, railway station,
libraries, shopping complexes, and in various fields like education,
communications, business, research, development and many more.
Types of computers
Based on the processing power , storage capacity and cost, computers are classified as,

Super Computers Supercomputers - T'he most powerful computers.' They are used for highly complex problems like launching a rocket in the space or weather prediction. Supercomputers are used by universities and government agencies.

Mainframe Computers Mainframe Computers - Usually slower, less powerful and cost less than supercomputers. They are used in large organizations, like banks and businesses.

Personal Computers Microcomputers, or Personal Computers - The small and low cost computers. Microcomputers are more commonly known as personal computers (PC). Personal Computers are further classified as (a) Stationary (b) Mobile
- Stationary personal computers are DesktopComputers
- Mobile Personal Computers are
- L

- L

aptop Computer Laptop' - 'A laptop computer popularly called laptop, or notebook computer, is a small personal computer designed for carrying where ever we go.
- Netbook – A Netbook is a small, light and low cost laptop computer.
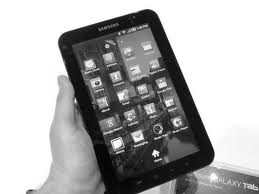

Tablet PC Tablet PC - A tablet PC is a notebook or slate-shaped mobile computer. It takes input from the monitor itself, without a separate keyboard. You can input data into the computer using a stylus (digital pen), or your finger. The monitor is called touch screen. Where else have you seen touch screen monitors ?
The Hardware : The parts of a computer
Have you seen a computer and its parts? Do you know what they are? Do you know what they do? If you already know – great! If you do not know, we will learn about computer parts in this chapter.
 A
computer has many parts working together. The parts, which you can
see and touch, are called hardware. Computer hardware is divided into
four parts; system unit, input devices, output devices and storage
media.
A
computer has many parts working together. The parts, which you can
see and touch, are called hardware. Computer hardware is divided into
four parts; system unit, input devices, output devices and storage
media.
The
picture shows the common hardware in a computer. A laptop computer
has similar parts but all as one single item.
The System unit
 Have
you seen something shaped like a big box? Usually
it is kept on or below the computer table. It will have a power
switch and a place called CD Drive to insert Compact Discs(CDs). It
is the system
unit – the heart of a computer system. Inside this box are many
electronic parts which do the actual work. The most important of
these parts is the central processing unit (CPU), or microprocessor,
which acts as the "brain" of the computer. Another part is
random access memory (RAM), which temporarily stores information that
the CPU uses while the computer is on. Ask
your teacher to let you look at the back of the computer (never do
this without permission, because there is a lot of dangerous
electricity back there!). You will see lots of cables coming out of
the back of the box and going to other computer parts. On the back or
sometimes front of the case you will also see rectangular slots.
These are called USB(Universal Serial Bus) ports. These are used to
connect storage devices such as flash drives to your computer. You
can also use a USB port to connect the computer to devices like a
digital camera and mobile phones.
Have
you seen something shaped like a big box? Usually
it is kept on or below the computer table. It will have a power
switch and a place called CD Drive to insert Compact Discs(CDs). It
is the system
unit – the heart of a computer system. Inside this box are many
electronic parts which do the actual work. The most important of
these parts is the central processing unit (CPU), or microprocessor,
which acts as the "brain" of the computer. Another part is
random access memory (RAM), which temporarily stores information that
the CPU uses while the computer is on. Ask
your teacher to let you look at the back of the computer (never do
this without permission, because there is a lot of dangerous
electricity back there!). You will see lots of cables coming out of
the back of the box and going to other computer parts. On the back or
sometimes front of the case you will also see rectangular slots.
These are called USB(Universal Serial Bus) ports. These are used to
connect storage devices such as flash drives to your computer. You
can also use a USB port to connect the computer to devices like a
digital camera and mobile phones.
 In
your school set up, you will see something smaller than the regular
system unit. They are called thin clients. These units depends on the
main computer in your lab, which is called a server. These thin
clients are connected to the server through cables. All the
information is stored on the server and many people can access them
using thin clients, at the same time.
In
your school set up, you will see something smaller than the regular
system unit. They are called thin clients. These units depends on the
main computer in your lab, which is called a server. These thin
clients are connected to the server through cables. All the
information is stored on the server and many people can access them
using thin clients, at the same time.

Chapter summary
- Television, radio, telephone, mobile phones, computers and Internet are ICT tools.
- A computer is a device which takes input, processes it and gives output which can be stored and shared.
- A computer lets you to do most of your daily jobs like writing a letter, solving problems, watching a film, playing games, listening to music and looking for things on Internet.
- Latest computers are touch screen (using finger tips or stylus) computers. They are also called tablet PCs and smart phones.
- Hardware is the physical part of a computer that you can see and touch.
Lab exercises
Identify and list all the parts of a computer in your lab.
Exercises
Choose the correct answer
- The output can be
- Latest computers use
- Microprocessors 2. Transistors 3. Vacuum tubes
- A personal computer is also a
- Supercomputer 2. Microcomputer 3. Mainframe computer
- What component of computer is considered the brain of a computer?
- Output 2. CPU 3. Input 4. Memory
Say True or False
- ICT stand for Important Communication Technology.
- The first computer was made of Vacuum tubes.
- A netbook is a personal computer.
- Laptops are mainframes.
- Computers can be used to learn and solve mathematics.
- Hardware is the physical part of a computer that you can see and touch
Activity
Some of the uses of computers in
education is given below. Think of more uses and complete the table.
|
Uses for students
|
Uses for teachers
|
Uses for school management
|
|
Research on any information
|
As a teaching aid in the form of presentations
|
Record keeping
|
|
Create presentations of the projects they have to work on
|
Create worksheets
|
Timetable
|
Additional resources
- Learn more about the history of computers [[1]] [[2]]
- Learn more about computer classification [[3]]
2.Software
Chapter objectives
In this chapter you will learn about,
- Different types of software
- Operating System and its features
- Graphical User Interface
- Windows 7 and Ubuntu GNU/Linux Operating system
- The Desktop
- Files and Folders
Computer Software
By now, you have understood that a computer can be used to do a lot of things. So, what do you do when you want to paint, write an essay, or listen to music on a computer? Can you do all these things when you just have the computer hardware? No, you cannot. To make the computer do what you want there must be a computer programme. A computer programme also termed as software, is a set of instructions that tells a computer what to do. This is separate from the hardware and it is the most important aspect of the computer which allows it to do many different tasks.

Software needs hardware to work on and a hardware is useless without software. So computer must have both hardware and software.
Types of software
 A
computer should know what to do when you switch on the computer, move
the mouse or press a key on the keyboard. However, a computer can
only understand 0s and 1s, and you cannot talk or understand that
language. To explain our instructions to the computer we need a
special computer programme which is called the Operating system.
Operating system is also called system software as it works with the
hardware. Every computer must have an operating system to run other
computer programmes . Even your mobile phones will have an operating
system. Operating systems start automatically when you turn on the
computer. This process is called booting. All the other
computer programmes like programmes to paint, type, listen to music,
learn maths etc., are called Application Software or 'Apps'
which work with the system software. People who write programmes are
called computer programmers or software developers. On any computer
you will have software to paint, to type letters, to watch movies, to
find something on the Internet, to learn maths.
A
computer should know what to do when you switch on the computer, move
the mouse or press a key on the keyboard. However, a computer can
only understand 0s and 1s, and you cannot talk or understand that
language. To explain our instructions to the computer we need a
special computer programme which is called the Operating system.
Operating system is also called system software as it works with the
hardware. Every computer must have an operating system to run other
computer programmes . Even your mobile phones will have an operating
system. Operating systems start automatically when you turn on the
computer. This process is called booting. All the other
computer programmes like programmes to paint, type, listen to music,
learn maths etc., are called Application Software or 'Apps'
which work with the system software. People who write programmes are
called computer programmers or software developers. On any computer
you will have software to paint, to type letters, to watch movies, to
find something on the Internet, to learn maths.
What does an Operating System do?
- It checks if the hardware is working properly.
- It translates your language into computer language, by reading input from keyboard/mouse and sending the output to the monitor.
- It allows you to access and modify files, use printers and disk drives, and run applications.
How does the Operating
Systems enable you to use the computer?
Operating systems use a program
called the Graphical user interface (GUI, pronounced as goo-ee), .
It allows you to access other computer programmes (applications) by
using a mouse.
The popular operating systems are Windows, GNU/Linux and Mac OSx. In
this chapter, you will learn about Windows 7 operating system and
GNU/Linux operating system called Ubuntu.
 Why
are you learning both Windows and Ubuntu GNU/Linux Operating
system?
Why
are you learning both Windows and Ubuntu GNU/Linux Operating
system?
It is useful to learn at least two operating systems to develop a general understanding of how operating systems work. Microsoft Windows, made by a company called Microsoft is a popular operating system . It is a proprietary OS, each user has to individually purchase a licence to use it. The Ubuntu GNU/Linux OS is free (mukta) software, which is free to use, share and modify. Ubuntu is becoming increasingly popular.
Before you learn more about
Operating systems, you should know that one computer can have more
than one operating systems. You can use one at a time. In your
computer, you will see both Windows 7 and U buntu
Operating system. You can choose any one at the start up. You will
see a list like this when you turn on the computer.
buntu
Operating system. You can choose any one at the start up. You will
see a list like this when you turn on the computer.
Choose the first option if you
want to use Ubuntu and the last option which says Windows 7 (loader)
if you want to use Windows 7.
Windows 7 operating system
Once you select Windows 7 operating system, you will see a welcome screen which looks like this.
I t
displays a list of all users on the computer. You can click your user
name instead of typing it. You will have to enter the password to log
in. Login is a process that allows you to start using the computer
once you type the correct password.
t
displays a list of all users on the computer. You can click your user
name instead of typing it. You will have to enter the password to log
in. Login is a process that allows you to start using the computer
once you type the correct password.
The desktop is the main screen area that you see after logging on to Windows. When you open programs or folders, they appear on the desktop. You can put files and folders on the desktop, and arrange them however you want.
 Why should you
log in?
Why should you
log in?
Logging in
prevents unauthorised people from using your computer which keeps
your data secure.
T here
is a taskbar at the bottom of your screen. It shows you which
programs are running and allows you to go from one program to
another. It also contains the Start button
here
is a taskbar at the bottom of your screen. It shows you which
programs are running and allows you to go from one program to
another. It also contains the Start button
![]() ,
which you can use to access programs, folders, and computer settings.
Clicking on the start button, opens a start menu. It's called a menu
because it provides a list of choices, just as a restaurant menu
does. And as start implies, it's often the place that you'll go to
start or open things. You can Use the Start menu to do these common
activities:
,
which you can use to access programs, folders, and computer settings.
Clicking on the start button, opens a start menu. It's called a menu
because it provides a list of choices, just as a restaurant menu
does. And as start implies, it's often the place that you'll go to
start or open things. You can Use the Start menu to do these common
activities:
- Start programs
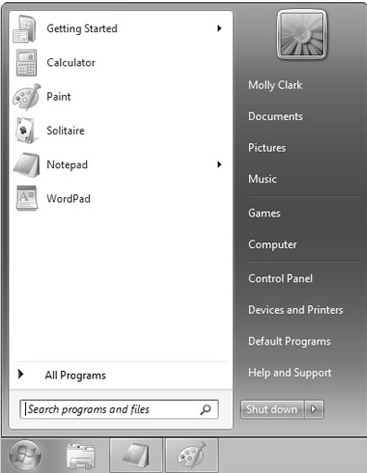
- Open commonly used folders
- Search for files, folders, and programs
- Adjust computer settings
- Get help on the Windows operating system
- Turn off the computer or log off from Windows


 Windows
Help and Support is the built-in help system for Windows.
It's a place to get quick answers to common questions, suggestions
for troubleshooting, and instructions for how to do things. To open
Windows
Help and Support, click the Start
button, and then click Help
and Support.
Windows
Help and Support is the built-in help system for Windows.
It's a place to get quick answers to common questions, suggestions
for troubleshooting, and instructions for how to do things. To open
Windows
Help and Support, click the Start
button, and then click Help
and Support.

On the desktop, you will see icons. Icons are small pictures that represent files, folders, programs, and other items. Double-clicking a desktop icon starts or opens the item it represents.
 The Recycle Bin
When
you delete a file or folder, it doesn't actually get deleted right
away—it
goes to the Recycle Bin. That's a good thing, because if you ever
change your mind and decide you need a deleted file, you can get it
back. If you're sure that you won't need the deleted items again,
you can empty the Recycle Bin. Doing that will permanently delete
the items
Turning off your computer properly
When you're finished using your computer, it's important to turn it off properly. It saves energy, helps keep your computer secure and to ensure that your data is saved.
T o
turn off your computer using the Start menu, click the Start
button, and then, in the lower-right corner of the Start menu, click
Shut
down.
o
turn off your computer using the Start menu, click the Start
button, and then, in the lower-right corner of the Start menu, click
Shut
down.

Ubuntu operating system
If you choose Ubuntu at the start up, you will see a login screen screen as shown in the picture.
Logging in :
Select your username, and type your password the desktop will appear.
The Desktop
On a desktop, you will see icons (if any), windows (if any programme is being used) and menus.
Panels
Two panels are visible —one at the top of the screen, and one at
the bottom. The one at the top has icons and menus. The panel at the
bottom is where you'll see all the programmes running, and this panel
also has some buttons like a trash icon (right).
![]() Menus
Menus
The three menus at the top of
the screen (Applications, Places, System) are known as the main
menus. They stay on-screen all the time.
 The Applications menu at
the top left has a list of all the programmes (apps) on your
computer.
The Applications menu at
the top left has a list of all the programmes (apps) on your
computer.
The Places menu, next to it, lets you access the hard disk, CD/DVD or pen drives. Digital cameras and MP3 players are also listed here when plugged-in.
The System menu, next to the Places menu, lets you control your computer’s settings, eg., setting time & date, changing mouse buttons if you are a left handed person etc. It has two sub-menus, as follows:
Preferences: This
menu lets you to make your computer look and work as you want or
prefer. For example, you can change your desktop picture to the photo
of your school or your sports team. Select System > Preferences >
Appearances
Administration''':
This menu lets you change hardware settings, such as altering the
time/date, and adding/removing software.
 Shutting
down the computer
Shutting
down the computer
What will you do after you have
finished your work? You have to turn off the computer. You must turn
it off by clicking on the last button on the right hand top corner
and select shutdown. .
 Never turn off the
power button without shutting the computer properly
Never turn off the
power button without shutting the computer properly
Managing files and folders
When you write an essay or paint something on a paper, you would like to keep it for future, right? You would probably put it in a hard bound folder. May be, if you have more than one essay or painting, you would have one folder to hold your essays and one folder to hold your paintings.
What
would you do when you do the same things on a computer? Can you store
it as you would do with the paper ? Yes,of course. You can store all
that you have done on a computer as a file. Every programme,
image, video, song, and document is stored as a file. And similar
files can be put in a folder. Folders can also store other
folders called sub-folders. Folders are also called "directories"
Do you know where the files and folders are kept in a computer? They
are stored on a disk (remember your hardware chapter where you learnt
about hard disk, pen drives, CDs).
To manage all the files and
folders that you make, we need a file manager (also called as
file browser). A file manager or file browser is a computer programme
that provides a user interface to work with files. Windows uses a
file manager called the Windows explorer and Ubuntu uses a file
manager/browser called Nautilus. File browser is used to
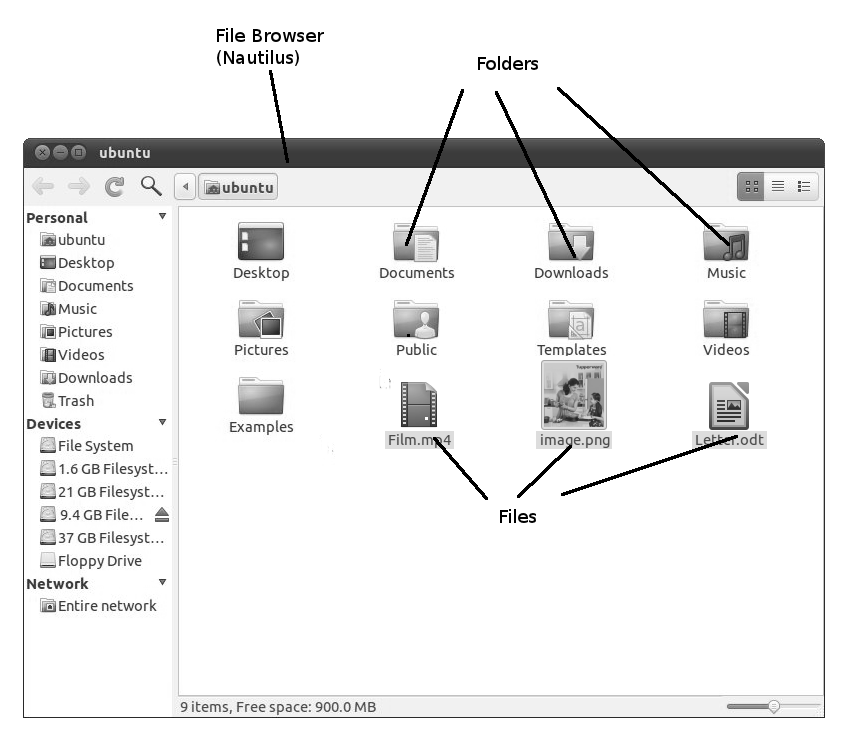 Create folders and documents
- Display your files and folders

- Search and manage your files
 This
file manager lets you organize your files into folders. Folders can
contain files and may also contain other folders. Using folders can
help you find your files more easily. You can also copy or move files
from one folder to another, create new folders, delete unwanted
folders, give new names to the files and folders etc, using the file
browser.
This
file manager lets you organize your files into folders. Folders can
contain files and may also contain other folders. Using folders can
help you find your files more easily. You can also copy or move files
from one folder to another, create new folders, delete unwanted
folders, give new names to the files and folders etc, using the file
browser.
For
any operating system, many things are files, such as documents,
photos, movies, and music.
Lab exercises
Do the following exercises first in Windows and then in Ubuntu Operating system
- Log in to a computer (Take teachers help for username and password)
- Open a programme called 'Calculator'.
- Add any two numbers.
- Close the programme (you'll have to click on the X button on the right hand top corner of the calculator).
- What is the difference between log off and shut-down functions ?
Chapter summary
- A computer programme tells a computer what to do and how to do it. A computer programme is also called software.
- Operating System and Application software are two types of software.
- Operating system is a special computer programme which is required in all computers to explain our instructions to it.
- Operating Systems make computers user friendly or easy to use by using a programme called graphical user interface (GUI).
- Windows 7 is a GUI based operating system
- On a Windows 7 Desktop, you will see a start menu at the bottom on the taskbar, and some icons on the desktop.
- Ubuntu is a GNU/Linux Operating system.
- On a Ubuntu Desktop, you will see top panel (which has icons and menus), bottom panel (which has a trash bin), and windows, if any programmes are running.
- You have to login to a computer to use it and shut down properly after use.
- Every programme, image, video, song, and document is stored as a file. And similar files can be put in a folder.
- File browser is used to create folders and documents, display your files and folders, search and manage your files.
Exercises
Choose the correct answer
- A computer programme is also called
- Desktop ii. Software iii. Hardware
- The most important programme on any computer is
- Applications ii. File manager iii. Operating System
- GUI stands for
- Good user interface ii. Graphical user interface iii. Great user interface
- Which of the following is an Operating system?
- GNU/Linux ii. Calculator iii. Text Editor
Say True or False
- Operating system make computers user-friendly.
- To shut down the computer, press the power off switch.
- The programme which can understand what you want to do and tells it to the computer is called the application software.
- A folder is also called a directory.
- File manager in Ubuntu is called Explorer.
Additional resources
[[4]]
[[5]]
[[6]]
www.top-windows-tutorials.com/windows-7.html
[[7]]
[[8]]
3.Text editing with text editor
Chapter objectives
At the end of this chapter, you will learn about
- Word processors
- Different types of text editor (also called word processors)
- Using word processor like LibreOffice Writer
- Text editing and formatting
Word processors If you want to write a letter to your friend, a story or school work in a computer, what would you do or where would you type them? A software application called the word processor would do that. A word processor is a software used for creating (including writing, editing, formatting, and possibly printing) documents. This software lets you to create a document, store it on the disk, show it on a screen, make changes to it using the keyboard and print it on a printer.
What can the word processors do?
- Insert text: It allows you to insert text anywhere in the document.
- Delete text: It allows you to erase characters, words, lines, or pages as easily as you can cross them out on paper.
- Cut and paste : It allows you to remove (cut) a section of text from one place in a document and insert (paste) it somewhere else.
- Copy : It allows you to duplicate a section of text.
- Page size and margins : It allows you to define various page sizes and margins, and the word processor will automatically readjust the text so that it fits.
- Search and replace : It allows you to search for a particular word or phrase. You can also replace one group of characters with another anywhere that the first group appears.
- Word wrap : The word processor automatically moves to the next line when you have filled one line with text, and it will readjust text if you change the margins.
- Print: It allows you to send a document to a printer to get print out.
- Font specifications: It allows you to change fonts. (A font is how a character, alphabet or symbol appears on the screen. Different fonts are available for typing different styles). For example, you can make the text in your document bold (dark), italics (slant) and underlining. You can also increase or decrease the size of the text.
- Graphics: It allows you to insert pictures and graphs into a document.
- Layout : It allows you to specify how a page will look including setting margins, page size within a single document.
- Headers, footers, and page numbering: It allows you to put headers and footers that the word processor will put at the top and bottom of every page. The word processor automatically keeps track of page numbers so that the correct number appears on each page.
- Spell checker : It is a program that allows you to check the spelling of words. It will highlight any words that it does not recognise.
List of some popular word processors
- LibreOffice Writer
- OpenOffice.org writer
- Microsoft Word
- Web-based word processors (Google Docs)
You will learn how to use LibreOffice Writer on Ubuntu. LibreOffice works on Ubuntu GNU/Linux, Mac and Windows operating systems while Microsoft Word works only on Microsoft Windows. LibreOffice is a public software and can be freely shared without licence restrictions or payment of licence fees. Microsoft Word is proprietary software and can be got by paying licence fees per user. microsoft word
Using LibreOffice to create documents

LibreOffice

You will have to log into Ubuntu operating system to use LibreOffice Writer.
To start LibreOffice, you have to click Applications → Office → LibreOffice Writer. You will see a window like the one in the picture. There will be a blank page and a cursor where you can start typing. Note that everything that you dp using Microsoft Word can be done using LibreOffice too.
Type a paragraph using LibreOffice. The functions that you may be using in Microsoft office will be discussed in LibreOffice.

Saving the file
Type the paragraph. Save the file by clicking on 'File' menu and selecting 'Save' option as shown in the picture. Type the file name in the dialog box that shows up as 'My School' and click on the 'Save' button.


Making changes to the text
Inserting, deleting and selecting text is done exactly the same way as it is done in Microsoft Word.
![]()
![]()
![]()
![]()
![]()
Copying text Select the text you want to copy and click on 'Edit' menu and select 'Copy'. You can also copy text by clicking on copy button or by using the keyboard shortcut CTRL and C.
Cutting text Select the text you want to cut and click on 'Edit' menu and select 'Cut'. You can also cut text by clicking on cut button, or by using the the keyboard shortcut CTRL and X.
Pasting text Click on 'Edit' and select 'Paste' menu. You can also paste copied or cut text by clicking on the paste button or by using the keyboard shortcut CTRL and V.
Formatting characters and paragraphs
![]()
![]()
![]()
![]()
![]()
![]()
![]()
![]()
![]()
![]()
![]()
 You can change the font style, size. You can make the text bold, slanting or underline the text. To change case (small letters to capital letters etc), click on 'Format' menu and select 'Change Case'. To capitalise the selected text, choose UPPERCASE option.
![]() To change the colour of the
text, click on the small arrow next to the icon in the picture.
To change the colour of the
text, click on the small arrow next to the icon in the picture.
You can format paragraphs, i.e., align the text left, centre, right and justify using these buttons
![]() .
.
For more character formatting options, click on 'Format' menu and choose 'Character'. There are many tabs like Indents and Spacing, Alignment, Text Flow, Outline & Numbering, Tabs, Drop Caps, Borders, and Background available when you click on Format → Paragraph.
 To shade a paragraph or give a background colour to it, click on the 'Background' tab and choose a colour. And, to add border to paragraphs, click on the Borders tab. Now try changing the essay using the above options. Align the heading 'My school' to centre. Change the background colour to light blue. Put borders to the paragraph.
Making simple lists
![]() Use these buttons to create lists. The first button is used to make lists with bullets and the second one is used for numbered lists. Make two lists of animals. One list is bulleted and of wild animals. The other one is numbered and of domestic animals.
Use these buttons to create lists. The first button is used to make lists with bullets and the second one is used for numbered lists. Make two lists of animals. One list is bulleted and of wild animals. The other one is numbered and of domestic animals.
Typing in Kannada
![]() IBus is a software application used to type in various languages. Using IBus and LibreOffice, you will learn how to type in Kannada. Open LibreOffice Writer. Click CTRL and the SPACE bar together. On the top panel, you will see something like this. Now you can start typing in Kannada. Use the following key strokes to type.
IBus is a software application used to type in various languages. Using IBus and LibreOffice, you will learn how to type in Kannada. Open LibreOffice Writer. Click CTRL and the SPACE bar together. On the top panel, you will see something like this. Now you can start typing in Kannada. Use the following key strokes to type.
|
Keyboard Sequence
|
Character
|
Keyboard Sequence
|
Character
|
Keyboard Sequence
|
Character
|
|
k
|
ಕ್
|
bh
|
ಭ್
|
u
|
ಉ
|
|
kh
|
ಖ್
|
m
|
ಮ್
|
uu
|
ಊ
|
|
g
|
ಗ್
|
y
|
ಯ್
|
U
|
ಊ
|
|
gh
|
ಘ್
|
r
|
ರ್
|
RRi
|
ಋ
|
|
~N
|
ಙ್
|
l
|
ಲ್
|
R^i
|
ಋ
|
|
N^
|
ಙ್
|
L
|
ಳ್
|
Ru
|
ಋ
|
|
ch
|
ಚ್
|
ld
|
ಳ್
|
e
|
ಎ
|
|
Ch
|
ಛ್
|
v
|
ವ್
|
E
|
ಏ
|
|
chh
|
ಛ್
|
w
|
ವ್
|
ee
|
ಏ"
|
|
j
|
ಜ್
|
sh
|
ಶ್
|
ai
|
ಐ
|
|
jh
|
ಝ್
|
Sh
|
ಷ್
|
o
|
ಒ
|
|
~n
|
ಞ್
|
shh
|
ಷ್
|
O
|
ಓ
|
|
JN
|
ಞ್
|
s
|
ಸ್
|
oo
|
ಓ
|
|
T
|
ಟ್
|
h
|
ಹ್
|
au
|
ಔ
|
|
Th
|
ಠ್
|
GY
|
ಜ್ಞ್
|
M
|
ಂ
|
|
D
|
ಡ್
|
j~n
|
ಜ್ಞ್
|
H
|
ಃ
|
|
Dh
|
ಢ್
|
dny
|
ಜ್ಞ್
|
0
|
೦
|
|
N
|
ಣ್
|
x
|
ಕ್ಷ್
|
1
|
೧
|
|
t
|
ತ್
|
ksh
|
ಕ್ಷ್
|
2
|
೨
|
|
th
|
ಥ್
|
3
|
೩
| ||
|
d
|
ದ್
|
a
|
ಅ
|
4
|
೪
|
|
dh
|
ಧ್
|
aa
|
ಆ
|
5
|
೫
|
|
n
|
ನ್
|
A
|
ಆ
|
6
|
೬
|
|
p
|
ಪ್
|
i
|
ಇ
|
7
|
೭
|
|
ph
|
ಫ್
|
ii
|
ಈ
|
8
|
೮
|
|
b
|
ಬ್
|
I
|
ಈ
|
9
|
೯
|
Lab Exercises
Type a paragraph on trees using and LibreOffice Writer
Trees are very important things in our daily lives. They provide us food and oxygen – two most vital things for our survival. Some trees have medicinal value. Some other trees gives us wood. This wood is used in building homes, making furniture and as a source of fuel too. It is very important not to cut trees and to plant more trees.
After formatting, it should look like
TREES Trees are very important things in our daily lives. They provide us food and oxygen – two most vital things for our survival. Some trees have medicinal value. Some other trees gives us wood. This wood is used in building homes, making furniture and as a source of fuel too. It is very important not to cut trees and to plant more trees.
Summary
- A word processor lets you to create a document, store it on the disk, show it on a screen, make changes to it using the keyboard,and print it on a printer.
- A word processor can insert, delete, cut, copy and paste text.
- Some popular word processors are Microsoft Word, LibreOffice writer, OpenOffice Writer, Google Docs.
- Microsoft Word works only on Microsoft Windows operating system and the files created using it has a .docx extension.
- LibreOffice Writer works on many operating systems including Ubuntu GNU/Linux and Microsoft Windows. The files created using it has a .odt extenstion.
- Using LibreOffice Writer, you learnt how to make changes to the text, format characters and paragraphs and create lists with bullets and numbers.
Exercises
- Open LibreOffice Writer (This can be done in Kannada or English)
- Type your names. ii. Change the way your names look.
- Make copies of your names without retyping them.
- Move your names to the middle of the page without retyping them.
- Make a list of states in India using numbers
- Write a letter to your teacher asking for 15 days leave
- Make a list of your friends using bullets in LibreOffice Writer.
Additional resources
Press F1 function key when using LibreOffice for help
4.Browsing the Internet
Objectives
In this chapter, you will learn about
- Computer Network
- Internet
- Software and Hardware required to connect to the Internet
- World Wide Web and URLs
- Internet Browsers
- Browsing the Internet
The Internet
How do we get electricity in our homes? Electricity flows through a network which is a connection of power lines, cables, towers and reaches our homes. There are different kinds of networks; rail network, road network,telephone, water supply network and many more. A network is a connection of many components. Also, networks are shared by many people. Even computers can be connected in a network. A computer network is a group of two or more computer systems linked together. Computer networks can be broadly classifed as,
- Local Area networks (LANs) : The computers are close together (may be, in the same building).
- Wide Area networks (WANs) : The computers are farther apart and are connected by telephone lines or radio waves.

Hub
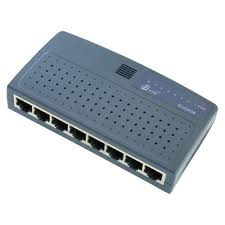
In your school or DIET lab, you must have seen all the computers (clients) connected to one main computer - “the server”. It is a LAN. The cables from the clients are connected to a device called a 'hub', and the hub is connected to the server. A hub is a common connection point for devices in a network. Do you know what can be shared in a computer network? You can share files, information and even some hardware devices using a computer network.
What is the use of sharing information over a computer network? You might have booked train or bus tickets when you travel across the state. To book a ticket you need to find out which train or bus goes from your place to wherever you want to go and also if the tickets are available on the dates you want to travel. If your computer is connected to the computer in a railway reservation office which has the information about the trains and ticket availability, you can book tickets from home. Such a connection of computers is called an Internet connection. Information is communicated and shared between the two computers, through such an Internet connection.
If you want information about some book available in your library, you can connect to the library's computer from home and get the information that you want. There are many such computers in different organisations giving us different types of information. These computers are all connected to one another. This is called the Internet. So, for sharing or getting information from another computer on the Internet, you need a connection to the Internet.
- What do you need to connect to the Internet?
 Modem
Modem
Before you can connect to the Internet, you must have a computer, a modem (A modem is a hardware device that allows a computer to transmit data over telephone or cable lines) and access to a telephone line which is connected to the Internet and a software to connect.
 Data card
You can also use a device called data card for connecting to the internet without any wire connections. The data cards use the mobile phones network to connect to the internet. The connection software is provided usually by the service providers (which are mostly telephone companies). In Karnataka/India, companies like Airtel, BSNL, Vodaphone provide such services.
To know more about the history of the Internet, visit Wikipedia
World Wide Web (WWW)
There are millions of pages of shared information on the computers in the network, created by many people and organizations, in the form of 'web pages' accessed using a software application called a 'web browser'. This information network is called the World Wide Web (in short known as www). The source of information is called the web site. A web site is a collection of related web pages of information. http://en.wikipedia.org/wiki/World_Wide_Web WWW] is one application on the Internet.
Web Browser
 Once you are connected to the Internet and are ready to look for things, you will need a software called the web Browser. There are many browsers available like Mozilla Firefox, Windows Internet Explorer, Apple's Safari, Google Chrome etc. All browsers will have similar functions. In this chapter you will learn to use Mozilla Firefox to
browse the web. Browse the web means look for things on the internet. Click on the icon on your top panel to start the Firefox Internet browser when you are using Ubuntu. You will see a screen like this.
Once you are connected to the Internet and are ready to look for things, you will need a software called the web Browser. There are many browsers available like Mozilla Firefox, Windows Internet Explorer, Apple's Safari, Google Chrome etc. All browsers will have similar functions. In this chapter you will learn to use Mozilla Firefox to
browse the web. Browse the web means look for things on the internet. Click on the icon on your top panel to start the Firefox Internet browser when you are using Ubuntu. You will see a screen like this.


A website is nothing but a folder on a computer connected to the Internet, which has an 'address ' . You will have to enter the address of a website in the address bar (see the picture). This address is also called Uniform Resource Locator (URL). In the address bar, type www.wikipedia.org and press enter. This is a website where you can find information on many subjects.

This website has information on many languages. Move the mouse pointer on English and you will find that the pointer has changed to a hand. These are links to other sections of the web site. They are called hyperlinks. A hyperlink is a mechanism by which a web page is linked to another related web page. Text, images can be made into hyper links. A hyperlink is usually underlined.

When you click on English, you get the information from the encyclopedia in English. There are different sections, if you look at the right hand top corner, giving information about Arts, History, Maths, Science etc. You can click on Maths and search on a certain topic. Type multiplication in the search box that you see just above the different sections. You will get an article about Multiplication.
Search Engine
A search engine is used to search for information on the World Wide Web. It keeps a track of all web pages. We can search for information we want by providing a word or a sentence to a search engine. Google search engin is a very popular search engine. In your browser's address bar type "Google.co.in". In the search box you see type 'sachin tendulkar centuries'. You will see a list of all the webpages having information about Sachin Tendulkar's centuries. You can click on the hyper links and get more information. There are other search engines too, such as DuckDuckgo. DuckDuckgo does not collect information about users and hence your privacy is protected.
Lab exercises
Visit the following websites
- kn.wikipedia.org, Kannada.samachar.com, irctc.com rmsa.karnatakaeducation.org.in, dsert.kar.nic.in
- Search for information on your topic using [Google search engine and DuckDuckgo search engine.
Topics - School Leadership
Chose from - Aims of education, School and society, Community participation in education, teacher professional development, open educational resources, professional learning community, School development, School leadership, Leadership styles. Leadership theories
Chapter summary
- Files, information and even some hardware devices can be shared using a computer network.
- Information is communicated and shared between the computers through an Internet connection.
- A computer, modem and access to a telephone line which is connected to the Internet and a connection software is required to connect to the Internet.
- A web site is a collection of related web pages of information.
- A software application called a web browser is required to look for things on the Internet's World Wide Web.
- A search engine is used to search for information on the World Wide Web
Exercises
- Choose the correct answer
- Internet is a network of
- Roads 2. Rails 3. Computers 4. Water pipes
- Which of these is not a browser
- Safari 2. Chrome 3. Nautilus 4. Firefox
- The device used to connect without wires to the Internet is called
- USB Flash drive 2. Data card 3. Memory Card 4.Modem
- Say True or False
- Internet is a network of computers
- A Modem is required to connect to the Internet without wires
- Wikipedia is a website
- WWW stands for world wide web
- URL stands for Unknown resource locator
Additional Resources
[[9]]
5.Mind mapping
Mind mapping with Freemind
Chapter objectives
In this chapter you will be able to
- Understand the meaning of a mind map
- Learn how to use mind maps
- And learn how to create mind maps using a software application called Freemind
What is a mind map?
Close your eyes and think of a word. For example think about the word plant. Now think of all the words that that come into your mind when you think about the word plant. List these words in your notebook.
Some of the common thoughts/words that would come into mind when thinking about plants are:
PLANT WATER PHOTOSYNTHESIS LEAF
FLOWER ROOT STEM
SOIL SUNLIGHT CARBON
DI OXIDE
 These
words have meaning that can be pictured in the mind. These words can
be called concept
words. Concept
is a way of describing a word that can be pictured in the mind. It is
also any thought, idea, belief, picture or image that is formed in
the mind when we think of a word or topic. For example, one concept
for plant is that it is a living thing.
These
words have meaning that can be pictured in the mind. These words can
be called concept
words. Concept
is a way of describing a word that can be pictured in the mind. It is
also any thought, idea, belief, picture or image that is formed in
the mind when we think of a word or topic. For example, one concept
for plant is that it is a living thing.
Now
look at these words:
HAVE USING NEED
CARRY-OUT
These
words are not concept words
but link
two or more concept words
together. For example,
plants have roots, leaves, stem, flower. So one concept may be
linked to many other concepts. This can be drawn like a map shown in
the picture below.
Now
add more concept
words to the above picture or map by linking one concept
to many other concepts to make a mind
map
of the topic plant.


 Figure
2
Figure
2
A
mind map of plant with the words that was described above while
picturing the word plant is seen below in Figure 2.
What
are the differences you notice in Figure
1
and Figure
2?
One obvious difference is that in Figure
1
not all the concept and link words that have been listed are there.
The other difference is
that in Figure
1 a
pen and paper has been used to draw the mind map freehand. In
Figure
2
a software application or tool called Freemind
is
used to
draw the Mind-map.
Lab exercises
What is Freemind and how can I use it ?
 Open
Freemind
Open
Freemind
Freemind is a public educational application software tool for creating and editing (changing) mindmaps. You can share it freely.
To open Freemind
Select from the Ubuntu menu
Applications > Office > Freemind


 To create a new mind-map
- Select the mode as Maps > Mindmap Mode (Shortcut Key ALT+1) from the Freemind Menu
- Select File > New
- (Shortcut Key Ctrl+N). You should see a screen as follows:
To start writing the Mind map
- Double-Click on the Node New Mindmap as shown in Figure 3'.
- Delete the text New Mindmap and type in PLANT the central concept word.
To add a link word place your cursor on PLANT node (Parent Node) and use one of the following options
- Select menu option Edit > New Child Node (Shortcut Key Insert)
- You have created a new child node of node PLANT
- Enter the text have in this new node
- Select menu option Format > Fork
To add another concept word place your cursor on have node (Parent Node) and
- Select menu option Edit > New Child Node (Shortcut key: Insert)
- You have created a new child node of node have
- Enter the text STEM in this new node
- Select menu option Format > Bubble
To add a concept word
LEAVES you can also place your cursor on STEM
(Sibling Node) and
- Select menu option Edit > New Sibling Node (Shortcut key: Enter)
- You have created a new sibling node of node STEM
- Enter the text LEAVES in this new node
- Select menu option Format > Bubble
In this way you can create the complete Mind-map for PLANT.
 Saving
the mind map
Saving
the mind map
Save your Freemind mind map
- Select menu option File > Save As'.'
- A window appears (like Figure).
- Select the folder by double clicking on ./ in the Folders box. The folder selected here is /Home/Bindu/Documents'.'
- Type the file name plant in the box.
- Click OK.
- You will notice the name changes in the top panel of the freemind window and now has the file name with the path it is saved in.
- Your file is saved as plant.mm. All freemind files have the file extension mm.
To open a Freemind mind map

Figure 5 Select menu option File > Open
- A window appears
- Select the folder in which you saved the file
- Select the file <filename>.mm in this case plant.mm
- Click OK
Try this
exercise in the Lab
- The topic or main mind is TRANSPORTATION. Here are a list of 'Mind' words : air, slow, car, sea, petrol, aeroplane, fast, submarine, car, bicycle, ship, helicopter, fuel, water, diesel. If you think of more mind words add it to this list. Use your own 'link' words and create a Mind map in Freemind. Name your file Transportation.mm
Chapter summary
In this chapter we learnt about
- Concepts: Concepts are like giving meaning to words or ideas that you picture in your mind. You can link one concept word with many other concept words using a link word based on your understanding. Examples of concept words : Animal, Plant, Food, Mammals etc. Examples of link words are: having, belonging, a part of etc.
- Mind maps : Mind maps link different concepts with each other and create a map of the ideas you have in your mind about a specific topic.
- Freemind: Freemind is a software application that you can use to draw a mind map on the computer. When you save the mind map on the computer it is a digital document that you can change and share any time you want to.
- How mind maps are useful for learning different subjects and topics; by thinking of all the ideas that come into your mind about a topic and how these ideas are related to each other in your understanding. If the understanding is not correct, your teacher can discuss with you why it may be incorrect and this way you also learn to correct some ideas which you may have misunderstood.
Exercises

Figure 6 The topic or main concept is ANIMALS. The different animals are reptiles, mammals, fish, birds, amphibians. List all the animals you know in each category. The mindmap has been started for you. See Figure 6 below. Complete it with all the animals you know.


- Select MY VILLAGE as your main topic. If you live in a bigger town or city select MY LOCALITY as your main topic. Close your eyes and picture your village/locality and create a mind-map.
Additional resources
See '[[10]]' for many mindmaps on different subjects. You can also join the community online and contribute your maps''''. ''''[[11]]' also has mindmaps for concepts in mathematics, science and social science topics.
Computer Aided Learning
6.Learning geometry with GeoGebra
Chapter objectives
In this chapter you will learn
- How you can use the computer to learn mathematics.
- About GeoGebra a mathematical software application that helps you learn Geometry, Algebra and Statistics.
- How to use GeoGebra.
- Connect GeoGebra with the geometry taught in the maths class to better understand some of the concepts and properties.
How can we use ICTs for learning mathematics?
Nowadays we see computers everywhere and we know that it has become an important part of our daily lives. So far we have learnt how to use the computer for basic document writing also called text processing. We have used the Internet to read information. We might also have watched some videos, listened to music, seen some CDs about our class lessons. You must have played some games on the computer as well! Have you seen or used a calculator? A calculator is a device to do arithmetic calculations. Now calculators are available in computers and mobile phones. Now you can also learn other areas of mathematics such as geometry, algebra and statistics using software applications like GeoGebra.
It helps you visualise geometric concepts and explore properties of
different types of geometric figures like lines, triangles and rays.
What is GeoGebra ?
Can you guess why the creators of this tool named it GeoGebra. Geo is an abbreviation for Geometry and Gebra for Algebra. Did you know that you can represent all geometric figures as algebra equations? GeoGebra helps you see both the geometric figures and its algebra representation at the same time, hence the name GeoGebra.
![]()


In this chapter you will learn to understand Geometry concepts using GeoGebra.
In GeoGebra you can animate
the geometric figure you have drawn and dynamically see how
some values like length, area, perimeter of a figure changes, see the
same figure in different ways.


Lab exercises
Introduction, the GeoGebra window
The GeoGebra screen is divided in several sections to represent mathematical objects in different
ways. The names of the different
parts are shown below.
 Main Screen -
GeoGebra
Main Screen -
GeoGebra
Menu
Bar: It is a typical
windows command menu bar. File,
Edit, View etc...
are called the menu-items.
Tool Bar: It
has all the tools (compass
box) to use in the graphic view.
Active Tool View: It
tells you which tool is active to use on the graphic view and how to
use it.
Graphic View: It is used
to draw the geometric figures (also called objects
in GeoGebra). This window can never be closed.
Algebra View: It shows
the algebraic expressions. This window can be closed if you are
working only on geometry.
Input Bar: This
is used to enter more complex mathematical expressions that may not
be available on the Tool Bar.
Commands: It has to be used
along with the Input Bar, to select from a list of available
commands.
The Toolbar
The tool bar is GeoGebra's compass box
 Each tool has many related tools under it. To see all
the related tools, click on the arrow at the bottom right hand corner
of each tool as shown below.
Each tool has many related tools under it. To see all
the related tools, click on the arrow at the bottom right hand corner
of each tool as shown below.
Basic use of tools
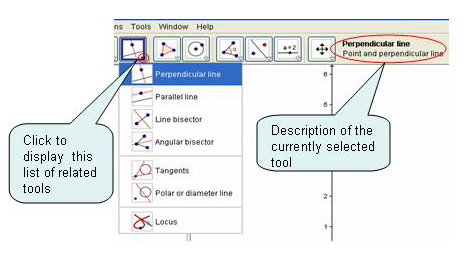 Activate a tool by clicking on the button showing the corresponding icon.
- Open a toolbox by clicking on the lower part of a button and select another tool from this toolbox.

Look of screen
 In
GeoGebra only the graphic view cannot be closed. You can change the
screen to be best fit for working with your needs: Press View
on the menu Item and uncheck or check Algebra View,
Axes and Grid based on your needs.
In
GeoGebra only the graphic view cannot be closed. You can change the
screen to be best fit for working with your needs: Press View
on the menu Item and uncheck or check Algebra View,
Axes and Grid based on your needs.
GeoGebra Exercises
- Drawing points, line segment and rays


To learn how to use GeoGebra we will
use the most commonly used tools when drawing geometrical shapes .
- Select Point Tool, and click anywhere on the drawing point to plot six points A, B, C, D, E, F.
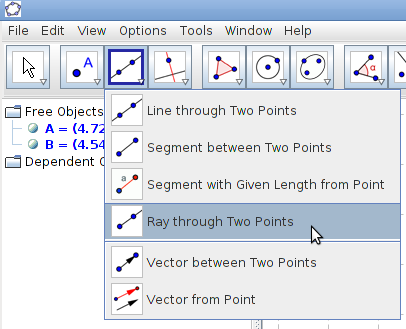 Select Segment between two points tool, click on point A and then point B.
- Select Line through two points tool, click on point C and then point D.
- Select Ray through two points tool, click on point E and the point F.

Can you describe in your own words the difference between a segment, line and ray? Also see the algebra view and observe the equations of the line b and ray c. The line segment a is represented in the algebra view as a = 2.83, where 2.83 is the length of the segment.
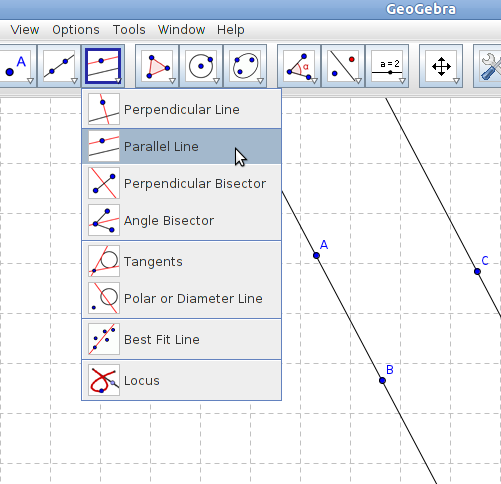 Drawing a parallel line
- Select Point Tool and click anywhere on the drawing point to plot three points A,B, C.
- Select Line through two points tool, click on point A and then point B.
- Select Parallel Line tool, click on point C first. Then click on line AB.

![]() Now
use the Move Tool
move points A, B and C. What do you observe? Describe it.
Now
use the Move Tool
move points A, B and C. What do you observe? Describe it.
![]() Next
use the Move Graphics view
tool and move the drawing pad. Do the two lines ever
meet?
Next
use the Move Graphics view
tool and move the drawing pad. Do the two lines ever
meet?
- Drawing polygons
- Select Point tool and plot three points A B and C to represent the vertices of a triangle.
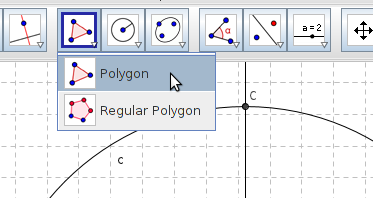 To draw a three-sided polygon – triangle, select Polygon tool click on point A, then B and C and again click on point A. OR
 Try
making a pentagon and hexagon on your own.
Try
making a pentagon and hexagon on your own.
- Rotate a ray
- Draw line segment AB of any length' (Segment between two points tool)'.
- Select the Ray Through two points tool, click on point A, then select another point C on the drawing pad as shown in the figure.
- Select the Angle tool, as seen in the figure and click on points B, then A and finally C. You will see an angle measure. Click on the Move tool and move point C. Observe the change of angle.
- Observe the direction (clockwise, anticlockwise) in which you move the ray? In which direction does the angle increase and which direction does it decrease?
- Draw triangles
In this exercise you are going to draw a right-angled triangle where the base is 5 units and the hypotenuse is 8 units.
All buttons on the tool bar hide
many related tools. You choose the tool you want by pressing the
small red arrow in the lower right corner of the button. Choose from
the list that shows up.
- Start your drawing by using the tool Segment with Given Length from Point.


- Continue by drawing the right angle. Do this by drawing a perpendicular line through point A. Choose the perpendicular line tool, click on point A first and then on the line.


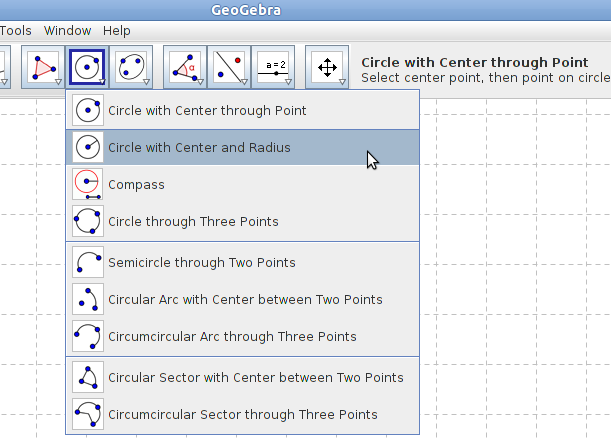 To mark the third corner of the triangle you use one of the circle tools, Circle with Centre and Radius.
- Click on the point B and fill in the length of the hypotenuse as radius.


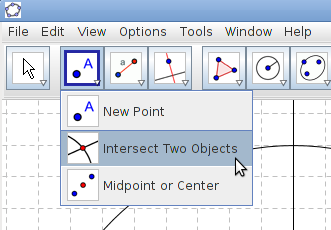 Choose the tool Intersect Two Objects, click on the circle and the perpendicular line. The point in the intersection is the third corner of the triangle.


- Draw the triangle by choosing the Polygon tool. You need to click all the corners and then click again on the first corner to complete the triangle.

- The perpendicular line and the circle, even the points do not need to be visible or seen now, you only want to show the triangle. Hide an object by right-clicking the object and uncheck Show Object by clicking on it.


- The lengths of the sides in the triangle can be shown. Right-click one of the sides and choose Object Properties in the menu which shows up. Check the Show Label field and choose Value from the drop down list.


 To show the size of the angles use the Angle tool. Click on each vertex of the triangle. The order in which you click the vertices must be in the clock wise direction. In this figure click in this order BAC, CBA, and ACB.


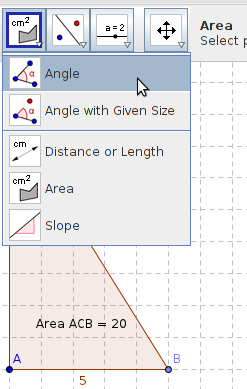
- The area of the triangle can also be shown, use the Area tool as seen in the figure above. Click on Area tool and then click on the polygon.
- Change the shape of the triangle by moving the points you are able to move (use the Move tool).
To save GeoGebra files

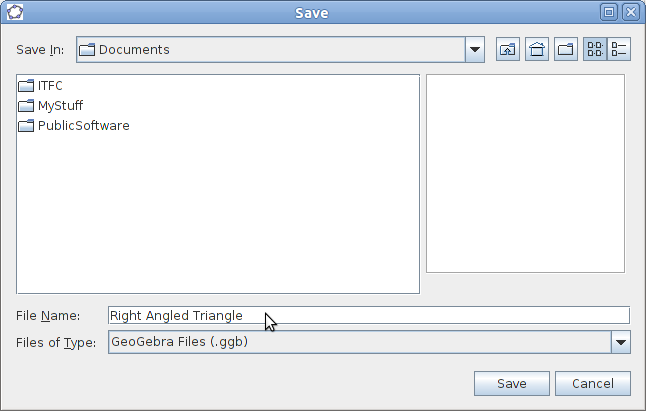 To save your GeoGebra file, select menu item File > Save As.
- Select the Document folder.
- Type the filename Right Angled Triangle.
- The Files of Type box will automatically have Geogebra Files (.ggb).
- Click Save. Your file will be saved as Right Angled Triangle.ggb.


 To
open GeoGebra files
To
open GeoGebra files
- Open the GeoGebra applications.
- Select menu item File > Open.
- Select the folder and the file.
- Click Open.

Additionally you can try the following exercise.
- Follow the following steps to construct a rectangle ABCD like the figure. Use the Move tool and move the vertices of the rectangle. If you have constructed the rectangle correctly, when you move the vertices the figure will always be a rectangle. Seeing this construction can you write down the properties of a rectangle? Steps:
- Draw a line segment AB of any length (Segment between two points tool).
- Draw a perpendicular line at point A perpendicular to line segment AB. For this in GeoGebra : Select the Perpendicular line tool. Click on point A then select line segment AB.
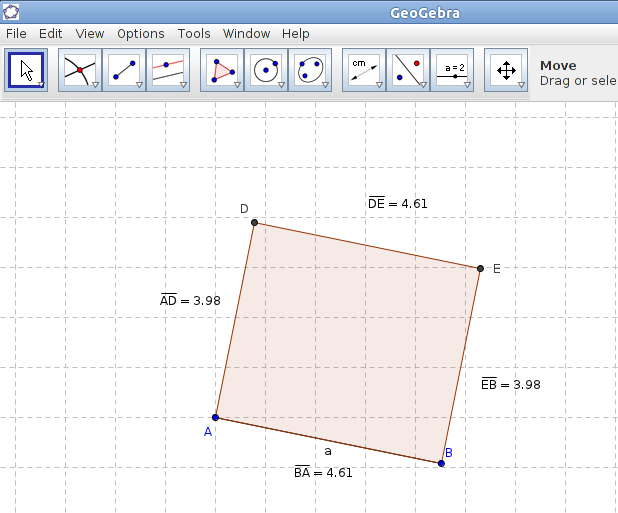
- Similarly draw another perpendicular line at point B to line segment AB. How will you do this in GeoGebra?
- Now select the 'Parallel Line tool and draw a parallel line to AB at any new point C'.
- Mark the intersection points of the parallel and perpendicular lines as D and E using the Intersect two objects tool.
- ADEB the rectangle you constructed.
- To measure the sides, use the Distance or Length tool and click on points AD, then DE, then EB and finally AB.
- Select the move tool and move points A or B. What do you observe, write down your observations.
- Now use the polygon tool and complete your rectangle. Also hide the construction. How will you do this?

Chapter summary
In this chapter you have learnt about:
- GeoGebra is a mathematical tool that helps you construct geometrical figures and see the geometric and algebraic representations at the same time. It is dynamic (where you can change the values of some of the properties like length, angle) and you can animate your geometric figures to understand properties of the figures you have drawn.
- You learnt how to use GeoGebra to construct different geometrical figures and understand some mathematical concepts.
Exercises
- Verifying a Theorem: T'he sum of the interior angles of a triangle are 180 degrees.'
- Draw three points A, B, C (New Point tool)
- Draw the triangle with vertices A,B and C (Polygon tool)
- Select the Angle tool to measure each of the interior angles of the triangle. Now verify that the sum of all the interior angles equals to 180 degrees.
- Select one of the vertices of the triangle (A,B or C) and move the points (Move tool) to change the shape of the triangles.


|
Angle BAC
|
Angle CBA
|
Angle ACB
|
Sum of Interior Angles of Triangle ABC
|
- Exploring the rule: Similar triangles are proportional : Draw a triangle. Place a point on one of the sides and draw a line through this point parallel to one of the sides in the triangle. Parallel line: Use the Parallel line tool. You now have two triangles like the figure below.
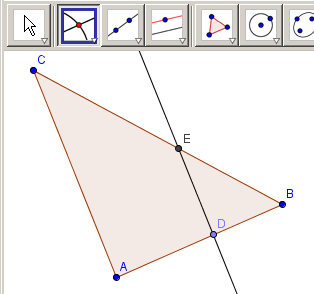

- Explain why triangle ABC is similar to triangle DBE. Measure the lengths of the sides in both triangles.
- Check if the rule stating that the ratio between the lengths of corresponding sides in similar triangles is the same applies.
- Measuring lengths: Use the Distance or Length tool.
- Make the Algebra View visible: View on the Menu Item.
- Show names of points: Right‐click on one of the points, choose properties, in the list on the left side click on points and check Show Label.
- Calculate the ratio: In the Input bar write: r1=Distance[A,B]/Distance[A,D]. AB and AD are corresponding sides in the two triangles. Repeat the command for the other two pairs of corresponding sides.
- Change the shape of the triangle by moving the points you are able to move (use the Move tool). Are the triangles still similar? What happens to the ratios?


- Construct a square in GeoGebra. You are only given a line segment AB of any length. How will you construct the square? The steps are given below
- Draw a line segment AB of any length using Segment between Two Points Tool'.'
- Draw two perpendicular lines at points A and B respectively and perpendicular to the line segment AB using Perpendicular Line tool'.'
- Draw a circle of radius = length of line segment AB using the circle with centre 'through point tool'. Make point A the centre of the circle and point B as the point on the circle.
- Use Intersection two objects and click on the point where the circle intersects the perpendicular line at A. This will be point C.
- Draw a parallel line by selecting point C and line segment AB using the parallel line tool.
- Use Intersection two objects and click on the point where the parallel line intersects the perpendicular line at B. This will be point D.
- ABCD is your square.
- Measure the sides using the Distance or Length tool. What do you observe? What are the properties of a square?
- Move the points A or B using the Move tool. Is ABCD still a square?
Additional resources
- To learn more GeoGebra seethe website [[12]]
- To download GeoGebra files (.ggb) created by your mathematics teachers go to [[13]] Select Maths Tab , then Computer Tools Tab.
- [[14]] To see video tutorials of GeoGebra
- To learn about how to participate in mathematics olympiads please see the website [[15]]
- Here are a list of mathematics websites that you can try out puzzles
7.Science and technology
Chapter objectives
At the end of this chapter, you should be able to
- Understand the way science and technology have grown
- Use different software applications for learning topics
- Understand simulations and how they are used
- Use the Internet to access information
You will work with your teacher in this module. She will guide you through the various topics as well as give examples for each of these topics from your syllabus. Several examples here will require you to do practical experiments in the science lab as well as observe things outside your classroom.
Science and technology
What is the connection between science and technology? Study of science includes a method of observing things around us, thinking about why those events happen, explaining why the events happen, recording information about the events and also predicting what might happen. The understanding of phenomena can lead to the development of tools – this is what we call technology. The technology can provide us more methods of observing, experimenting and recording. And this in turn results in the advancement of science. Thus, science and technology are very closely connected.
One of the technologies that has a
great influence on many areas of our life today is Information and
Communication Technologies (ICTs). These include the computer and
the internet for transmitting information. You have already learnt
about the history and development of computers. Now we will look at
the various ways in which computers can be used for scientific
research and study.
Making large calculations
Computers make it easy for
scientists to do calculations with large numbers, for example number
of cells or number of stars.
Make models for study
Experiments in science are of
different kinds. Some are small, some are large, some are simple,
some need lots of equipment, some are very complex and need lots of
skill to do and some are impossible to do physically. Can you think
of some examples of each of these kinds?
Computers
help scientists in making models of complex and physically difficult
experiments. If we want to find out whether a medicine will work or
not, it is possible to build a computer model of the human cell for
simulating how it will respond to the medicine. Similarly, we cannot
go to a star and study the radio waves produced; but we can model it
on a computer.
|
|
|
|
This is simulation of a supernova explosion. This has been made on the computer so that scientists can study what causes an explosion, what happens during an explosion and what is the effect afterwards.
|
This is a geological map of the world – you can see the rock structure in the Himalayas, Andes and other mountain ranges of the world. This map has been produced from many local, paper maps and putting them on the computer.
|


Connecting scientists and building databases
Science is everywhere. When
computers are used to share the data collected, more people can have
access to it. In Bengaluru, the National Centre of Biological
Sciences wants to build a database of scientific data by getting data
on trees and plants from all over Karnataka. Such a database will be
available to many people.
Lab exercises
The internet is a very useful resource for getting information about many topics.
1. With the help of your teacher,
look at the following websites:
[[18]]
[[19]]
This will give you information about
satellites and how they are made and used.
2.
Check the internet for information about the Citizen Sparrow Project
to see how the computer can help collect scientific information from
many people and help make analyses.
What are computer simulations?
Computer simulations are very useful for scientific research when a physical experiment may be very costly or dangerous or extremely time consuming to do. When a scientist is studying a problem, she will make assumptions about what causes the change and make predictions about what will change. This information can be input to the computer and the simulation will make all the calculations and show what changes happen. Sometimes, the changes that the simulation will show will be different from what the scientist predicted. This will help the scientists refine the theory. The simulation shows the experiment on a computer. The scientist can change the inputs to see how the experiment changes. This helps in the development of new knowledge.
Simulations are different from
animations
Computer models are different from
animations. In an animation, we simply see a movie which shows a
phenomenon happening. The inputs cannot be changed.
Your teacher will show you the
following. Write down what you observe in the two activities. Is
there any difference between the two?
- Applications> Education> PhET> My Solar System
- Applications> Education> Kstars> Tools> Solar System
- Check out the following link on the solar system.
[[20]]
Computer simulations for studying science
PhET is a software application that contains computer demonstrations of experiments and activities. These are called simulation. A simulation is like doing an experiment on the computer.
Lab exercises
You can find PhET under Applications> Education> Science. We will learn more about simulations a little later when we learn about the use of computers in science. The PhET simulation can also be found on the Internet at [[21]].
When you open PhET you will see a
page like the one shown below.
When we click on Play with sims
– it will open simulations in various subjects. We will click on
Physics and scroll down to the simulation on Waves on a String. When
we want to open a simulation, we click on the green rectangle which
says 'Run Now'. And this will start the simulation.
Exercise 1 : Observe
the simulation 'Wave on a String'
You will see a picture like this.
This is similar to a situation that you might have had where you tie
a rope to one end and the other end is in your hand.
When you shake your hand, the rope
will shake though it will be fixed at the other end. Similarly, if
we move the wrench here, the rope (which is a collection of beads)
will also move without being removed from the other end.
This simulation will allow you to
move the string in different ways using the mouse and the various
choices you have. Your teacher will explain what these various
choices are.
Physics simulation:
Waves on a string -I

 In
this simulation, you would have noticed two words – tension and
damping. Tension is the force that will get set up in a rope when
you pull on it. How much tension gets set up depends on the material
of the string. If you have a cotton saree as a rope and a nylon
string as a rope, they will move in different ways. Damping means
reducing. When I pull up the rope, the rope will try to resist that
pull and this resistance is called damping.
In
this simulation, you would have noticed two words – tension and
damping. Tension is the force that will get set up in a rope when
you pull on it. How much tension gets set up depends on the material
of the string. If you have a cotton saree as a rope and a nylon
string as a rope, they will move in different ways. Damping means
reducing. When I pull up the rope, the rope will try to resist that
pull and this resistance is called damping.
Answer the following questions
- When you 'move' the wrench up and down, did the string move? How did it move? How did each of the beads move?
- When you look at the simulation, it looks like something is moving from one end to another. What is moving?
- Let us understand what happens when you move the string using the manual option. You can complete the table below.
|
Activity
|
What do you observe ?
|
|
Move the wrench upwards
|
|
|
Move the wrench downwards
|
|
|
Move the wrench upwards and downwards
|
|
|
Are the beads in the string moving left to right; right to left, or up and down? What does this tell you about waves
|
|
|
How fast does the string move when tension is high and when tension is low. Is there a difference and why?
|
|
|
When you add damping how does the string move
|
- Let us understand what happens when you move the string using the oscillating option. You can complete the table below. You will see that there is a green rectangle on the top in which there are control buttons for amplitude, frequency and damping. We know what damping is. At the end of this simulation, you will be able to describe amplitude and frequency.
|
Increase and decrease amplitude
|
How does the wave look? How do the beads move? What changes in the beads when you change the amplitude? Do all the beads move in the same way? When you increase or decrease amplitude, what happens to the frequency
|
|
Increase and decrease frequency
|
How does the wave look? How do the beads move? What changes in the beads when you change the frequency? Do all the beads move in the same way? When you increase or decrease frequency, what happens to the amplitude?
|
|
Change the values of tension and damping
|
What do you observe is happening to the wave? What happens if the wave end is not fixed but loose?
|
|
Use the ruler to see how the beads move?
|
How far do the beads jump? Does it change?
|
 When
you use the ruler you will notice that some of the beads jump very
high – much more than when the wave started. Why is this so? How
high the beads go is related to the amplitude. Discuss with your
teacher why the beads jump so high after a while and also the
relationship with the amplitude of the wave. Describe what you
understand by amplitude and frequency.
When
you use the ruler you will notice that some of the beads jump very
high – much more than when the wave started. Why is this so? How
high the beads go is related to the amplitude. Discuss with your
teacher why the beads jump so high after a while and also the
relationship with the amplitude of the wave. Describe what you
understand by amplitude and frequency.
Chapter summary
- Science and technology are linked; technology has helped the development of science.
- Computers have made many improvements in how we study science. They can be used to simulate models, do large calculations,develop databases and help connect people.
- The computer and Internet technologies can also be used for studying science in schools.
- You have studied about ecosystems, biomes through videos.
- You have seen the difference between simulation and animation.
Exercises
- Open the PhET simulation on Colour Vision. Run both the simulations – RGB Bulbs and Single Bulb. Then, answer the following questions:
- When only one bulb is used, what colour does the man see? Why?
- When more than one colour is used, what colour does the man see? Why? Does this change if I move the sliders on each of the bulbs the man sees? If it changes, why does it change?
- When all the three bulbs are used, what is the colour that the man sees? Where else do we see white light? If R,G,B when mixed give the white light, what can you say about the nature of the red, green and blue.
- When does the man see any colour and when does he see black?
- What is the filter doing? Explain the difference in colour between the source being monochromatic (single colour) and white.
- Open the PhET simulation on Friction under Physics/ Motion. Run the simulation and answer the following questions.
- What do the moving green and yellow circles indicate?
- When you are rubbing the yellow book on the green book what happens? How do you know that the heat is being generated?
- When the temperature goes very high, the yellow circles fly off. What does this mean physically?
Additional resources
- [[22]] - For a description of radio astronomy
- http://www.computersciencelab.com/ComputerHistory/History.htm' – 'Growth in computer technology
8.Social science
History
Chapter objectives
At the end of this chapter, you will work with ICTs to get an understanding over the following
- Different historical sources and perspectives.
- How to look for information beyond the available history textbook material on the lives of different people in history.
Historical sources and perspectives:
When we study history, we learn about different events that have happened in the past. We hear about stories of kings and queens, the commoners and their lives. How can you know that these things have happened? As we cannot see these people, we need to think about what they looked like, how they dressed, what they ate, what did they worship, what was their government like and many more such things.
Historians use different types of evidence to build stories of what might have happened in the past. They use different sources including ancient monuments, clothes, tools, diaries and other kinds of written documents, works of art and by speaking to older people in the community. Sources can be primary or secondary. Primary sources are original material, for example excavated material, letters and diaries of people from the past and other such material. Secondary material is that which uses primary sources to produce historical writing.
We usually visit museums to see displays of material from the past. Below each will be a description of how old it is, where it was found etc.
But this is limited as museums cannot store all the sources of history. Besides, different museums will have different kinds of sources. Hence, if we want to see and learn about all the different kind of evidences that have been used to write history, we can look it up on the Internet.
Websites like the Archaeological Survey of India's [[23]] are good repositories of historical information. The information on such websites are valid and certified as authentic. However, this may not be the case with all websites on the Internet.
|
|

Lab exercise
- Look up websites on the Indus Valley Civilisation and look at how the information is written. Are there any differences? Note it down. For example, what are the sources mentioned, who has written about this information? (You can start your search with the below mentioned websites)
- Using these web links: [[27]], [[28]] and [[29]], write about the lives of the people (their food habits, clothes, regular places they visited, their daily life) in the Vijayanagara empire. You can use the word processor for this. Some examples which you could write about are
- A temple dancer
- One of the Virupaksha temple builders
- A vendor in Hampi
- A farmer
Chapter summary
- History is written with the help of different historical sources, both primary and secondary.
- Historical writing represents the ways of life of people in the past.
- Historical writing must be authenticated. .
Exercises
- Using these websites, go through stories from Buddhism and Jainism. Work in groups and choose one website. Collect the main points from the stories and narrate your favourite story to your class.
- Watch some videos on Alexander the Great on www.youtube.com and write a short life sketch imagining that you are Alexander. Also write a life sketch imagining you are the person who was in charge of taking care of his horse.
- Look up these websites to read the life of famous Indian historians: [[33]], [[34]], [[35]], [[36]]. Why do you think they wanted to become historians? Type all the possible answers you can think of and share with your class.
- With the help of your teacher, go on a expedition of your village/neighbourhood. Find out about the major historical sites of your area. Try to trace how and why these sites became important. You can also take photographs of this and share with your class.
- Meet some of the old people in your village and ask them to tell you a story about the village or a janapada that tells the story of the village. Can you write it down and later type it so that everybody can read it?
Political science
Chapter objectives
At the end of this chapter, you should be able to explore using ICTs to develop an understanding over
- Your role as a citizen in a local and national context.
- Identifying different social and civic issues in the locality.
- How to access the elected representatives in charge.
India is
a democratic country and as citizens of this country, we have certain
rights as well as responsibilities. To be an active citizen, we must
understand the social issues and civic issues around us and see how
we can participate to do something about these issues. Through these
exercises, we will explore what you and your classmates understand by
the term democracy. You will work with your teacher to learn this
concept. You will also draw up lists of the issues in your
neighbourhood, especially concerning the common resources (water,
forests, irrigation systems, land etc.)
Lab exercise
- Using a mindmap, map out all what you understand by the term democracy. Work in groups and present it to your classmates and come up with your own definitions of the term.
 Create a photo essay of the social and civic issues in your neighbourhood
|
|
- What are the common resources in your village. Make a photo essay on this.
- Visit the government departments (agriculture, horticulture, social welfare etc.) and gather information that is relevant and useful for you and your family. This will cover your needs now and for the future, your family needs etc. : [[37]]v=Sgd6y9GTcdE&list=UUH4suj5leg5_Na0ttjuHHjw&index=20&feature=plcp
Chapter summary
- Different government departments have different responsibilities
- As a citizen, you must be aware of this and ensure that all basic needs of your community are met.
Exercises
- Interview some of your classmates and teachers and head master or head mistress and find out what they think are important issues that need to be addressed in your school. Prepare a note on this and present this to your head master/head mistress with inputs from your teacher.
- Visit your local Grama Panchayat and make a list of their functions. Interview some of the members on their vision for the village.
- What is the most important need for your school? (For example, need of toilet, a science lab etc. Find out who the concerned official is and write an application for this. Watch this video of how some girls did a similar activity to get a bus to their village. [[38]]
Geography
Chapter objectives
At the end of this chapter, you should be able to explore using ICTs to develop an understanding over
- The reason behind natural phenomenon, how it can affect lives of people and safety measures against it.
- Navigate the public educational tool Marble and use it to locate different places.
Natural Phenomenon
There are many natural phenomena occurring all the time. Rains, floods, droughts, earthquakes, volcanoes are some examples of these. Phenomenon like these occur in most places around the earth. However, there are particular areas which are more prone to volcano eruptions, earthquakes etc. Some of these prove to be harmful to animal and human life. This leads to people losing their homes, their livelihoods and also their close friends and family.
|
|

 It is not possible for us to see some of these things in our daily
life (for example, volcano eruption, earthquakes). Let us make use of
the Internet to look up some of these videos and try and understand
these phenomenon.
It is not possible for us to see some of these things in our daily
life (for example, volcano eruption, earthquakes). Let us make use of
the Internet to look up some of these videos and try and understand
these phenomenon.
Lab exercises
- Go to www.youtube.com and watch some videos on earthquakes, volcanoes and tsunamis. Divide into groups and prepare a presentation teaching you fellow classmates on how these phenomenon occur. Listed below are some videos to help you start your search.
- Drought and floods are common in Karnataka. Look up online newspapers ([[44]]) and present to the class your analysis of the situation (which regions are most affected, the situation of the people and your ideas on what government can do to help these regions).
Maps
One of the techniques we use in geography is pictorial representation of places, events, features using maps. Map making (cartography) is a very important skill and has been around for many many years. For more information on the history of map making, visit [[45]] and [[46]].
We can use maps to emphasise some things (for example the map showing volcanoes that you saw above), describe details of some things. There are different kinds of maps for example physical map, political map, etc. Maps come in different shapes and sizes. We can also make a map of our school, our locality and even our village. Open Street maps [[47]] are an example of how people are now making their own maps of their neighbourhoods and adding things to it which are important for them.
Let
us now look at different maps and understand what they are depicting.
|
|

Lab exercises
|
Type of Map
|
The purpose of the map
|
- Marble Go to Applications – > Education – > Marble.
 On
the left side, you can see the different earth views for example
precipitation in July and December, rainfall in July and December
etc. Click on each of the maps, explore. Try and answer the questions
below.
On
the left side, you can see the different earth views for example
precipitation in July and December, rainfall in July and December
etc. Click on each of the maps, explore. Try and answer the questions
below.

- Identify the regions where there is heavy rainfall in June and December. Are there any similar regions? What could be the reason?
- Which are the hot zones on the earth and which are the cold zones? What could be the reason?
- Turn the globe upside down. Note down some of the main differences you feel could happen because of this. (For example, Australia on top.)
|
|
Chapter summary
- Natural phenomenon occur due to many natural as well as human influenced reasons.
- Maps are a representation of some information in a pictorial manner.
- Marble is an educational tool through which physical information can be collected about the earth through its different map views.
Exercises
- Prepare a concept map on what you think the environment consists of. What are the environmental problems that you are aware of? Have you observed anything like this in your surrounding areas? It is important for us to participate in saving the environment.
- How many borewells/ wells are there in and around your school? Are all of them functioning? What do you think could be the reasons for the drying up of borewells? Prepare a note on why ground water conservation is important. You can use the Internet to look for pictures and other websites for your sharing.
- In the first week of every month, record the temperature. Prepare a table of the data that you have collected. {| border="1" |- | | Minimun | Maximum | Rainfall |- | January | | | |- | February | | | |- | ….... | | | |- | December | | | |}


Additional exercises
- Using this website [[50]] look at the evolution of the coin system in India. What are the currency notes and coins that we today? Try to trace the evolution and make a list of currency that has been used in India.
- Make a presentation of all the industries in your area. Make a list of the different kinds of occupations provided by these industries and the number of people in your neighbourhood who work in each industry.
Additional resources
<Back Inside Cover Page >
ICT Curriculum committee members
<Please add names and designations here >
Resource Book Creation and Editing team members
Creation
and Editing
Formatting
& Copy Editing