Difference between revisions of "Frequently Asked Questions"
| Line 410: | Line 410: | ||
=='''[[http://karnatakaeducation.org.in/KOER/en/index.php/LibreOffice_FAQ LibreOffice FAQ]]'''== | =='''[[http://karnatakaeducation.org.in/KOER/en/index.php/LibreOffice_FAQ LibreOffice FAQ]]'''== | ||
| − | |||
| − | |||
| − | |||
| − | |||
| − | |||
=='''MOZILLA THUNDERBIRD ON UBUNTU'''== | =='''MOZILLA THUNDERBIRD ON UBUNTU'''== | ||
Revision as of 11:09, 25 September 2014
About UBUNTU
Is Ubuntu compatible with Windows?
Yes. Installing Ubuntu does not stop you from working with your Microsoft Windows files and applications. Ubuntu can be installed along-side (side-by-side) Windows and also it can be installed within Windows as a program. However if you use Ubuntu you may not need to use Windows since most of the applications on Windows are also available bundled with Ubuntu, like Office, Web browser etc
How do I install UBUNTU using something else option
Steps to follow after choosing something else option while installing Ubuntu:-
Step 1: When you chose something else and click on Continue, something like the following screen will show up:

In the above window, first ntfs partition is the Windoze native partition and second is the free space. In your case, if you don't see any free space, then you can create one by deleting free partition in your desired hard disk. You can make sure which hard disk you have selected under “Device for boot loader installation”. Your ubuntu bootloader will be installed in this hard disk drive.
Step 2: Now, after freeing up the required space, you can add partitions for root directory by clicking on “Add” in the above window.
The below screen will show up when you click on “Add”:

Now, select as shown in this picture by giving your desired space for ubuntu root directory. The “/” symbol always indicates the root directory in GNU/Linux systems.
Then click OK.
This will create a new partition for the root directory.
Step 2a: Now, again click on “Add” and create a swap area. This can be done by selecting swap in the drop down menu of “Use as:” in the above window.
Always the swap partition size should be the double of your RAM size. So if your RAM is 1GB then swap would be 2GB.
Then click OK.
Step 3: The above steps will result in the Install window as shown below:

Here it shows that /dev/sda1 is your Windoze partition. /dev/sda2 is your new root partition. And /dev/sda3 is your SWAP space.
Once you are happy with the changes you have made, click “Install now” and proceed to the next step.
From next step, it'll be usual installation which may show up “Where are you?” window to know the location and so on.
How do I setup Thin client in Phase-1 and phase-2 schools
Note:below mentioned setup is only for the server
1.Go to the right top panel, Left click on network icon,
select the Edit connection.

2.Click on the Wired tab. and there click on Edit button.


How to make correct, The Ubuntu login screen splitted into 2 parts Or Lower graphics mode
Note:Before following the below mentioned steps please connect the internet(internet should connected)
1: Whenever you get the split ed screen press the keys Ctrl+Alt+(F2 or F3 or F4 or F5 or F6) press any one
of the function key f2 to f6 along with the ctrl and alt button till you get terminal (blank screen
ended with $ sign).
2:In front of $ sign type the following command without mistake sudo apt-get install gdm press Enter
3: provide the system password (password will not appear)
4:Once the process is complete, type the command sudo reboot
5:Your machine will restarts automatically with good screen display.
Note:-If you Don't have internet follow the below mentioned steps.
1: Whenever you get Lower graphics mode press the keys Ctrl+Alt+(F2 or F3 or F4 or F5 or F6) press any one
of the function key f2 to f6 along with the Ctrl and Alt button till you get terminal (blank screen
ended with $ sign).
2:In front of $ sign type the following command without mistake sudo rm /etc/X11/xorg.conf press Enter
3: provide the system password (password will not appear)
4:Once the process is complete, type the command sudo service lightdm restart
5:Restart Your machine you will get correct screen display.
How to convert videos from one format to different formats in Openshot video editor
Step 1:Open The openshot video editor by clicking on Applications---->Sound and videos----->Openshot video editor (If openshot video editor is not installed then install it from the Ubuntu software center)

Step 2: After Opening the Openshot video editor Click on “+” mark to import the video files from your computer.

Step3:After importing the video files, to convert the video from one format to another format click on Export video tool which is red Button as shown in the below picture.

Step4:After selecting the export button you will get the below mentioned window.
In File name give the video name and in profile select all format and in Target select the format you want to convert the video file.
And then click on export video to convert.

How do I install and switch to the GNOME-Classic desktop?
- To install the Classic desktop on your Ubuntu 12.04 machine, follow the steps below:
- Press Ctrl + Alt + T on your keyboard to open the Terminal.
- When the Terminal opens, type the commands below at the prompt, i.e. after the $ symbol.
- sudo apt-get install gnome-session-fallback
- Press Enter. Enter your password when prompted.
- Note: When you type, your password is not visible.
- Restart your system, and at the log in screen, click on the Ubuntu Greeter icon.

- Select the GNOME-Classic session and login. As shown below.
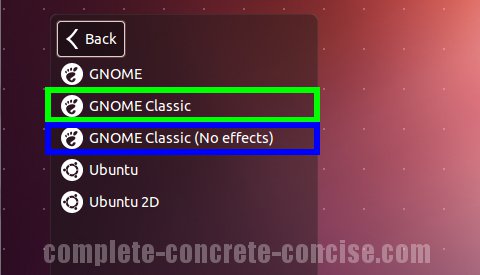
- This is only a one-time selection. You need not do this everytime you login.
- Your system will now start with Classic Desktop always!


How to setup kannada Ibus
Step I
1. Click on applications > system tools > iBus

2.you will see a keyboard icon on the right side of the top panel

3. left click on keyboard icon > preference – iBus preference window will open

4. select input method Note -check “that customize active input methods “ is selected

5.click on “ select input method “ - choose Kannada from drop-down list > select kgp (if you prefer Nudi for Kannada typing)


6.click on add on the right side. Once it added to the list click on close.
Now you can type kannada using control space keys.
If you want to type Baraha please select i-trans(instead of kgp) in the list,
Step II
To setting up a fonts in libreoffice :
Open LibreOffice writer:
Go to Tools --> Options --> Language Settings.
In Languages, check if Enabled for Complex Text Layout is ticked(enabled).
Also in Default Languages for Documents(CTL), select Kannada then click Apply --> close.
Again Go to Tools --> Options --> Libreoffice writer --> Basic font CTL -->> select Lohith Kannada or any unic code fonts in all the 5 boxes --> click OK.
Now Restart your Computer.
Open LibreOffice writer and press Control+Space. You can now start typing in Kannada and If you want English then press Control+Space'
My LibreOffice crashes everytime I see print preview. What do I do?
- To not have LibreOffice crashing everytime you see the print preview, do the following steps:
- Open the Terminal (Application > Accessories > Terminal)
- At the prompt, type sudo apt-get autoremove lo-menubar
- Press Enter.
- Enter your password when prompted (password not visible).
How do I partition my hard disk manually to install Ubuntu 12.04?
How to use APF dvd's in Ubuntu
In APF cd/dvd's 9 dvd's are audio and video dvd's these can be play by right click and select open with VLC media player it will open up. For remaining 4 dvd's are the interactive games for that, please follow the below mentioned steps.
How to connect the Projector in Ubuntu 12.04
Basically we use 2 connections of Projector to connect, they are.
-
Projector Power cable connection is from socket to projector and VGA is from laptop/desktop to
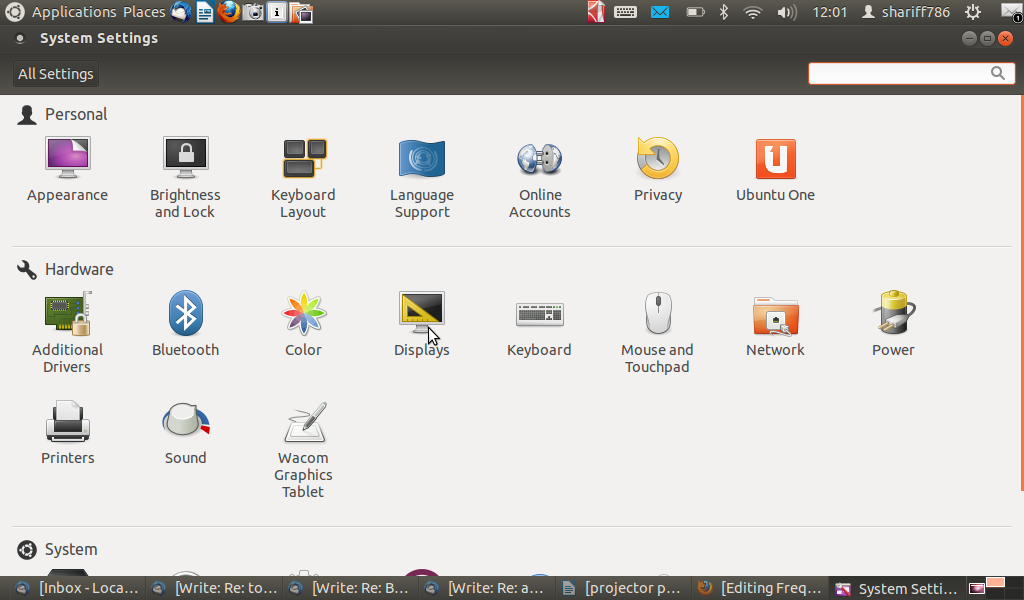
- 1.In Computer go to Applications------>System tool-------->System Settings
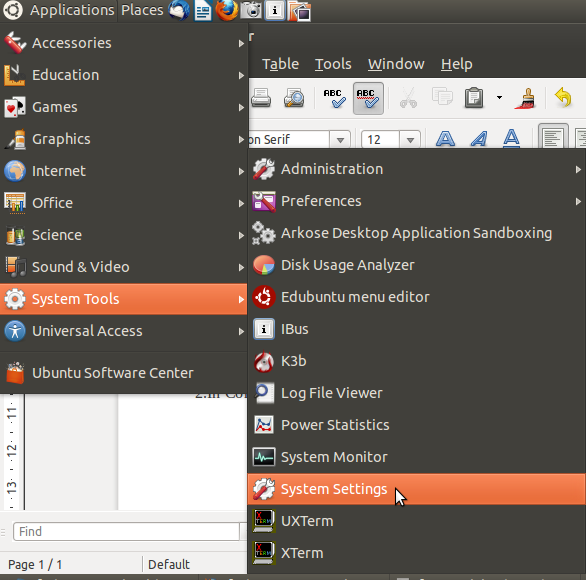
- 2.Click on Display.
- 3. Check mark on Mirror display and click on Detect displayes and Apply.
It will connects automatically.
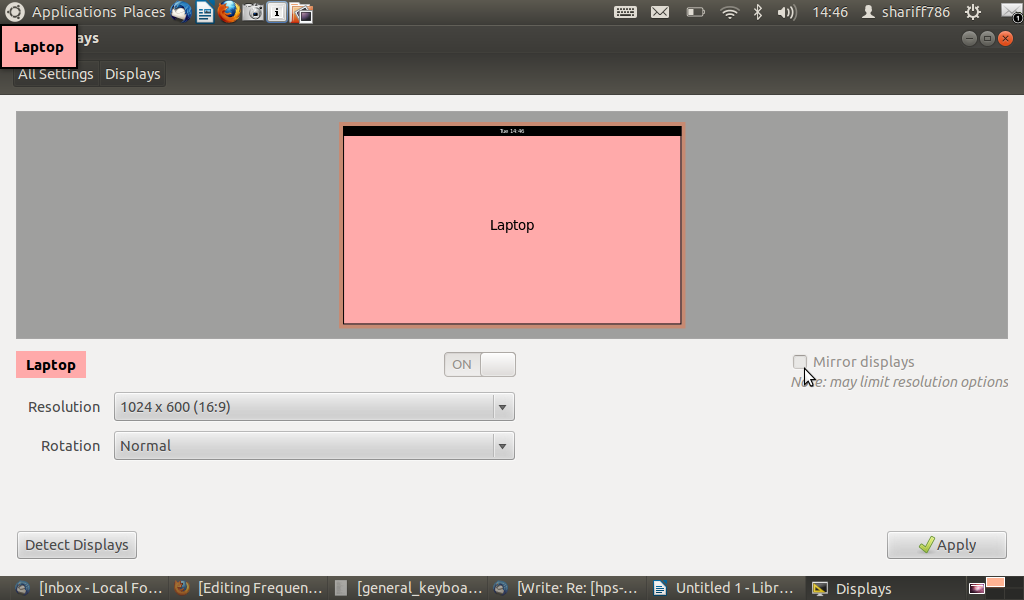
- (Note: After following the ablove steps if you are not able connect the projector then keeping projector ON state restart your laptop/Desktop.)
Back to top
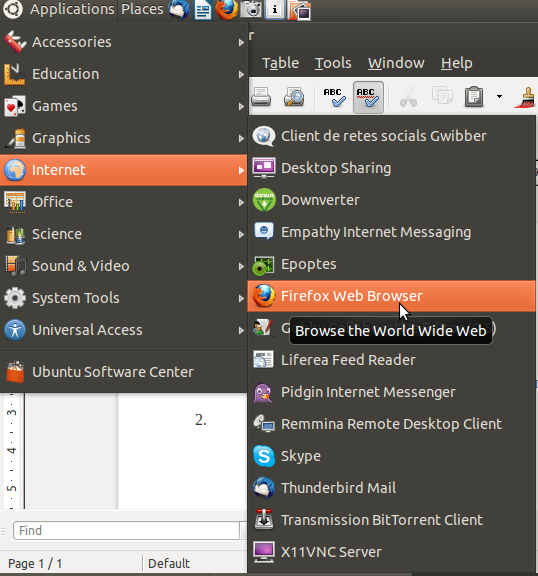
- 1.open the firefox for opening, Applications----->Internet------>Firefox Web Browser
- 2.In firefox web browser click on tools------>add-ons
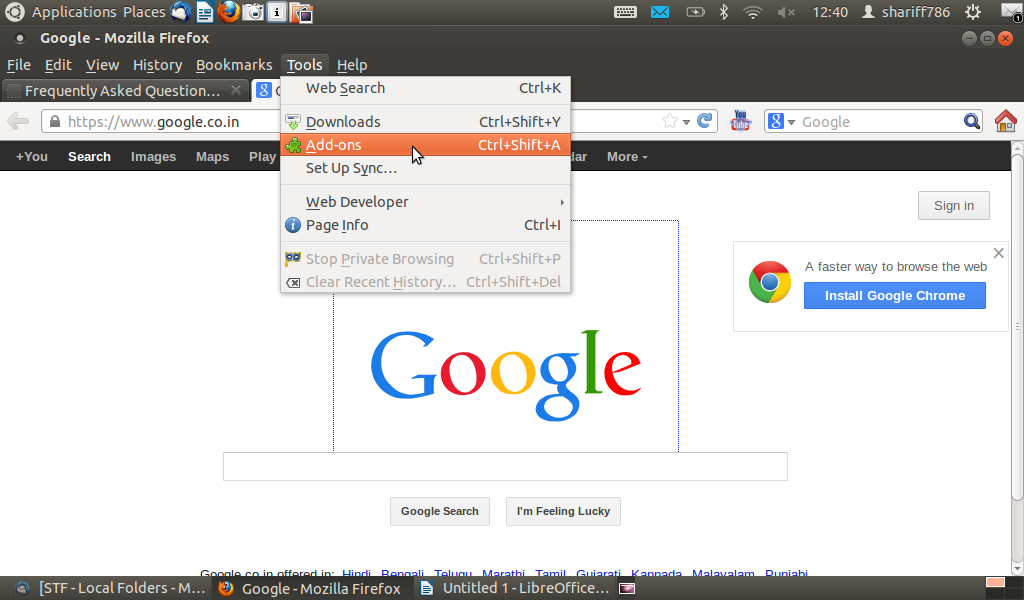
- 3.In top seearch box type as easy you tube video downloader press enter , you find the same add on in list click on install button and provide the passward.
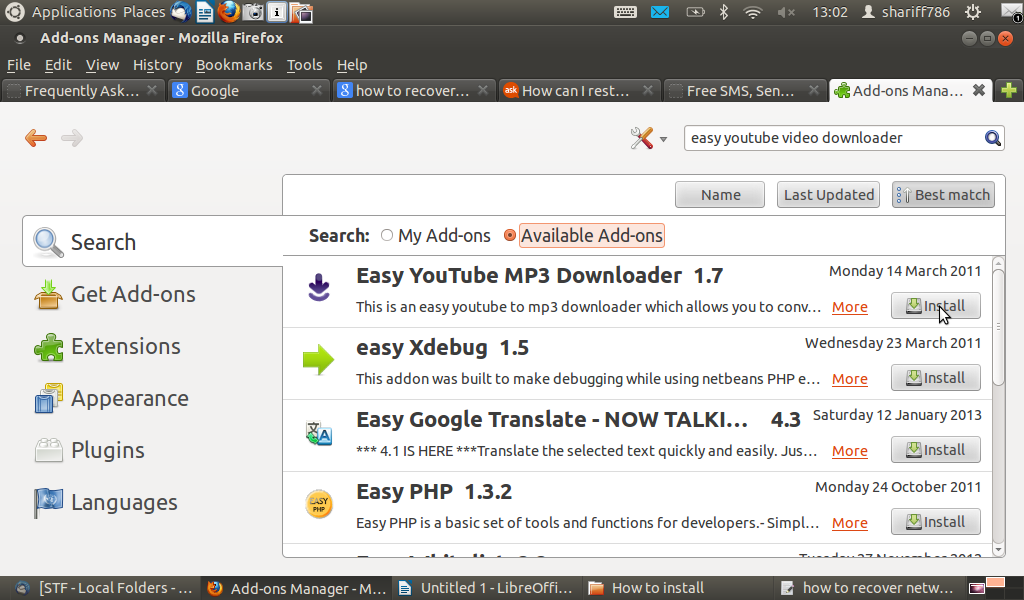
After installation open any youtube video at the bottom of you tube video you will find the DOWNLOAD button. Click download button and save the video. Back to topHow to install Openshot video editor in ubunutu
Please follow the steps to install open shot video editor.
(Note:-To install any software in ubuntu Internet is necessary)
1.Applications------>ubuntu software----->center
2.In search box type as openshot video editor
3.After searching the openshot video editor application in the list
4.Click on the install button at the right side, If you will not find the install button 'double click on the openshot video editor
5.It will ask you for the password, provide your system password click on authenticate.
6.After some time openshot video editor installation will completes.
How do I launch PhET?
The customised DVD that you receive during your training sessions has PhET pre-installed on it. A shortcut or a launcher to PhET can be created as follows:
- 1. Applications----->System Tools------->Preferences------>Main menu
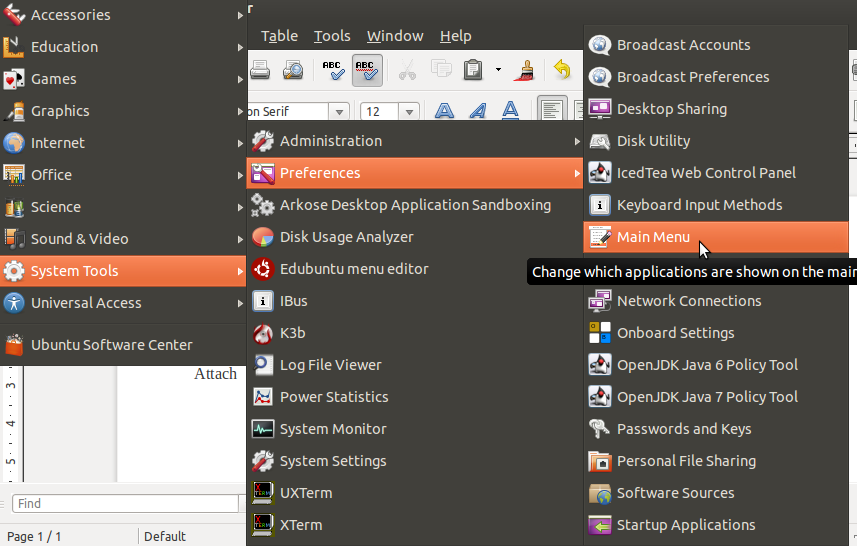
- 2.Select Science from menu, Click on +New Item
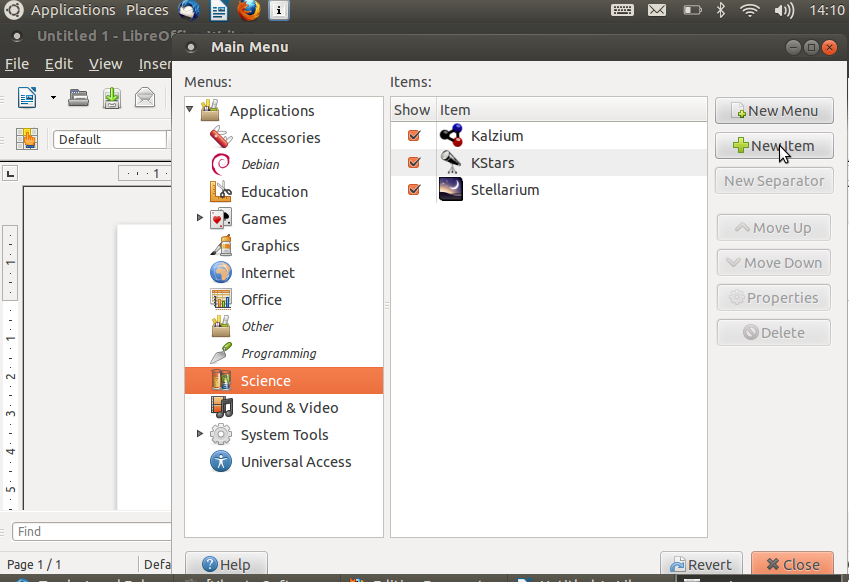
- 3.Type as mentioned below without any mistake.
- Name:PhET
- Command:firefox /opt/PhET/index.html
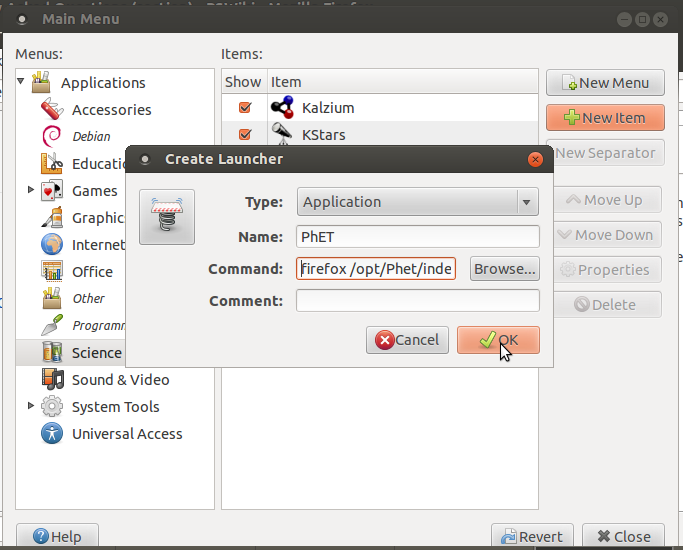
- 4.Click on OK and close all tabs
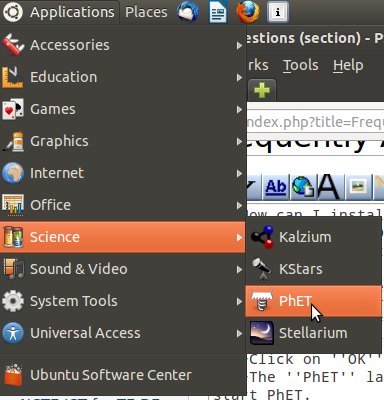
- 5.To open PhET, go as follows
Applications----->Science----->PhET
Back to topWhere is 'START → PROGRAMS' in Ubuntu?
Instead of the START menu as in Windows, there are different Menus in Ubuntu (usually 'Applications', 'Places', and 'System'). These are present on the right side of the top panel. Any application, after its installation will be inserted into the Applications menu. Back to Top
How do I create desktop shortcuts for applications on Ubuntu?
- Follow the steps to create desktop shortcuts:
- Find the program in the Applications menus and right click.
- Select Add this launcher to desktop.
- A link to the application will now be on your desktop.
How can I install new software/tools on Ubuntu?
The preferred way to install software in Ubuntu is to use the package manager, which you can access through Ubuntu Software Center. This requires an Internet connection, unless you are using offline repositories. Ubuntu Software Center can be accessed through Applications-> Ubuntu Software Center. Type a query into the search-> Select a package you think is relative to what you want-> Click "Install"
How do I remove an application/software on Ubuntu?
- To remove an application:
- Click Applications → Ubuntu Software Center.
- In the Installed Software section, find the application that you want to remove by finding it in the list or by searching for it.
- Select the application and click Remove.
- You may be asked to enter your password. After you have done that, the application will be removed. This should not take very long.
Why is Linux/Ubuntu less prone to Malware/Viruses?
-
Possible reasons Linux/Ubuntu is less prone to malware:
- Linux is based on UNIX architecture. UNIX is designed as a multi-user operating system and has in-built safeguards to protect user from malware. This includes user permissions definitions, user space distinct from system space etc
- Programs are run as normal user, not Root User.
- Vast diversity makes it difficult to reproduce flaws in a system.
- All software and drivers are frequently updated by Package Managers.
- Software is generally installed from vast Repositories not from unfamiliar websites.
- No-one profits from supplying anti-virus or security products.
Why isn't there a 'Refresh' option when I right-click on Ubuntu?
- There is no 'Refresh' option in Ubuntu. Instead you can press 'F5' or 'Ctrl+r' for refreshing your desktop.
How to recover the missing top panel in Ubuntu (Gnome Desktop)
- Press Alt+F2
- Type 'gnome-terminal'
- Check/tick 'Run in terminal' box
- and type the following command 'gconftool --recursive-unset /apps/panel&& killall gnome-panel'
Alternatively,
You can open the terminal by clicking on Application -> Accessories -> Terminal and type the following command at the $ sign 'gconftool --recursive-unset /apps/panel&& killall gnome-panel'
How to add new/recover missing icons on top Panel in Ubuntu (Gnome Desktop)
- Alt+Win+ right click on the top panel to add the applet.
- Then in the list select select indicator applet complete as below.( for time,volume,blutooth and power button)
- click Add
- Then close the window.
- First, using an email client can be a tremendous time-saver if you have multiple email accounts. If you want to check for new messages across all of your email addresses, then that means that you will have to log in to several different sites.
- Once you download and setup an e-mail client like Outlook or Thunderbird, it will download your mails across all of your accounts, so that you can access them all at one easy place.
- One of the greatest advantages of using an e-mail client is that they allow you work with your e-mails even when you are off-line.
- You can group your messages/mails into folders.
- You can set up MESSAGE FILTER to automatically move a mail to a defined folder so that it does not flood your Inbox. For example, all subject teacher forum emails can be automatically sent to a separate folder such as 'MathsSTF' or 'EnglishSTF'. Inbox will be less busy and you can read the STF Mails at your convenience
- Logging into your GMail webmail account using your default browser
- Click on Settings > Forwarding and POP/IMAP > POP Download: and choose Enable POP for all mail.
- Note: POP (Post Office Protocol) is the protocol that is used by local email clients to retrieve email from a remote server.
- Click the Save Settings button.
- [Click here to view the screenshot of the Mail Settings option in GMail.
- You must provide the POP settings in Thunderbird for GMail, so that the email client is able to access all the messages of that account.
- Go to Edit > Account Settings > Server Settings.
- [Click here] to refer the document to enter the correct POP details.
- You must also enter the SMTP details in the Thunderbird settings.
- Note: SMTP (Simple Mail Transfer Protocol) is an Internet standard for email transmission across IP networks.
- [Click here] to refer the document to enter the correct SMTP details.
- Open Freemind Ubuntu Menu Applications > Office > Freemind
- Click on Menu Item File > New (CTRL N)
- Click Menu Item Tools > Preferences, a window like the example below appears
- Select Defaults Tab
- In Default Font type in Lohit Kannada
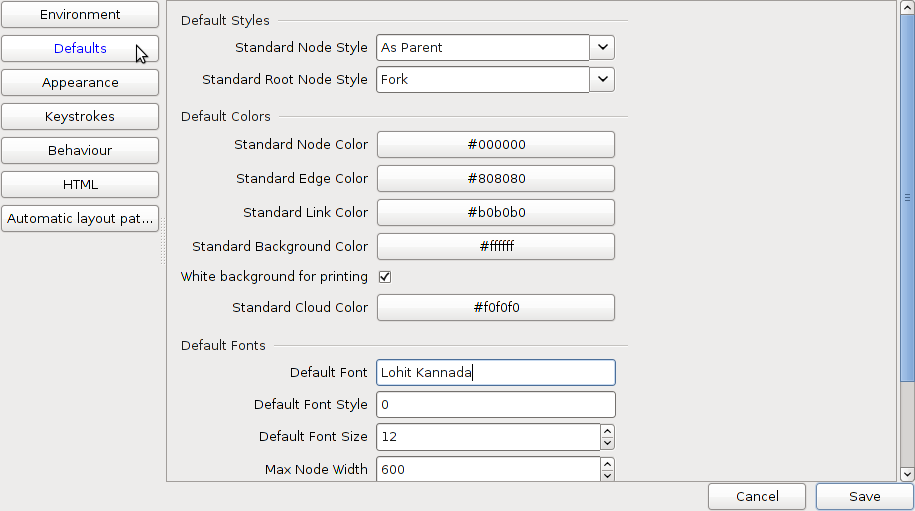
- Click Save, the window below appears, click ok.

- Close and restart Freemind Application
- To type in Kannada
- Open Open Office Writer
- Type the words in Kannada using iBUS
- Copy and paste to Freemind.
Can I read old Kannada documents in non-UNICODE font using OpenOffice?
Yes, you can read Kannada documents in non-UNICODE font using OpenOffice.
Where can I get the Tunga, Lohit Kannada and other UNICODE fonts?
Lohit Kannada is available on Lohit Kannada. Tunga is part of Windows operating system. Information on downloading UNICODE fonts is availabile on the Public Software website.
My Kannada documents do not open with the Kannada script. What do I do?
- To open documents typed with Nudi or Baraha fonts, those fonts must be installed on your computer. If you don't have the required Nudi fonts, download them from here. Follow the steps below to install the downloaded fonts on your system.
- Click Alt + F2 and type sudo nautilus and select Run in terminal. A terminal window will open prompting for the password. Please enter the password and press enter.
- A file browser will open. On the side pane (if no side pane is visible, press F9), double click File System, then double click on the usr folder, then on the share folder and then on the fonts folder. Now the location bar would show /usr/share/fonts.
- Paste the copied fonts in the fonts folder.
- Fonts will now be installed on Ubuntu.
How do I install fonts on Ubuntu?
Once you download the font, double-click on it. In the right down corner there is an "Install" button just click it and your font is installed.
How do I download and instal Unicode fonts on Ubuntu and Windows?
Red Hat has released five Indian language fonts as open source licensed under the GPL. The fonts are named Lohit which means Red in Sanskrit. Currently, the font family supports 16 Indian languages: Assamese, Bengali, Gujarati, Hindi, Kannada, Kashmiri, Konkani, Maithili, Malayalam, Marathi, Nepali, Oriya, Punjabi, Sindhi, Tamil, and Telugu. Now, Fedora Project and its contributors took the responsibility to consolidate the further efforts and improvements of the Lohit fonts. Lohit Fonts are Unicode compatible.
- Steps to install Lohit Kannada or any other fonts on Ubuntu:
- Click on Applications -> Accesories -> Terminal
- At the $ sign, please type $sudo apt-get install ttf-kannada-fonts
- Enter your password when prompted (you'll have to key in your password, it will not be visible at all).
- OR
- Click on Applications -> Accesories -> Terminal
- Type sudo nautilus then it will ask your login password, type and press Enter key.
- Copy your downloaded fonts then Goto File System -> usr -> share -> fonts folder -> copy your downloaded fonts into this folder
- Once you done with this process, if you want to working on new installed fonts. Please restart your machine.
- To download the font, copy the the given link in your bowser--> thatskannada.oneindia.in/common/Lohit-Kannada.ttf
- Click Start, and then click Run.
- Type the following command, and then click OK: %windir%\fonts.
- On the File menu, click Install New Font.In the Drives box, click the drive that contains the font that you want to add. Note The floppy disk drive is typically drive A or drive B. The CD drive is typically drive D.
- In the Folders box, click the folder that contains the font that you want to add, and then click OK.
- In the List of Fonts box, click the font that you want to add. To select more than one font at a time, press and hold the CTRL key while you select each font.
- Click to select the Copy Fonts To Fonts Folder check box. The new font is saved in the Windows\Fonts folder.
- Click Ok
- If finding difficulty in the above steps just follow the single steps for installing a specific fonts in both Ubuntu and Windows
- Download the new fonts from the Internet -> double click on the downloaded font file -> Then click on the Install font -> restart your computer.
- Click on System → Administration → Synaptic Package Manager Note: You must have Internet connection
- Enter the password and click OK, when asked for.
- Click on the Reload button.
- Once the packages are downloaded, type scim in the quick search bar.
- Now, click on the square boxes and mark for installation the following packages:
- scim
- scim-bridge-agent
- scim-bridge-client-gtk
- scim-bridge-client-qt4
- scim-m17n
- scim-modules-table
- Click on Apply.
- Restart computer once done.
How do I setup Kannada language on OpenOffice.org, Ubuntu and Windows?
- Open OpenOffice.org Word processor by clicking on Application → Office → OpenOffice.org Word Processor.
- Click on Tools → Options → Language Settings → Languages.
- Check Enabled for Complex Text Layout(CTL) and Choose Kannada in Default languages for Documents (CTL).
- Click on OK.
Also,
- Click on System → Administration → Language Support.
- Choose scim-immodule in the input method box.
- Log off and login again to see the effects.
Can I convert word documents with nudi non-unicode fonts to a document with unicode fonts?
- Download the 'converter' document (Nudi Conversions.dot) to your computer (This converter will run on a Microsoft Word document in Microsoft Windows. So users should do conversion on Windows platform using Microsoft Word since this is a Microsoft Word template document. After conversion the document can be edited/used in OpenOffice (Windows/Ubuntu)).
- Open this document
- Open your document which has non unicode font
- Select all text from your document, copy and paste to the converter document
- Click the button 'nudi converter' on the converter document
- Select the required option for UNICODE conversion and click on select button
- Save the file as the new file with UNICODE font and make changes for re-use
- Please read this new document carefully to ensure the changes are OK
For NEW documents, please use UNICODE font only - Lohit Kannada, Gubbi, Navilu, Janakannada, Tunga or ArialMSUnicode. Government of Karnataka has also released UNICODE fonts for Kannada.
DEVICE AND NETWORK SETUPS ON UBUNTU
How do I setup my printer on Ubuntu?
-
Before you begin the installation steps below, connect your printer/s. You need to do this prior to turning your system on. This helps to ensure Ubuntu recognizes how the printer is connected to the system, and it allows Ubuntu to identify the specific printer port.
- Starting Ubuntu’s printer tool --- From your Ubuntu main menu, select System, then choose Administration. Under the Administration menu, you will find an icon labeled Printing. Select this tool and within several seconds the Printer Configuration Tool will open.
- Configuring a printer connection --- Now, double click on the New Printer icon. This will bring up the Add a Printer wizard.
- Choosing a printer driver --- Your printer has been detected. Select your printer from the list and click the Forward button to complete the process.
- Testing the printer --- Highlight your new printer icon and press the right mouse button. Now choose the Properties option. This takes you to your specific printer’s properties control. The properties control allows you to not only print a test page, but also to make changes to your printer paper, resolution, color options and ink usage. Your printer is now ready to use.
How to set up Hp printers through hplip?
- Download hplip from here
- Open a terminal(applications>> accessories>> terminal)
- Type sh hplip-3.14.6.run command/copy+paste in terminal press Enter
- If it asks for a password, please enter your Ubuntu login password
- then follow as it shows.
- Once it complete all the steps, follow the general printer setup steps.
How do I connect to a wireless network on Ubuntu?
-
To connect to a wireless network:
- Ensure that your wireless device is turned on.
- Click the Network Manager icon in the system notification area. If you are connecting to a network for the first time, security details may be needed. If so, a dialog box will open. Enter your security details as follows:
- In most cases the security type will be detected automatically. If not, select the security type from the Wireless Security drop-down box. This will depend on how the wireless network is set up. Examples of security types are WEP, WPA and LEAP.
- Enter the password, key or other authentication details as appropriate. These are usually case-sensitive. If you don't know your wireless key, it may be printed on the bottom of your wireless router.
- Click Connect. If you are prompted again for your security details, you may have entered them incorrectly, or there could be a problem with your wireless setup.
How do I connect to a wired (LAN) network on Ubuntu?
-
You will be connected to a wired network automatically when you plug in the network cable.
Manually entering your network settings
- Right click the Network Manager icon in the system notification area and click Edit Connections.
- Click the Wired tab, select the connection and click Edit.
- Click the IPv4 Settings tab and choose Manual from the Method drop down list.
- Click Add and enter your IP address and other details. Enter the address of your DNS server too.
- Click Apply. The network should now connect if you entered the settings correctly.
How to setup MTS Data card on UBUNTU 12.04
Follow the steps to configure the data card on UBUNTU 12.04
- 1.Insert the MTS data card. Wait till the system detects the data card.
- 2. Once detects, right click on the Network Icon placed at the top panel on the right hand side of the screen. Select Edit connections.
- 3.It opens up the “NETWORK CONNECTIONS” window, click on “MOBILE BROADBAND” tab
- 4.click on “ADD” button. It opens up the “NEW MOBILE BROAD BAND CONNECTION” window click on “CONTINUE” button
- 5.Select INDIA from the country or region list and then click on “CONTINUE”.
- 6.Select on Service provider name as “MTS” and then click on “CONTINUE”
- 7.Here default plan is automatically selected, hence just click on “CONTINUE” button.
- 8.In this step, type the user name: internet@internet.mtsindia.in and password: MTS (caps on). On the screen, the password will appear as stars (***), then click on Apply
- Back to Top
Samsung/iPhone net connection
Note: We have required the following things to connect a Internet through Android/iPhones:
a. Activate GPRS in the connecting Phones.
b. Ubuntu installed Computer with wireless card.
In Mobile Phone 1. Go to Mobile settings ----> Wireless and Networks -----> Tethering and portable hotspot -----> Check the portable Wifi-hot spot ---> go to portable wi-fi hot spot settings ----> select Configure portable wifi hotspot----> note down the password by checking show password below or you can change the default password also.
In computer 2. In top pannel left click on Network icon(Rightside of the top pannel) Select the Network name starting with the Androd select it will ask you for the password, which you noted above noted password type and click on Connect. Now it will try to connect your mobile internet. - Back to Top
How to make multiple Ubuntu copies Using K3B
Please follow the steps to make multiple Ubuntu dvd'S
- 1. Insert the ubuntu DVD into the dvd drive(see to it dvd drive should work properly).
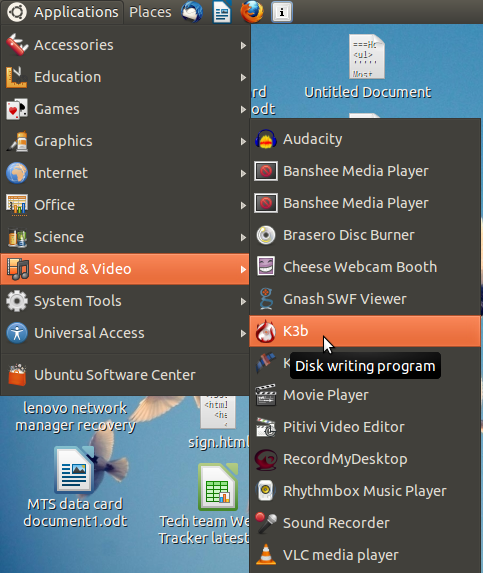
- 2. Go to applications----->sound and videos------>K3B(close window did you know?)
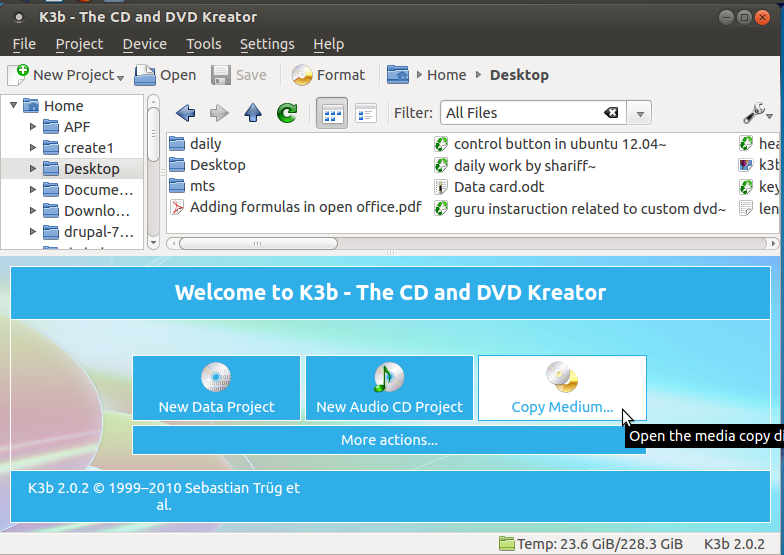
- 3. click on make copy medium.
- 4. Mention the number of DVD's you want to prepare, In copy menu. Click on start.
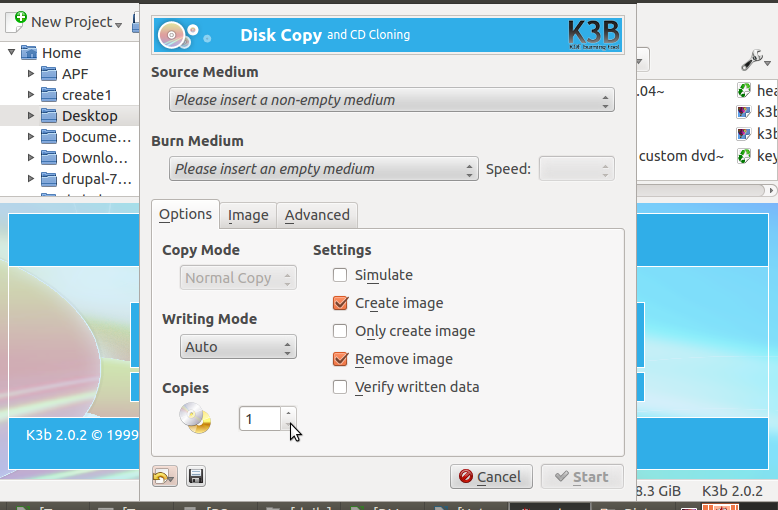
- 5.Once copy is done the inserted DVD comes out, Insert Empty dvd's into DVD drive, have mention in number of copies one by one.
How to make a pen drive bootable
-
Note: In order to make a pen drive bootable pen drive, one requires the following:
- a. Minimum pen drive capacity of 4 GB.
- b. ISO image of UBUNTU.
- c. Once booted, make sure that no new data is saved.
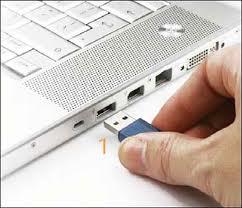
- 1. Insert the pen drive into the USB port of your computer as shown below.
- 2. Go to Applications---->system tools---->Administration---->startup Disk creator,as shown
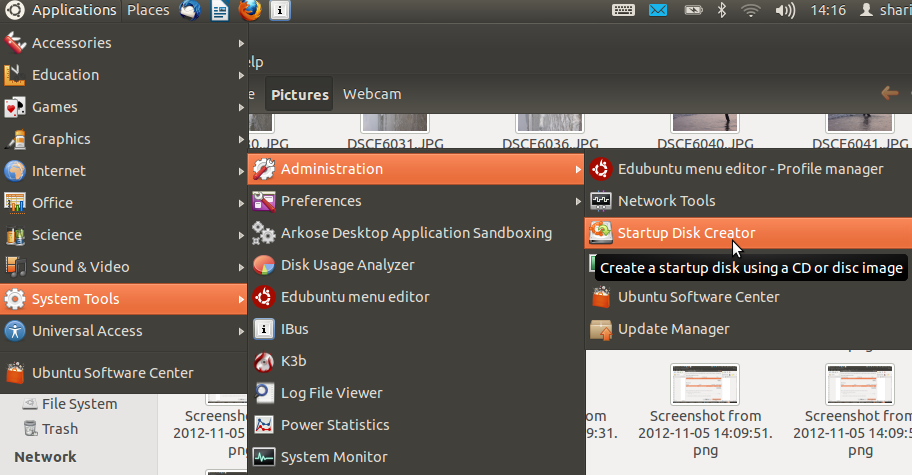
- 3. Once system detects pen drive, click on other. Show the path where you stored the ISO UBUNTU image file.
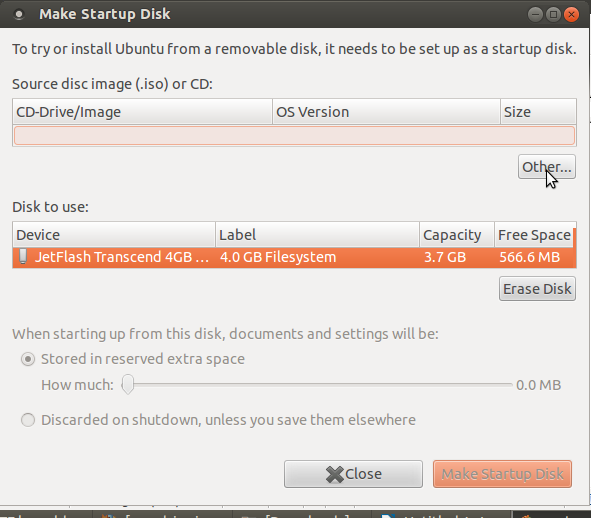
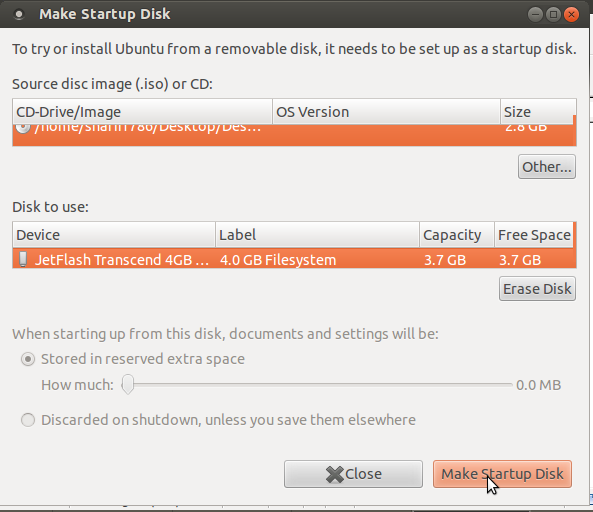
- 4. Click on Make Startup Disk, as shown in the image below.
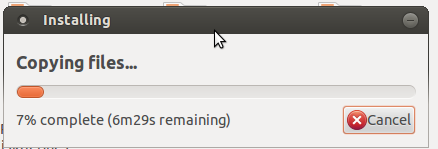
- 5. After clicking, the 'installing' process would begin. Once the installation is complete with the figure showing 100%, click on the quit option.
Your pen drive is ready for installing UBUNTU on your computer.
Back to TopHow do I connect to the Internet via a Wireless Data Card (Mobile Broadband)?
-
Mobile Broadband means any kind of high speed Internet connection which is provided by an external device such as a 3G USB stick or mobile phone with built-in HSPA/UMTS/GPRS data connection.
Most mobile broadband devices should be recognized automatically when you connect them to your computer. Ubuntu will prompt you to configure the device:
- The New Mobile Broadband Connection wizard will open automatically when you connect the device.
- Click Forward and insert your details, including the country where your Mobile Broadband device was issued, the network provider and type of connection.
- Give your connection a name (it is up to you what name you choose) and click Apply.
- Your connection is now ready to use. To connect, click the Network Manager icon in the top right of the panel and select your new connection.
- To disconnect, left click the Network Manager icon in the top right of the panel and click Disconnect.
-
If you are not prompted to configure the device when you connect it, it may still be recognized by Ubuntu. In such cases you can add the connection manually:
- Right-click the Network Manager icon in the system notification area and click Edit Connections.
- Select the Mobile Broadband tab.
- Click Add.
- This should open the New Mobile Broadband Connection wizard. Enter your details as described above.
OR
Most of the data cards available in the market are designed to work on windows and mac computers. Few have drivers (software) to work on GNU/Linux too! However for the data cards that do not have GNU/Linux drivers, here is the most generic and simple solution..
1. Connect the data card to the USB port.
2. Open the 'Terminal' (Application → Accessories → Terminal)
3. Two additional software are required for this activity. So use internet (may be wifi or cable) to download these software packages. In the terminal window, at the $ sign, type sudo apt-get install wvdial and when prompted for a password, type in your login password (you will not see a thing on the screen, don't worry just key in your password)
4. The next software package that we have to install is call usb-modeswitch. This package is very important because most of the datacards when plugged in acts like storage devices and not datacards and this package switches the devices' mode from storage device to a datacard. You can download this package from http://www.draisberghof.de/usb_modeswitch/usb-modeswitch-1.2.0.tar.bz2 and you'll need another file which can be downloaded from here http://www.draisberghof.de/usb_modeswitch/usb-modeswitch-data-20111023.tar.bz2. A supporting package called libusb is required too. This can be downloaded by typing sudo apt-get install libusb at the $ symbol in the terminal.
5. The two files downloaded needs to be unzipped (uncompressed). If you are not sure of where the files are, check your Downloads folder under the home folder. Right-click on the downloaded files and select extract here. Once this is done, go back to the terminal and type the following commands
cd ~/Downloads/usb-modeswitch-1.2.0
sudo make install (you'll have to enter your login password after this)
cd ~/Downloads/usb-modeswitch-data-20111023
sudo make install
sudo apt-get install libusb-dev
6. Now we need to configure wvdial. In the terminal at the $ symbol type sudo gedit /etc/wvdial.conf. This will open a text editor which might have some text in it. Replace the text with the following[Dialer Defaults]
Init1 = ATZ
Init2 = ATQ0 V1 E1 S0=0 &C1 &D2 +FCLASS=0
Modem Type = Analog Modem
Baud = 9600
New PPPD = yes
Modem = /dev/ttyUSB0
ISDN = 0
Username = <type your reliance number here> or internet (if it is a tata photon datacard)
Password = <type your reliance number here> or internet (if it is a tata photon datacard)
Phone = #777
Stupid Mode = 1
7. Once this is done, at the $ type sudo wvdial to connect to the internet
–> WvDial: Internet dialer version 1.60
–> Cannot get information for serial port.
–> Initializing modem.
–> Sending: ATZ
ATZ
OK
–> Sending: ATQ0 V1 E1 S0=0 &C1 &D2 +FCLASS=0
ATQ0 V1 E1 S0=0 &C1 &D2 +FCLASS=0
OK
–> Modem initialized.
–> Sending: ATDT#777
–> Waiting for carrier.
ATDT#777
CONNECT
–> Carrier detected. Starting PPP immediately.
–> Starting pppd at Thu Nov 5 15:45:26 2009
–> Pid of pppd: 3205
–> Using interface ppp0
–> pppd: 0$P
–> pppd: 0$P
–> pppd: 0$P
–> pppd: 0$P
–> pppd: 0$P
–> local IP address 115.184.194.33
–> pppd: 0$P
–> remote IP address 220.224.141.145
–> pppd: 0$P
–> primary DNS address 202.138.103.100
–> pppd: 0$P
–> secondary DNS address 202.138.96.2
–> pppd: 0$P
You are now connected to the internet
8. You can start browsing now and remember not to close the terminal window. To disconnect you'll have to press Ctrl C. Back to Top
FREE AND OPEN SOURCE SOFTWARE (FOSS)
What is FOSS?
Free and open-source software (FOSS) or free/libre/open-source software (FLOSS) is software that is liberally licensed to grant the right of users to use, study, change, and improve its design through the availability of its source code.
Can FOSS be downloaded and installed on Windows?
Yes. There are public software alternatives to proprietary softwares. These softwares can be downloaded and installed on Ubuntu (Linux) as well as Windows. To see a list of these public software alternatives, click here.
How can I download FOSS for Windows?
To download FOSS for your Microsoft Windows Operating System, the links are as follows:
Ubuntu GNU- Linux (Operating System)
To download: http://www.ubuntu.com/getubuntu/download
LibreOffice.org
To download: https://www.libreoffice.org/download
Mozilla Thunderbird (E- Mail Client)
To download: http://www.mozillamessaging.com/en-US/thunderbird/
Mozilla Firefox (Web Browser)
To download: http://www.mozilla.com/en-US/
7-zip, Peapod (Archiving)
To download: http://www.7-zip.org/download.html
VLC Player, MPlayer (Media)
To download: http://www.videolan.org/
GIMP (Graphics)
To download: http://www.gimp.org/downloads/
PDF-edit (PDF Editor)
To download: http://pdfedit.petricek.net/en/download.html
Inkscape (Vector Graphics Editor)
To download: http://inkscape.org/download/?lang=en
Audacity (Digital Audio Editor)
To download: http://audacity.sourceforge.net/download/linux
How do I install OpenOffice on Windows?
To install LibreOffice on Windows, click here, and follow the steps.
How to make OpenOffice as the default program to open Microsoft Office files on Windows?
To know how to set LibreOffice as the default program for MS Office files on Windows, click here.
How do I install Lightning extension for Thunderbird?
Lightening extension allows quick display of current tasks. Task preview pane displaying task parameters like the description, from date, due date, category, etc and calender showing events.- Download extension for lightening from this link: https://addons.mozilla.org/en-US/thunderbird/addon/2313
- Open Mozilla Thunderbird, from Tools menu select Add-ons.
- Click the Install button, and locate/select the file you saved on desktop (lightning-0.9-tb-win.xpi) and click OK.
How do I use Nudi and Baraha on LibreOffice for Windows?
Nudi:
- Start Nudi direct (Assuming Nudi is installed, if not, please download from the website www.kagapa.org)
- Right click on the icon on the system tray and choose Nudi Unicode.
- Choose Unicode fonts like Kedage, Mallige, Tunga in the OpenOffice.org writer fonts.
Baraha
- Start Baraha direct. (If you do not have Baraha, please download from the website [www.Baraha.com])
- Right click on the Baraha icon on the system tray and choose Languages -> Kannada -> Unicode or Languages -> KGP Keyboard Layout -> Unicode.
- Choose Unicode fonts like Kedage, Mallige, Tunga in the OpenOffice.org writer fonts.
How do I change the page setup in LibreOffice?
- To change your page settings in LibreOffice, select Format >> Page from the menu bar.
- The dialogue box opens which allows you to change the various parameters of the page.
- Click here to view the screenshot of the Format Page option.
How do I change the page orientation in LibreOffice (to Potrait, Landscape etc.)?
- To change your page orientation, right click on the Default option at the bottom the page and select the appropriate option.
- Click here to view the screenshot of the Page Orientation option.
BLOGS & OTHERS
How can I create a blog account and write blogs in karnatakaeducation.org.in?
- In the address bar of a web browser, please type http://karnatakaeducation.org.in and enter the site.
- In the home page, at the bottom left corner, you'll see a user login block.
- In this block, click on the create new account link.
- Fill up the form
- Choose a user name for your self. Spaces are allowed; punctuation is not allowed except for periods, hyphens, and underscores.
- Enter a valid email ID
- Click on the Create new account button
- You'll see a message like this “Thank you for applying for an account. Your account is currently pending approval by the site administrator.In the meantime, a welcome message with further instructions has been sent to your e-mail address.”.
- Please check your email and you'll have a mail with the subject line “Account details for <user> at Karnataka education (pending admin approval)”.
- You'll receive another mail after the approval with a subject line “Account details for <user> at Karnataka Education (approved)”. Please click on the link in the mail or copying and pasting it in your browser. You can use this link to login in only once. After you login you'll go to a page where you can change your password. Once you have set your own password, you will be able to log in to http://karnatakaeducation.org.in/?q=user in the future using: <your chosen username>.
- In the Main Menu, click on create content → blog and you can write your own blog.
What is Way2SMS? Can I send SMS and E-Mails via Way2SMS?
Way2SMS is a service that offers SMS communication totally cost free to mobile users. Mobile users can register at absolutely no cost with Way2SMS.com, and receivers of the messages need not be registered Way2SMS users. To create an account at Way2SMS.com, click here.
How do I increase the screen brightness on my Samsung N148 Plus Netbook?
- Go to Applications --> Accessories --> Terminal.
- After the $ prompt, copy and paste the following command: sudo setpci -s 00:02.0 f4.b=ff
- Press Enter. It may prompt you for the password. Type your password and press Enter.
- The value ff increases your screen brightness to the maximum.
To increase the screen brightness on your Samsung N148 Plus Netbook, do the following:
- 42, 56, 70, 92, AF, CC, E5, FF
- 30, 40, 50, 60, 70, 80, 90, 100
Note:One of the following possible values can be entered instead of ff to adjust your screen to a medium brightness to save battery.
How can I download and save any Youtube video on my computer?
- First copy the youtube video link (while it is open) from the address bar of your internet browser.
- In a new tab or a window, go to www.keepvid.com
- In the URL box, paste the video link (which you copied) and click Download
- This will show the various video formats that you can download for that video.
- You can click on any format and download/save the video on your hard disk.
To download and save any YouTube video on your hard disk , yo can do the following --
How to install, setup and start using Skype on Ubuntu 10.04?
This page has the required information to install, setup and use skype on Ubuntu 10.04
DESKTOP PUBLISHING
How to use MS Publisher (.pub) files on GNU/Linux?
Microsoft Publisher (.pub) files do not work on GNU/Linux systems. Zamzar is a free online conversion service, which lets you convert your files online to any desired format (images, documents, audio, video, e-books, compression too). You can select files (upto 100mb in size) at a time for conversion. Once you select the file to be converted and the output format, you will be sent a link to your e-mail(which you provide during the conversion process), to download the converted file. One can upload the .pub files and it will convert the .pub file into OpenOffice.org's (or any other) format so that it can be used on GNU/Linux.
GIMP and INKSCAPE Manual
Download the manual here
EDUCATIONAL TOOLS
view .ggb Geogebra files on latest android tablets/smartphones and phablets
Visit Play store application: https://play.google.com/store/apps/details?id=org.geogebra OR (If 'play store' app does not allow you to do it,)
Download from Google Drive: https://drive.google.com/file/d/0B5VjEPbF04AVckVobVE5RFMtRWM/edit?usp=sharing
Then install the file. You need to allow external sources to install apk files in android. It is mostly known feature.[Go to Settings, Security ->, External Sources. Tick the option and open the file again to install. After installing, disable 'external sources' again if you like to.]
After installing, you will be able to open Geogebra files on your tablet. It will work on latest android tablets with enough RAM and processor power. If it does not work for you, then your phone may be incapable of handling it. - Johnson Dcunha, Naravi High School. http://johnson.net.in/
On Tuesday, 18 March 2014 20:21:02 UTC+5:30, Radha Narve,GHS Begur wrote: I have downloaded Geogebra Beta 5 on my laptop which is very good to show 3d objects.I am sending a video in which i have demonstrated a moving cylinder.Because you can not view this in your geogebra application which you are using now.In this video I have not used the voice because of problem in my head phone.For downloading Geogebra Beta 5 use this link http://download.geogebra.org/installers/5.0/?C=M;O=D
How can I install KTechLab?
The customised DVD that you receive during your training sessions has KTechLab pre-installed. A shortcut to KTechLab can be created as follows
- On the desktop right-click and select create launcher.
- In the box that pops up, please enter the name as KTechlab and command as 'ktechlab' (command is case sensitive) and click on OK.
- The Ktechlab icon will appear on desktop. Double click on the icon to start KTechlab.
How to install Openshot video editor in Ubuntu
(Note:-To install openshot video editor It required Internet)
Openshot video editor can be installed in two types
Type1:
You can install Openshot video editor by Ubuntu software centre by following the below mentioned stepsStep1:-Go to Applications--->Ubuntu software centre---->In search box type Openshot video editor click on install and provide the password after complete installation you can use the Openshot video editor.
Type2:
You can install Openshot video editor by command mode. by following the below mentioned steps.
Step1:Go to Applications--->Accessories---->Terminal----->Type the following commands one by one without mistake
sudo add-apt-repository ppa:openshot.developers/ppa Press Enter and provide the passworrd Press Enter
sudo apt-get update Press Enter
sudo apt-get install openshot Press Enter
After executing the above mentioned command Openshot videos editor will be available to use Openshot video editor. to Use Openshot video editor Goto Applications---->Sound & video---->Openshot video editor.
How to install PhET in Ubuntu?
The customised DVD that you receive during your training sessions has PhET pre-installed on it. A shortcut or a launcher to PhET can be created as follows:
- 1.Right click on Desktop select Creat launcer
- 2.Type as mentioned below without any mistake.
- Name:PhET
- Command:firefox /opt/PhET/index.html
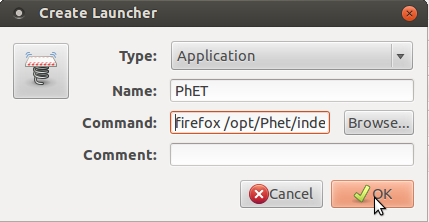
- 3.Click on OK and close all tabs
- 4.PhET will appears on Desktop,Just double click on PhET Icon it opens up.
Back to top
How to reset the Ubuntu Username password
- Boot in a recover mode.
- Now select "root - Drop to root shell prompt" and press "Ok"
- Now in front of # symbol type ls /home
- Type following command :mount -rw -o remount /
- Then, enter the following command to reset your password:passwd <username>
- It will ask for new password (2 times) type and press Enter key.
- reboot the machine using below command : sudo reboot
- Now try to login with using a new password.
How to open .jar files in Ubuntu
- Right click on .jar file and goto properties
- Then goto permissions tab right check on Execute: Allow executing file as program then click on close.
- Again click on .jar files open with open with open JDK java 7.
About Hardware
How to increase battery life in your computer?
- Turn off Wi-Fi and BlueTooth - Most laptops have shortcut keys to instantly disable wireless networking.
- Don't play computer games, music or DVD movies - Multimedia activities drain laptop batteries.
- Adjust your screen brightness - Dimming your display saves battery power.
- Decrease or mute the Laptop Speaker Volume.
- Turn off Auto-save features in Office and other applications.
- If your PC has a built-in wireless card, turn it off or disable it when not in use.
- Programs that are run from a CD or DVD can be copied to and run from the hard drive, which typically consumes less power than an optical drive.
- If you do not use your laptop for extended periods of time (a week or more), remove the battery pack from the laptop.
- Do not expose the battery to high heat or freezing temperatures. Do not leave your battery in your car in the summer. Hot batteries discharge very quickly, and cold ones can't create as much power.
- Make sure to plug your laptop charger adapter into a UPS and not directly into a power outlet or surge protector.
- If you have a nickel-metal hydride battery, completely drain and recharge the battery once a month to maximize its capacity to hold a charge.
- Fully charge new battery packs before use. New pack needs to be fully charged and discharged (cycled) a few times before it can condition to full capacity.Leaving a battery in a laptop while using an electrical outlet for long periods of time will keep the battery in a constant state of charging up and that will reduce the life cycle of the battery.
canon
Digital Mapping
=How to use android phone to collect mapping points
- Steps to install Lohit Kannada or any other fonts on Windows:
- OR
-
Back to Top
How do I install scim on Ubuntu?
Installing and Configuring SCIM:

Why is GNU/Linux not as popular as Windows though it has so many advantages and benefits
It is known that technology particularly software has an element of addiction and people are unwilling to move to a 'new' environment requiring learning (also Newtons first law :-) ). this also adds to the 'lock-in' of the software. in an environment where proprietary software is pirated, it is already free (mufta) so no immediate economic benefit is seen in adopting public software.
The challenge is to explain to people that this is not about mufta but about mukta - that the learning resources we use (software is a digital tlm) must be publicly owned so that we all have the freedom to share and modify. If a private company owns them then our learning process is under the control of the vendor who can decide the access to the software. Hence this is a philosophical and ethical issue (rather than purely technological or economic) and like any other social change process (like fighting alcoholism for eg - the benefits of avoiding alcohol is known still it is not easy to give it up), change will be slow and gradual.
Also there are strong forces to keep us chained to proprietary software - hardware vendors who get commission on sale of the proprietary software (no commission on public software!!), proprietary software vendors who adopt unethical and illegal practices to push their products. and the willingness of many of us to stay ignorant :-) and avoid this debate/discussion on the ethics of using proprietary software on grounds of "convenience"
Gnu/linux is public software, intended for public use in all areas (not just education). it is our collective responsibility (all of us in society need to come together to insist that we will only use digital resources that are not proprietary), proprietising (privatising) digital resources and preventing their free sharing (which is so simple - copy/paste) is unethical and greatly harmful to society.
But there are many positive examples - in many countries (and states in India like Kerala), once many people start using GNU/Linux, it spreads fast. Specially if teachers use it, they can explain the benefits to students. So let us keep talking about the importance of software freedom, of the need for public software (like public education) for universal access... and supporting people to adopt it.. our efforts will surely give the result--
[LibreOffice FAQ]
MOZILLA THUNDERBIRD ON UBUNTU
What is Thunderbird
Thunderbird is a free, open-source Mail Client application for managing email. It is a local (rather than a web-based) email application that is powerful yet easy-to-use. Thunderbird is free. Also, it gives you control and ownership over your e-mail.
What is the benefit of using Thunderbird
If you have your own computer - desktop or Laptop, then you MUST configure Thunderbird on your computer. It is easy to configure Thunderbird. Thunderbird is part of Ubuntu custom distribution. You can click on the APPLICATIONS - INTERNET - THUNDERBIRD TO install it and use it.
How can I configure or add my GMail account on Thunderbird?
- To add an account in Thunderbird, you need to have a GMail account. You can add your account in Thunderbird by going to Edit > Account Settings > Account Actions > Add Mail Account. You need to know your email ID and password to configure this account on Thunderbird. By default, it uses the IMAP account, but you can direct it to use the POP account, by selecting the option. After you enable the POP/IMAP account in Thunderbird, enable the server with your account by:
LANGUAGE SETTINGS (KANNADA) ON UBUNTU
Can I type in Kannada in OpenOffice or libreoffice?
Yes. On Windows, OpenOffice Kannada typing using Nudi works exactly in the same manner. After installing OpenOffice, a one-time configuration for Kannada typing is required. The Kannada and Public Software document has the information for such configurations and also on typing in Kannada information in general. One requirement is to use UNICODE fonts, which is the universal standard for all languages.
how to type knnada in freemind
How to download the youtube videos in ubuntu using firefox
Please follow the below mentioned steps
- 1.open the firefox for opening, Applications----->Internet------>Firefox Web Browser

Follow the steps to connect the projector


