Difference between revisions of "Frequently Asked Questions"
| Line 578: | Line 578: | ||
==Hardware== | ==Hardware== | ||
| − | === | + | ===Basic troubleshooting In school computer LAB=== |
'''* The Computer Won’t Start''' | '''* The Computer Won’t Start''' | ||
Revision as of 06:31, 20 October 2014
ABOUT UBUNTU
For doubts on Ubuntu and other public software, Click here
LIBRE OFFICE
For doubts on LibreOffice and Open Office, Click here
MOZILLA THUNDERBIRD IN UBUNTU
For doubts on Thunderbird mail, [[Mozilla_Thunderbird_FAQ Click here]
LANGUAGE SETTINGS (KANNADA) ON UBUNTU
how to type knnada in freemind
- Open Freemind Ubuntu Menu Applications > Office > Freemind
- Click on Menu Item File > New (CTRL N)
- Click Menu Item Tools > Preferences, a window like the example below appears
- Select Defaults Tab
- In Default Font type in Lohit Kannada
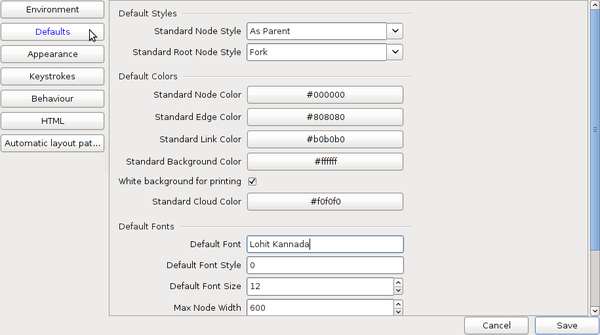
- Click Save, the window below appears, click ok.

- Close and restart Freemind Application
- To type in Kannada
- Open Open Office Writer
- Type the words in Kannada using iBUS
- Copy and paste to Freemind.
How to install multiple fonts on Ubuntu ?
Follow the below steps to install multiple fonts on ubuntu.
- Click Alt + F2 keys and type sudo nautilus and select Run in terminal.
- Terminal window will open and it will ask your ubuntu password, Please enter the password and press Enter key(password will not display in the terminal window).
- Now home folder window will open, on the left side pane (if no side pane is visible, press F9).
- Go to downloaded fonts folder and copy all the fonts.
- Now click on File System or Computer==>click on usr folder ==>share==> fonts folder.
- Paste all the copied fonts in the fonts folder.
- Close all the window and restart the computer.
that's it. Back to Top
How to install single font on Ubuntu or Windows?
- Its very easy to install particular fonts in ubuntu.
- First download required font from the internet(most of the fonts formate .ttf).
- Once font downloaded, just double-click on it and click on install font and if its shows as installed that’s it.
For Lohit Kannada font click here.
How to convert non-unicode fonts document to unicode font ?
Note: A tool to convert Kannada text written using ASCII format like Nudi/Baraha to Unicode.Online version is available here. Source code is released under GPL license and developed by Aravind VK.
DEVICE AND NETWORK SETUPS ON UBUNTU
How do I setup Thin client in Phase-1 and phase-2 schools
Note:below mentioned setup is only for the server
1.Go to the right top panel, Left click on network icon, select the Edit connection.

2.Click on the Wired tab. and there click on Edit button.
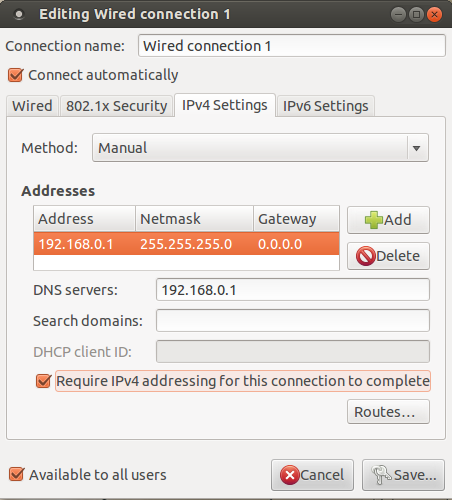
- a window opens, select IP4 settings and click on it. In methods, select manual. Now you can enter the address click on the address box below and press add and enter the information as mentioned below.
- IP address - 192.168.0.1
- Netmask - click on it and press add and enter 255.255.255.0
- gateway - click on it and press add and enter 0.0.0.0(if it is there initially no need to enter)
- DNS Servers - enter the IP address 192.168.0.1
- now check mark the box below : require IP4 addressing for this connection to complete.
- now check mark the box at the bottom : Available to all users click save
How to set up Hp printers through hplip?
- Download hplip from here
- Open a terminal(applications>> accessories>> terminal)
- Type sh hplip-3.14.6.run command/copy+paste in terminal press Enter
- If it asks for a password, please enter your Ubuntu login password
- then follow as it shows.
- Once it complete all the steps, follow the general printer setup steps.
How do I connect to a wireless network on Ubuntu?
-
To connect to a wireless network:
- Ensure that your wireless device is turned on.
- Click the Network Manager icon in the system notification area. If you are connecting to a network for the first time, security details may be needed. If so, a dialog box will open. Enter your security details as follows:
- In most cases the security type will be detected automatically. If not, select the security type from the Wireless Security drop-down box. This will depend on how the wireless network is set up. Examples of security types are WEP, WPA and LEAP.
- Enter the password, key or other authentication details as appropriate. These are usually case-sensitive. If you don't know your wireless key, it may be printed on the bottom of your wireless router.
- Click Connect. If you are prompted again for your security details, you may have entered them incorrectly, or there could be a problem with your wireless setup.
How do I connect to a wired (LAN) network on Ubuntu?
-
You will be connected to a wired network automatically when you plug in the network cable.
Manually entering your network settings
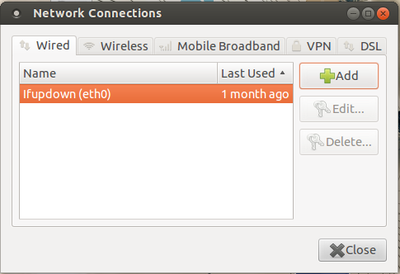
- Right click the Network Manager icon in the system notification area and click Edit Connections.
- Click the Wired tab, select the connection and click Edit.
- Click the IPv4 Settings tab and choose Manual from the Method drop down list.
- Click Add and enter your IP address and other details. Enter the address of your DNS server too.
- Click Apply. The network should now connect if you entered the settings correctly.
How to setup MTS Data card on UBUNTU 12.04
Follow the steps to configure the data card on UBUNTU 12.04
- 1.Insert the MTS data card. Wait till the system detects the data card.
- 2. Once detects, right click on the Network Icon placed at the top panel on the right hand side of the screen. Select Edit connections.
- 3.It opens up the “NETWORK CONNECTIONS” window, click on “MOBILE BROADBAND” tab
- 4.click on “ADD” button. It opens up the “NEW MOBILE BROAD BAND CONNECTION” window click on “CONTINUE” button
- 5.Select INDIA from the country or region list and then click on “CONTINUE”.
- 6.Select on Service provider name as “MTS” and then click on “CONTINUE”
- 7.Here default plan is automatically selected, hence just click on “CONTINUE” button.
- 8.In this step, type the user name: internet@internet.mtsindia.in and password: MTS (caps on). On the screen, the password will appear as stars (***), then click on Apply
- Back to Top
Samsung/iPhone net connection
Note: We have required the following things to connect a Internet through Android/iPhones:
a. Activate GPRS in the connecting Phones.
b. Ubuntu installed Computer with wireless card.
In Mobile Phone 1. Go to Mobile settings ----> Wireless and Networks -----> Tethering and portable hotspot -----> Check the portable Wifi-hot spot ---> go to portable wi-fi hot spot settings ----> select Configure portable wifi hotspot----> note down the password by checking show password below or you can change the default password also.
In computer 2. In top pannel left click on Network icon(Rightside of the top pannel) Select the Network name starting with the Androd select it will ask you for the password, which you noted above noted password type and click on Connect. Now it will try to connect your mobile internet. - Back to Top
How to make multiple Ubuntu copies Using K3B
Please follow the steps to make multiple Ubuntu dvd'S
- 1. Insert the ubuntu DVD into the dvd drive(see to it dvd drive should work properly).
- 2. Go to applications----->sound and videos------>K3B(close window did you know?)
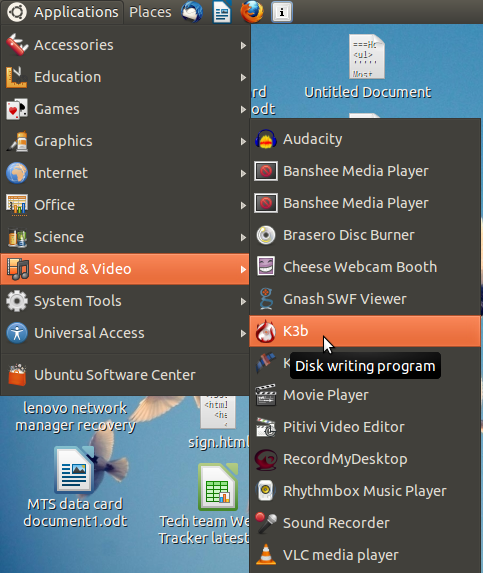
- 3. click on make copy medium.
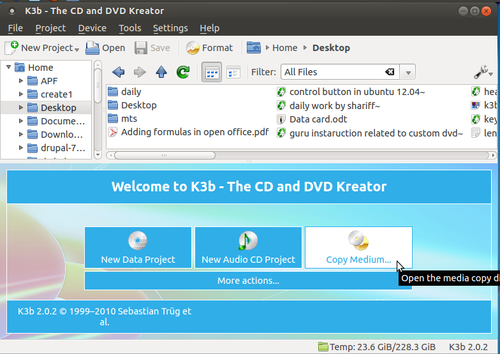
- 4. Mention the number of DVD's you want to prepare, In copy menu. Click on start.

- 5.Once copy is done the inserted DVD comes out, Insert Empty dvd's into DVD drive, have mention in number of copies one by one.
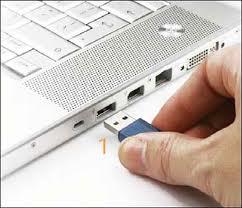
How to make a pen drive bootable
-
Note: In order to make a pen drive bootable pen drive, one requires the following:
- a. Minimum pen drive capacity of 4 GB.
- b. ISO image of UBUNTU.
- c. Once booted, make sure that no new data is saved.
- 1. Insert the pen drive into the USB port of your computer as shown below.
- 2. Go to Applications---->system tools---->Administration---->startup Disk creator,as shown
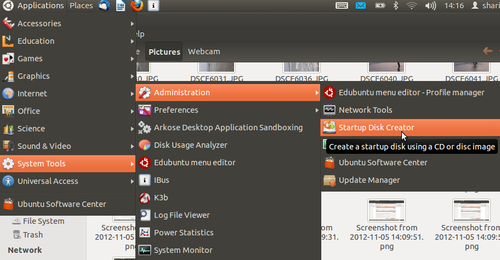
- 3. Once system detects pen drive, click on other. Show the path where you stored the ISO UBUNTU image file.
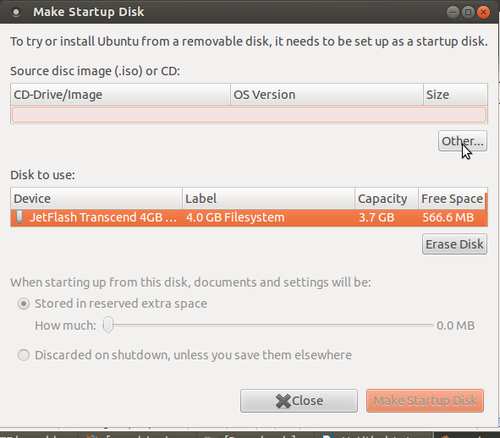
- 4. Click on Make Startup Disk, as shown in the image below.
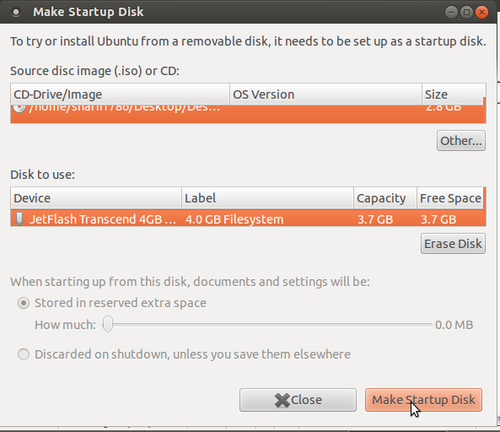
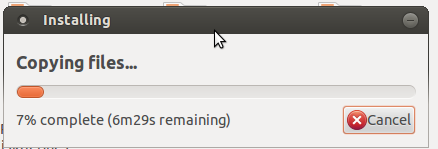
- 5. After clicking, the 'installing' process would begin. Once the installation is complete with the figure showing 100%, click on the quit option.
Your pen drive is ready for installing UBUNTU on your computer.
Back to TopHow do I connect to the Internet via a Wireless Data Card (Mobile Broadband)?
-
Mobile Broadband means any kind of high speed Internet connection which is provided by an external device such as a 3G USB stick or mobile phone with built-in HSPA/UMTS/GPRS data connection.
Most mobile broadband devices should be recognized automatically when you connect them to your computer. Ubuntu will prompt you to configure the device:
- The New Mobile Broadband Connection wizard will open automatically when you connect the device.
- Click Forward and insert your details, including the country where your Mobile Broadband device was issued, the network provider and type of connection.
- Give your connection a name (it is up to you what name you choose) and click Apply.
- Your connection is now ready to use. To connect, click the Network Manager icon in the top right of the panel and select your new connection.
- To disconnect, left click the Network Manager icon in the top right of the panel and click Disconnect.
-
If you are not prompted to configure the device when you connect it, it may still be recognized by Ubuntu. In such cases you can add the connection manually:
- Right-click the Network Manager icon in the system notification area and click Edit Connections.
- Select the Mobile Broadband tab.
- Click Add.
- This should open the New Mobile Broadband Connection wizard. Enter your details as described above.
OR
Most of the data cards available in the market are designed to work on windows and mac computers. Few have drivers (software) to work on GNU/Linux too! However for the data cards that do not have GNU/Linux drivers, here is the most generic and simple solution..
1. Connect the data card to the USB port.
2. Open the 'Terminal' (Application → Accessories → Terminal)
3. Two additional software are required for this activity. So use internet (may be wifi or cable) to download these software packages. In the terminal window, at the $ sign, type sudo apt-get install wvdial and when prompted for a password, type in your login password (you will not see a thing on the screen, don't worry just key in your password)
4. The next software package that we have to install is call usb-modeswitch. This package is very important because most of the datacards when plugged in acts like storage devices and not datacards and this package switches the devices' mode from storage device to a datacard. You can download this package from http://www.draisberghof.de/usb_modeswitch/usb-modeswitch-1.2.0.tar.bz2 and you'll need another file which can be downloaded from here http://www.draisberghof.de/usb_modeswitch/usb-modeswitch-data-20111023.tar.bz2. A supporting package called libusb is required too. This can be downloaded by typing sudo apt-get install libusb at the $ symbol in the terminal.
5. The two files downloaded needs to be unzipped (uncompressed). If you are not sure of where the files are, check your Downloads folder under the home folder. Right-click on the downloaded files and select extract here. Once this is done, go back to the terminal and type the following commands
cd ~/Downloads/usb-modeswitch-1.2.0
sudo make install (you'll have to enter your login password after this)
cd ~/Downloads/usb-modeswitch-data-20111023
sudo make install
sudo apt-get install libusb-dev
6. Now we need to configure wvdial. In the terminal at the $ symbol type sudo gedit /etc/wvdial.conf. This will open a text editor which might have some text in it. Replace the text with the following[Dialer Defaults]
Init1 = ATZ
Init2 = ATQ0 V1 E1 S0=0 &C1 &D2 +FCLASS=0
Modem Type = Analog Modem
Baud = 9600
New PPPD = yes
Modem = /dev/ttyUSB0
ISDN = 0
Username = <type your reliance number here> or internet (if it is a tata photon datacard)
Password = <type your reliance number here> or internet (if it is a tata photon datacard)
Phone = #777
Stupid Mode = 1
7. Once this is done, at the $ type sudo wvdial to connect to the internet
–> WvDial: Internet dialer version 1.60
–> Cannot get information for serial port.
–> Initializing modem.
–> Sending: ATZ
ATZ
OK
–> Sending: ATQ0 V1 E1 S0=0 &C1 &D2 +FCLASS=0
ATQ0 V1 E1 S0=0 &C1 &D2 +FCLASS=0
OK
–> Modem initialized.
–> Sending: ATDT#777
–> Waiting for carrier.
ATDT#777
CONNECT
–> Carrier detected. Starting PPP immediately.
–> Starting pppd at Thu Nov 5 15:45:26 2009
–> Pid of pppd: 3205
–> Using interface ppp0
–> pppd: 0$P
–> pppd: 0$P
–> pppd: 0$P
–> pppd: 0$P
–> pppd: 0$P
–> local IP address 115.184.194.33
–> pppd: 0$P
–> remote IP address 220.224.141.145
–> pppd: 0$P
–> primary DNS address 202.138.103.100
–> pppd: 0$P
–> secondary DNS address 202.138.96.2
–> pppd: 0$P
You are now connected to the internet
8. You can start browsing now and remember not to close the terminal window. To disconnect you'll have to press Ctrl C. Back to Top
FREE AND OPEN SOURCE SOFTWARE (FOSS)
What is FOSS?
Free and open-source software (FOSS) or free/libre/open-source software (FLOSS) is software that is liberally licensed to grant the right of users to use, study, change, and improve its design through the availability of its source code.
Can FOSS be downloaded and installed on Windows?
Yes. There are public software alternatives to proprietary softwares. These softwares can be downloaded and installed on Ubuntu (Linux) as well as Windows. To see a list of these public software alternatives, click here.
How can I download FOSS for Windows?
To download FOSS for your Microsoft Windows Operating System, the links are as follows:
Ubuntu GNU- Linux (Operating System)
To download: http://www.ubuntu.com/getubuntu/download
LibreOffice.org
To download: https://www.libreoffice.org/download
Mozilla Thunderbird (E- Mail Client)
To download: http://www.mozillamessaging.com/en-US/thunderbird/
Mozilla Firefox (Web Browser)
To download: http://www.mozilla.com/en-US/
7-zip, Peapod (Archiving)
To download: http://www.7-zip.org/download.html
VLC Player, MPlayer (Media)
To download: http://www.videolan.org/
GIMP (Graphics)
To download: http://www.gimp.org/downloads/
PDF-edit (PDF Editor)
To download: http://pdfedit.petricek.net/en/download.html
Inkscape (Vector Graphics Editor)
To download: http://inkscape.org/download/?lang=en
Audacity (Digital Audio Editor)
To download: http://audacity.sourceforge.net/download/linux
How do I install OpenOffice on Windows?
To install LibreOffice on Windows, click here, and follow the steps.
How to make OpenOffice as the default program to open Microsoft Office files on Windows?
To know how to set LibreOffice as the default program for MS Office files on Windows, click here.
How do I install Lightning extension for Thunderbird?
Lightening extension allows quick display of current tasks. Task preview pane displaying task parameters like the description, from date, due date, category, etc and calender showing events.- Download extension for lightening from this link: https://addons.mozilla.org/en-US/thunderbird/addon/2313
- Open Mozilla Thunderbird, from Tools menu select Add-ons.
- Click the Install button, and locate/select the file you saved on desktop (lightning-0.9-tb-win.xpi) and click OK.
How do I use Nudi and Baraha on LibreOffice for Windows?
Nudi:
- Start Nudi direct (Assuming Nudi is installed, if not, please download from the website www.kagapa.org)
- Right click on the icon on the system tray and choose Nudi Unicode.
- Choose Unicode fonts like Kedage, Mallige, Tunga in the OpenOffice.org writer fonts.
Baraha
- Start Baraha direct. (If you do not have Baraha, please download from the website [www.Baraha.com])
- Right click on the Baraha icon on the system tray and choose Languages -> Kannada -> Unicode or Languages -> KGP Keyboard Layout -> Unicode.
- Choose Unicode fonts like Kedage, Mallige, Tunga in the OpenOffice.org writer fonts.
How do I change the page setup in LibreOffice?
- To change your page settings in LibreOffice, select Format >> Page from the menu bar.
- The dialogue box opens which allows you to change the various parameters of the page.
- Click here to view the screenshot of the Format Page option.
How do I change the page orientation in LibreOffice (to Potrait, Landscape etc.)?
- To change your page orientation, right click on the Default option at the bottom the page and select the appropriate option.
- Click here to view the screenshot of the Page Orientation option.
VIDEO AND IMAGE EDITOR
How to install Openshot video editor in ubunutu
Please follow the steps to install open shot video editor.
(Note:-To install any software in ubuntu Internet is necessary)
1.Applications------>ubuntu software----->center
2.In search box type as openshot video editor
3.After searching the openshot video editor application in the list
4.Click on the install button at the right side, If you will not find the install button 'double click on the openshot video editor
5.It will ask you for the password, provide your system password click on authenticate.
6.After some time openshot video editor installation will completes.
BLOGS & OTHERS
How can I create a blog account and write blogs in karnatakaeducation.org.in?
- In the address bar of a web browser, please type http://karnatakaeducation.org.in and enter the site.
- In the home page, at the bottom left corner, you'll see a user login block.
- In this block, click on the create new account link.
- Fill up the form
- Choose a user name for your self. Spaces are allowed; punctuation is not allowed except for periods, hyphens, and underscores.
- Enter a valid email ID
- Click on the Create new account button
- You'll see a message like this “Thank you for applying for an account. Your account is currently pending approval by the site administrator.In the meantime, a welcome message with further instructions has been sent to your e-mail address.”.
- Please check your email and you'll have a mail with the subject line “Account details for <user> at Karnataka education (pending admin approval)”.
- You'll receive another mail after the approval with a subject line “Account details for <user> at Karnataka Education (approved)”. Please click on the link in the mail or copying and pasting it in your browser. You can use this link to login in only once. After you login you'll go to a page where you can change your password. Once you have set your own password, you will be able to log in to http://karnatakaeducation.org.in/?q=user in the future using: <your chosen username>.
- In the Main Menu, click on create content → blog and you can write your own blog.
What is Way2SMS? Can I send SMS and E-Mails via Way2SMS?
Way2SMS is a service that offers SMS communication totally cost free to mobile users. Mobile users can register at absolutely no cost with Way2SMS.com, and receivers of the messages need not be registered Way2SMS users. To create an account at Way2SMS.com, click here.
How do I increase the screen brightness on my Samsung N148 Plus Netbook?
- Go to Applications --> Accessories --> Terminal.
- After the $ prompt, copy and paste the following command: sudo setpci -s 00:02.0 f4.b=ff
- Press Enter. It may prompt you for the password. Type your password and press Enter.
- The value ff increases your screen brightness to the maximum.
To increase the screen brightness on your Samsung N148 Plus Netbook, do the following:
- 42, 56, 70, 92, AF, CC, E5, FF
- 30, 40, 50, 60, 70, 80, 90, 100
Note:One of the following possible values can be entered instead of ff to adjust your screen to a medium brightness to save battery.
How can I download and save any Youtube video on my computer?
- First copy the youtube video link (while it is open) from the address bar of your internet browser.
- In a new tab or a window, go to www.keepvid.com
- In the URL box, paste the video link (which you copied) and click Download
- This will show the various video formats that you can download for that video.
- You can click on any format and download/save the video on your hard disk.
To download and save any YouTube video on your hard disk , yo can do the following --
How to install, setup and start using Skype on Ubuntu 10.04?
This page has the required information to install, setup and use skype on Ubuntu 10.04
DESKTOP PUBLISHING
How to use MS Publisher (.pub) files on GNU/Linux?
Microsoft Publisher (.pub) files do not work on GNU/Linux systems. Zamzar is a free online conversion service, which lets you convert your files online to any desired format (images, documents, audio, video, e-books, compression too). You can select files (upto 100mb in size) at a time for conversion. Once you select the file to be converted and the output format, you will be sent a link to your e-mail(which you provide during the conversion process), to download the converted file. One can upload the .pub files and it will convert the .pub file into OpenOffice.org's (or any other) format so that it can be used on GNU/Linux.
GIMP and INKSCAPE Manual
Download the manual here
EDUCATIONAL TOOLS
view .ggb Geogebra files on latest android tablets/smartphones and phablets
Visit Play store application: https://play.google.com/store/apps/details?id=org.geogebra OR (If 'play store' app does not allow you to do it,)
Download from Google Drive: https://drive.google.com/file/d/0B5VjEPbF04AVckVobVE5RFMtRWM/edit?usp=sharing
Then install the file. You need to allow external sources to install apk files in android. It is mostly known feature.[Go to Settings, Security ->, External Sources. Tick the option and open the file again to install. After installing, disable 'external sources' again if you like to.]
After installing, you will be able to open Geogebra files on your tablet. It will work on latest android tablets with enough RAM and processor power. If it does not work for you, then your phone may be incapable of handling it. - Johnson Dcunha, Naravi High School. http://johnson.net.in/
On Tuesday, 18 March 2014 20:21:02 UTC+5:30, Radha Narve,GHS Begur wrote: I have downloaded Geogebra Beta 5 on my laptop which is very good to show 3d objects.I am sending a video in which i have demonstrated a moving cylinder.Because you can not view this in your geogebra application which you are using now.In this video I have not used the voice because of problem in my head phone.For downloading Geogebra Beta 5 use this link http://download.geogebra.org/installers/5.0/?C=M;O=D
How can I install KTechLab?
The customised DVD that you receive during your training sessions has KTechLab pre-installed. A shortcut to KTechLab can be created as follows
- On the desktop right-click and select create launcher.
- In the box that pops up, please enter the name as KTechlab and command as 'ktechlab' (command is case sensitive) and click on OK.
- The Ktechlab icon will appear on desktop. Double click on the icon to start KTechlab.
How to install PhET in Ubuntu?
The customised DVD that you received in your training sessions has PhET pre-installed on it.Just you need to launch in the applications list.
- Goto Application==>System tools==>Preferences==>main menu
- click on Science==>add new items
- Type as mentioned below without any mistake.
- Name:PhET
- Command: firefox /opt/PhET/index.html
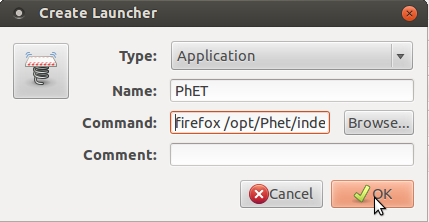
- Click on OK and close all tabs
- PhET will appears on Desktop,Just double click on PhET Icon it opens up.
Back to top
More about Ubuntu
Hardware
Basic troubleshooting In school computer LAB
* The Computer Won’t Start A computer that suddenly shuts off or has difficulty starting up could have a failing power supply. Check that the computer is plugged into the power point properly and, if that doesn’t work, test the power point with another working device to confirm whether or not there is adequate power.
* The Screen is Blank If the computer is on but the screen is blank, there may be an issue with the connection between the computer and the screen. First, check to see if the monitor is plugged into a power point and that the connection between the monitor and computer hard drive is secure. If the problem is on a laptop, then you may need to get a professional to fix it as some of the internal wires may be worn.
* Abnormally Functioning Operating System or Software If the operating system or other software is either unresponsive or is acting up, then try restarting your computer.
* Ubuntu Won’t Boot If you are having troubles booting Ubuntu, then you may have to reinstall it with the Ubuntu DVD.
* The Screen is Frozen When you computer freezes, you may have no other option than to reboot and risk losing any unsaved work. Freezes can be a sign of insufficient ram, registry conflicts, corrupt or missing files, or spyware. Press and hold the power button until the computer turns off, then restart it and get to work cleaning up the system so that it doesn’t freeze again.
* Computer is Slow If your computer is slower than normal, you can often fix the problem simply by cleaning the hard disk of unwanted files.
* Strange Noises A lot of noise coming from your computer is generally a sign of either hardware malfunction or a noisy fan. Hard drives often make noise just before they fail, so you may want to back up information just in case, and fans are very easy to replace.
* Overheating If a computer case lacks a sufficient cooling system, then the computer’s components may start to generate excess heat during operation. To avoid your computer burning itself out, turn it off and let it rest if it’s getting hot. Additionally, you can check the fan to make sure it’s working properly.
* Dropped Internet Connections Dropped Internet connections can be very frustrating. Often the problem is simple and may be caused by a bad cable or phone line, which is easy to fix.
* Reboot your computer. Turn your computer off, let it sit for two minutes, and reboot it. Sometimes one command of the hundreds a computer executes every second can cause corrupted memory or other temporary unexplainable problems. Rebooting will clear out all the gremlins and gives everything a fresh-start.
Digital Mapping
How to use android phone to collect mapping points
Googlegroups
Creating a Googlegroups
- Login to your gmail
- Visit www.groups.google.com
- Click on CREATE button on top
- Enter information required on the screen
- Save by clicking on CREATE button on top
Adding email id to googlegroups


