"ಮೂಡಲ್ ಕಲಿಯಿರಿ" ಆವೃತ್ತಿಗಳ ಮಧ್ಯದ ಬದಲಾವಣೆಗಳು
ಚು (added Category:ಅನ್ವಯಕಗಳನ್ನು ಅನ್ವೇಷಿಸಿ using HotCat) |
|||
| (೧೦ intermediate revisions by ೨ users not shown) | |||
| ೧ ನೇ ಸಾಲು: | ೧ ನೇ ಸಾಲು: | ||
| − | === | + | === ಪರಿಚಯ=== |
| − | ==== | + | ==== ಮೂಲ ಮಾಹಿತಿ ==== |
{| class="wikitable" | {| class="wikitable" | ||
| − | | | + | |ಐಸಿಟಿ ಸಾಮರ್ಥ್ಯಗಳು |
| − | | | + | |ಮೂಡಲ್ ಎನ್ನುವುದು ಕಲಿಕೆ ನಿರ್ವಹಣಾ ವ್ಯವಸ್ಥೆ (ಎಲ್ಎಂಎಸ್), ಇದು ಶಿಕ್ಷಣತಜ್ಞರು, ನಿರ್ವಾಹಕರು ಮತ್ತು ಕಲಿಯುವವರಿಗೆ ವೈಯಕ್ತಿಕ ಮತ್ತು ಸಹಕಾರಿ ಕಲಿಕಾ ಪರಿಸರವನ್ನು ರಚಿಸಲು ದೃಢವಾದ, ಸುರಕ್ಷಿತ ಮತ್ತು ಸಂಯೋಜಿತ ವ್ಯವಸ್ಥೆಯನ್ನು ಒದಗಿಸಲು ವಿನ್ಯಾಸಗೊಳಿಸಲಾಗಿದೆ. |
|- | |- | ||
| − | | | + | |ಶೈಕ್ಷಣಿಕ ಅನ್ವಯ ಮತ್ತು ಪ್ರಸ್ತುತತೆ |
| − | | | + | |ಸಹಕಾರಿ ಕಲಿಕೆಗಾಗಿ ಮೂಡಲ್ ಒಂದು ಆನ್ಲೈನ್ ವೇದಿಕೆಯನ್ನು ಒದಗಿಸುತ್ತದೆ . ಇದು ಕೋರ್ಸ್ಗಳನ್ನು ಹೊಂದಿಸಲು, ಕೋರ್ಸ್ಗೆ ಕಲಿಕಾ ಸಂಪನ್ಮೂಲಗಳು ಮತ್ತು ಚಟುವಟಿಕೆಗಳನ್ನು ಒದಗಿಸಲು ಮತ್ತು ಕಲಿಯುವವರನ್ನು ಮೌಲ್ಯಮಾಪನ ಮಾಡಲು ಶಿಕ್ಷಕರಿಗೆ ಅಧಿಕಾರ ನೀಡುತ್ತದೆ. ಶಿಕ್ಷಕರು ಮತ್ತು ಕಲಿಯುವವರು ಮೂಡಲ್ನಲ್ಲಿನ ಆನ್ಲೈನ್ ಚರ್ಚಾ ವೇದಿಕೆಗಳನ್ನು ಬಳಸಿಕೊಂಡು ವಿಚಾರಗಳನ್ನು ಮತ್ತು ಅನುಭವಗಳನ್ನು ಹಂಚಿಕೊಳ್ಳಬಹುದು. |
|- | |- | ||
| − | | | + | |ಆವೃತ್ತಿ |
| − | | | + | |ಪ್ರಸ್ತುತ 3.4 ಬಳಸುತ್ತಿದೆ |
|- | |- | ||
| − | | | + | |ಇದೇ ರೀತಿಯ ಇತರ ಅಪ್ಲಿಕೇಶನ್ಗಳು |
| − | | | + | |ಟ್ಯಾಲೆಂಟ್ ಎಲ್ಎಂಎಸ್ |
|- | |- | ||
| − | | | + | |ಮೊಬೈಲ್ ಮತ್ತು ಟ್ಯಾಬ್ಲೆಟ್ಗಳಲ್ಲಿನ ಅಪ್ಲಿಕೇಶನ್ |
| − | | | + | |ಇದು ವೆಬ್ ಆಧಾರಿತ ಅಪ್ಲಿಕೇಶನ್ ಆಗಿದೆ, ಮತ್ತು ಬ್ರೌಸಿಂಗ್ ಅನ್ನು ಬೆಂಬಲಿಸುವ ಯಾವುದೇ ಸಾಧನದಲ್ಲಿ ಬ್ರೌಸರ್ ಮೂಲಕ ಪ್ರವೇಶಿಸಬಹುದು. |
|- | |- | ||
| − | | | + | |ಅಭಿವೃದ್ಧಿ ಮತ್ತು ಸಮುದಾಯದ ಸಹಾಯ |
|[https://docs.moodle.org/dev/Main_Page Moodle] | |[https://docs.moodle.org/dev/Main_Page Moodle] | ||
|} | |} | ||
| − | === | + | === ಮೂಡಲ್ ಜೊತೆ ಕಾರ್ಯನಿರ್ವಹಣೆ === |
| − | + | ಮೂಡಲ್ ಉಚಿತ ಮತ್ತು ಮುಕ್ತ ಕಲಿಕೆ ನಿರ್ವಹಣಾ ವ್ಯವಸ್ಥೆ (ಎಲ್ಎಂಎಸ್). ಮೂಡಲ್ನಲ್ಲಿ ನೀವು ಯಾವುದೇ ಸಂಖ್ಯೆಯ ಕೋರ್ಸ್ಗಳನ್ನು ಹೊಂದಿಸಬಹುದು. ನೀವು ಅಗತ್ಯವಿರುವಂತೆ ಕೋರ್ಸ್ಗಳನ್ನು ವರ್ಗೀಕರಿಸಬಹುದು. | |
| − | + | ಅಭ್ಯಾಸಕ್ರಮ ಎನ್ನುವುದು ಮೂಡಲ್ ಸೈಟ್ನಲ್ಲಿ ಒಂದು ಸ್ಥಳವಾಗಿದ್ದು, ಅಲ್ಲಿ ಶಿಕ್ಷಕರು ತಮ್ಮ ವಿದ್ಯಾರ್ಥಿಗಳಿಗೆ ವಿಷಯ (ಕಲಿಕಾ ಸಾಮಗ್ರಿಗಳು) ಮತ್ತು ಚಟುವಟಿಕೆಗಳನ್ನು (ಶಿಕ್ಷಣಶಾಸ್ತ್ರ) ಸೇರಿಸಬಹುದು. ಒಬ್ಬ ಶಿಕ್ಷಕರು ಒಂದಕ್ಕಿಂತ ಹೆಚ್ಚು ಕೋರ್ಸ್ಗಳಿಗೆ ಅಧ್ಯಾಪಕರಾಗಿರಬಹುದು, ಒಂದು ಕೋರ್ಸ್ನಲ್ಲಿ ಒಂದಕ್ಕಿಂತ ಹೆಚ್ಚು ಶಿಕ್ಷಕರು ಮತ್ತು ಒಂದಕ್ಕಿಂತ ಹೆಚ್ಚು ಕಲಿಯುವವರು ಇರಬಹುದು. | |
| − | + | ಶಿಕ್ಷಕರು ಮತ್ತು ವಿದ್ಯಾರ್ಥಿಗಳು ಇಬ್ಬರೂ ಕೋರ್ಸ್ಗೆ 'ನೋಂದಾಯಿಸಿಕೊಳ್ಳಬೇಕು' ('ಶಿಕ್ಷಕ' ಅಥವಾ 'ವಿದ್ಯಾರ್ಥಿ'), ಈ ಪಾತ್ರ ಸಂರಚನೆಯನ್ನು ಮೂಡಲ್ ನಿರ್ವಾಹಕರು ಮಾಡುತ್ತಾರೆ. | |
| − | ==== | + | ==== ಮೂಡಲ್ ಅಭ್ಯಾಸಕ್ರಮ ಪುಟಕ್ಕೆ ಲಾಗ್ ಇನ್ ಆಗುವುದು ==== |
| − | + | ಅಭ್ಯಾಸಕ್ರಮ ವಿಷಯವನ್ನು ವೀಕ್ಷಿಸಲು ಅಥವಾ ಸಂಪಾದಿಸಲು ನಿಮ್ಮ ಮೂಡಲ್ ಅಭ್ಯಾಸಕ್ರಮ ಲಿಂಕ್ ಅನ್ನು ಕ್ಲಿಕ್ ಮಾಡಿ ಮತ್ತು ಲಾಗಿನ್ ಕ್ಲಿಕ್ ಮಾಡಿ. [https://karnatakaeducation.org.in/lms/ ಇಲ್ಲಿ ಕ್ಲಿಕ್ ಮಾಡಿ] ಸೆಂಟರ್ ಫಾರ್ ಎಜುಕೇಶನ್ ಅಂಡ್ ಟೆಕ್ನಾಲಜಿ, ಐಟಿ ಫಾರ್ ಚೇಂಜ್ ನಿರ್ವಹಿಸುವ ಮೂಡಲ್ ಸ್ಥಾಪನೆಯನ್ನು ವೀಕ್ಷಿಸಲು. | |
<gallery mode="packed" heights="200px" caption="Moodle - Login to the course"> | <gallery mode="packed" heights="200px" caption="Moodle - Login to the course"> | ||
| − | File:1. Moodle login page.png| | + | File:1. Moodle login page.png|ಮೂಡಲ್ ಲಾಗಿನ್ ಪರದೆ |
| − | File:2. moodle - After login.png| | + | File:2. moodle - After login.png|ಅಭ್ಯಾಸಕ್ರಮದ ಪ್ರವೇಶದ್ವಾರ |
</gallery> | </gallery> | ||
| − | + | ಒಮ್ಮೆ ನೀವು ಲಾಗಿನ್ ಮಾಡಿದ ನಂತರ, ನೀವು ಅಭ್ಯಾಸಕ್ರಮ ವಿಷಯವನ್ನು ನೋಡಬಹುದು ಮತ್ತು ನಿಮ್ಮ ಲಾಗಿನ್ ಹೆಸರನ್ನು ಪರದೆಯ ಮೇಲಿನ ಬಲ ಮೂಲೆಯಲ್ಲಿ ನೋಡುತ್ತೀರಿ. | |
| − | ==== | + | ==== ಸಂಪಾದನೆಯ ವಿಭಾಗ ==== |
| − | + | ನೀವು ಹೊಸ ಖಾಲಿ ಅಭ್ಯಾಸಕ್ರಮ ಅನ್ನು ಹೊಂದಿದ ನಂತರ, ನೀವು '<nowiki />' <nowiki /> '' ಸಂಪಾದನೆಯನ್ನು ಆನ್ ಮಾಡುವ ಮೂಲಕ '' '<nowiki />' ಸಂಪಾದನೆಯನ್ನು ಆನ್ ಮಾಡಿ 'ಕ್ಲಿಕ್ ಮಾಡುವ ಮೂಲಕ ಅದರ ಕೆಲಸವನ್ನು ಪ್ರಾರಂಭಿಸಬಹುದು. ಪರದೆಯ ಮೇಲ್ಭಾಗದಲ್ಲಿರುವ <nowiki /> 'ಬಟನ್. ಸಂಪನ್ಮೂಲಗಳು ಮತ್ತು ಚಟುವಟಿಕೆಗಳನ್ನು ಸೇರಿಸುವುದು ಸೇರಿದಂತೆ ಅಭ್ಯಾಸಕ್ರಮ ವಿಷಯಗಳನ್ನು ಸಂಪಾದಿಸಲು ಅಧ್ಯಾಪಕರಿಗೆ ಮಾತ್ರ ಹಕ್ಕುಗಳಿವೆ. ಇದು ವಿದ್ಯಾರ್ಥಿಗಳಿಗೆ ಲಭ್ಯವಿಲ್ಲ. | |
| − | + | 'ಸಂಪಾದನೆ' ಆಯ್ಕೆಯನ್ನು 'ಆನ್' ಮಾಡಿದಾಗ, ನಿಮ್ಮ ಅಭ್ಯಾಸಕ್ರಮ ಮುಖಪುಟದಲ್ಲಿನ ಪ್ರತಿಯೊಂದು ಐಟಂ ಮತ್ತು ಪ್ರತಿ ವಿಭಾಗ / ಬ್ಲಾಕ್ 'ಸಂಪಾದಿಸು' ಆಯ್ಕೆಯನ್ನು ಪ್ರದರ್ಶಿಸುತ್ತದೆ, ಇದು ಸಂಪಾದನೆ / ಸರಿಸಲು / ನಕಲಿಸಿ / ಅಳಿಸಿ / ಮರೆಮಾಡು ಮುಂತಾದ ವಿಭಿನ್ನ ಕಾರ್ಯಗಳನ್ನು ನಿರ್ವಹಿಸಲು ನಿಮಗೆ ಅನುವು ಮಾಡಿಕೊಡುತ್ತದೆ. '' 'ಗಮನಿಸಿ:' '' ನಿಮ್ಮ ಥೀಮ್ನಲ್ಲಿ '' ಐಕಾನ್ಗಳು '' ವಿಭಿನ್ನವಾಗಿರಬಹುದು. ಆದಾಗ್ಯೂ, ಮೂಡಲ್ನ ವಿಭಿನ್ನ ವಿಷಯಗಳಿಗೆ ಕ್ರಿಯಾತ್ಮಕತೆಯು ಒಂದೇ ಆಗಿರುತ್ತದೆ. '' | |
| − | + | ಒಮ್ಮೆ ನೀವು ಸಂಪಾದನೆ - ಸಂಪಾದನೆ ವಿಷಯಗಳ ಮೇಲೆ ಕ್ಲಿಕ್ ಮಾಡಿದರೆ, ಅದು ಪುಟವನ್ನು ಸಂಪಾದಿಸಲು ನಮ್ಮನ್ನು ಕರೆದೊಯ್ಯುತ್ತದೆ (ಕೆಳಗಿನ ಸ್ಕ್ರೀನ್ ಶಾಟ್ಗಳನ್ನು ನೋಡಿ). | |
<gallery mode="packed" heights="200px" caption="Moodle - editing course content sections"> | <gallery mode="packed" heights="200px" caption="Moodle - editing course content sections"> | ||
| ೫೦ ನೇ ಸಾಲು: | ೫೦ ನೇ ಸಾಲು: | ||
</gallery> | </gallery> | ||
| − | + | ಕಡತವನ್ನು ಸಾರಾಂಶ ವಿಭಾಗಕ್ಕೆ ಎಳೆಯುವ ಮತ್ತು ಬಿಡುವ ಮೂಲಕ ನಿಮ್ಮ ಕಡತಗಳನ್ನು ಚಿತ್ರಗಳು ಅಥವಾ ವೀಡಿಯೊಗಳಂತೆ ಎಂಬೆಡ್ ಮಾಡಬಹುದು. ನೀವು ಕಡತಗಳ ಗಾತ್ರವನ್ನು ಸಹ ಹೊಂದಿಸಬಹುದು. | |
| − | + | ನಿಮ್ಮ ವಿಭಾಗಕ್ಕೆ ನಿಮ್ಮ ಸ್ವಂತ ಶೀರ್ಷಿಕೆಯನ್ನು ನೀಡಲು "ಡೀಫಾಲ್ಟ್ ವಿಭಾಗದ ಹೆಸರನ್ನು ಬಳಸಿ" ಅನ್ನು ಪರಿಶೀಲಿಸಿ. | |
| − | + | ಸಾರಾಂಶ ಪೆಟ್ಟಿಗೆಯ ಅಡಿಯಲ್ಲಿ ವಿಭಾಗದ ಸಾರಾಂಶವನ್ನು ಸೇರಿಸಲು ಪ್ರಾರಂಭಿಸಿ (ನೀವು ಅಸ್ತಿತ್ವದಲ್ಲಿರುವ ಪಠ್ಯ ದಸ್ತಾವೇಜಿನಿಂದ ನಕಲಿಸಬಹುದು). ನಿಮ್ಮ ಪಠ್ಯವನ್ನು ಫಾರ್ಮ್ಯಾಟ್ ಮಾಡಲು ಉನ್ನತ 'ಮೂಲ ಫಾರ್ಮ್ಯಾಟಿಂಗ್' ಟೂಲ್ಬಾರ್ ಬಳಸಿ, ನಿಮ್ಮ ಪಠ್ಯವನ್ನು ನೀವು '' 'ದಪ್ಪಕ್ಷರ' 'ಅಥವಾ' 'ಇಟಾಲಿಸೈಸ್' 'ಮಾಡಬಹುದು ಮತ್ತು ಮೂಲ ಪಠ್ಯ ಸಂಪಾದನೆ ಕಾರ್ಯಗಳನ್ನು ಮಾಡಬಹುದು. | |
| − | + | ನಿರ್ಬಂಧಿಸುವ ವಿಭಾಗದ ಅಡಿಯಲ್ಲಿ, ಕೆಳಗಿನ ಸ್ಕ್ರೀನ್ ಶಾಟ್ನಲ್ಲಿರುವಂತೆ ನೀವು ಪುಟವನ್ನು ಪ್ರವೇಶಿಸಲು ನಿರ್ಬಂಧಿಸಬಹುದು. | |
<gallery mode="packed" heights="300px" caption="Moodle - editing course content sections"> | <gallery mode="packed" heights="300px" caption="Moodle - editing course content sections"> | ||
| ೬೨ ನೇ ಸಾಲು: | ೬೨ ನೇ ಸಾಲು: | ||
File:moodle add or remove sections.png|To add or remove sections | File:moodle add or remove sections.png|To add or remove sections | ||
</gallery> | </gallery> | ||
| − | + | ನಿಮ್ಮ ಸಂಪಾದನೆಯನ್ನು ಪೂರ್ಣಗೊಳಿಸಿದ ನಂತರ ಮತ್ತು ವಿಭಾಗದಲ್ಲಿ ಪಠ್ಯ, ಚಿತ್ರಗಳು, ವೀಡಿಯೊಗಳನ್ನು ಸೇರಿಸಿದ ನಂತರ, ಆ ವಿಭಾಗದ ಅಡಿಯಲ್ಲಿ ನಿಮ್ಮ ವಿಷಯವನ್ನು ಉಳಿಸಲು ನೀವು "ಬದಲಾವಣೆಗಳನ್ನು ಉಳಿಸು" ಗುಂಡಿಯನ್ನು ಕ್ಲಿಕ್ ಮಾಡಬೇಕು. | |
| − | + | ಅಭ್ಯಾಸಕ್ರಮ ಮುಖ್ಯ ಪುಟದ ಕೆಳಕ್ಕೆ ಸ್ಕ್ರಾಲ್ ಮಾಡಿ ಮತ್ತು ಕೊನೆಯ ವಿಭಾಗದ ಕೆಳಗೆ, ಸಣ್ಣ '' '+ ' 'ಮತ್ತು' '' - '' ಐಕಾನ್ಗಳನ್ನು ನೋಡಿ (ಬಲಭಾಗದಲ್ಲಿ). ವಿಭಾಗಗಳನ್ನು ಸೇರಿಸಲು ಮತ್ತು ತೆಗೆದುಹಾಕಲು '' 'ಜೊತೆಗೆ' '' ('' '+' '') / '' 'ಮೈನಸ್ (-)' '' ಕ್ಲಿಕ್ ಮಾಡಿ. | |
| − | |||
{{Clear}} | {{Clear}} | ||
| − | ==== | + | ==== ಸಂಪನ್ಮೂಲಗಳನ್ನು ಸೇರಿಸುವುದು ==== |
| − | + | ಸಂಪನ್ಮೂಲವು ಶಿಕ್ಷಕನು ಕಡತ ಅಥವಾ ವೆಬ್ ಲಿಂಕ್ನಂತಹ ಕಲಿಕೆಯನ್ನು ಬೆಂಬಲಿಸಲು ಬಳಸಬಹುದಾದ ಒಂದು ವಸ್ತು ಆಗಿದೆ. ಅಭ್ಯಾಸಕ್ರಮ ಪುಟಕ್ಕೆ ನೀವು ಸಂಪನ್ಮೂಲಗಳನ್ನು ಸೇರಿಸಲು ಎರಡು ಮಾರ್ಗಗಳಿವೆ | |
| − | ===== | + | ===== ನೇರವಾಗಿ ವಿಭಾಗದಲ್ಲಿ ಸಂಪನ್ಮೂಲವನ್ನು ಸಿದ್ಧವಾಗಿ ತೋರುವಂತೆ (ಎಂಬೆಡ್) ಮಾಡುವುದು ===== |
| − | + | ವೆಬ್ ಲಿಂಕ್ಗಳನ್ನು ನೇರವಾಗಿ ವಿಭಾಗದಲ್ಲಿಯೇ ಒದಗಿಸಬಹುದು. ನೀವು ಲಿಂಕ್ ಅನ್ನು ನೇರವಾಗಿ ನೀಡಬಹುದು ಅಥವಾ ಅಸ್ತಿತ್ವದಲ್ಲಿರುವ ಪಠ್ಯಕ್ಕೆ ಲಿಂಕ್ ಅನ್ನು 'ಎಂಬೆಡ್' ಮಾಡಬಹುದು (ಅದು ಹೈಪರ್ ಲಿಂಕ್ ಆಗಿ ತೋರಿಸುತ್ತದೆ). ಮೂಡಲ್ನಲ್ಲಿ ಚಿತ್ರ ಅಥವಾ ವೀಡಿಯೊ ಕಡತ ಸಂಗ್ರಹವಾಗಿರುವ URL ಅನ್ನು ಒದಗಿಸುವ ಮೂಲಕ ನೀವು ವಿಭಾಗ ಮತ್ತು ಪುಟಗಳನ್ನು ನೇರವಾಗಿ ವಿಭಾಗ ಪುಟದಲ್ಲಿ ಎಂಬೆಡ್ ಮಾಡಬಹುದು (ಇನ್ಸರ್ಟ್ -> ಮೀಡಿಯಾ ಆಯ್ಕೆಯನ್ನು ಬಳಸಿ). | |
| − | ===== | + | ===== ವಿಭಾಗಕ್ಕೆ ಸಂಪನ್ಮೂಲವನ್ನು ಸೇರಿಸಲಾಗುತ್ತಿದೆ ===== |
| − | + | ಕಡತಕಡತಗಳು, ಕಡತಕೋಶ , URL ಗಳಂತಹ ಸಂಪನ್ಮೂಲಗಳನ್ನು ಸೇರಿಸಲು ಅಥವಾ ಪುಸ್ತಕವನ್ನು ರಚಿಸಲು, ನಿಮ್ಮ ಅಭ್ಯಾಸಕ್ರಮ ಮುಖಪುಟದಲ್ಲಿ ನೀವು ಕಾಣಿಸಿಕೊಳ್ಳಲು ಬಯಸುವ ವಿಭಾಗವನ್ನು ಆರಿಸಿ ಮತ್ತು ಆ ವಿಭಾಗದಲ್ಲಿ ಲಭ್ಯವಿರುವ "ಚಟುವಟಿಕೆ ಅಥವಾ ಸಂಪನ್ಮೂಲವನ್ನು ಸೇರಿಸಿ" ಕ್ಲಿಕ್ ಮಾಡಿ ನಂತರ ಆಯ್ಕೆಮಾಡಿ ಡ್ರಾಪ್ ಡೌನ್ ಪಟ್ಟಿಯಿಂದ ನೀವು ಸೇರಿಸಲು ಬಯಸುವ ಸಂಪನ್ಮೂಲಗಳ ಪ್ರಕಾರ. ಇದು ನಿಮ್ಮಲ್ಲಿರುವ ಯಾವುದೇ ಕಡತ ಆಗಿರಬಹುದು, ಅದನ್ನು ನೀವು ಮೂಡಲ್ಗೆ ಅಪ್ಲೋಡ್ ಮಾಡುತ್ತೀರಿ ಮತ್ತು ಈ ವಿಭಾಗದಲ್ಲಿ ಸಂಪನ್ಮೂಲವಾಗಿ ಒದಗಿಸುತ್ತೀರಿ. | |
| − | + | ನೀವು ಪಟ್ಟಿಯಿಂದ ಯಾವುದೇ ಸಂಪನ್ಮೂಲ ಪ್ರಕಾರವನ್ನು ಆಯ್ಕೆ ಮಾಡಿದ ನಂತರ, 'ಸೇರಿಸು' ಕ್ಲಿಕ್ ಮಾಡಿ. ಮುಂದಿನ ಸಂವಾದ ಪೆಟ್ಟಿಗೆಯಲ್ಲಿ ನೀವು ಅಗತ್ಯ ಮಾಹಿತಿಯನ್ನು ನಮೂದಿಸಿದ್ದೀರಿ. ವಿವರಗಳಿಗಾಗಿ ಕೆಳಗಿನ ಸ್ಕ್ರೀನ್ ಶಾಟ್ ನೋಡಿ. <br> | |
<gallery mode="packed" heights="250px" caption="Adding resources into the sections"> | <gallery mode="packed" heights="250px" caption="Adding resources into the sections"> | ||
File:Moodle - adding file resources.png|Selecting a type of resources from the list | File:Moodle - adding file resources.png|Selecting a type of resources from the list | ||
File:Moodle adding resources 1.png|Entering basic information about the resources | File:Moodle adding resources 1.png|Entering basic information about the resources | ||
</gallery> | </gallery> | ||
| − | * | + | * ಹೆಸರು: ನಿಮ್ಮ ಸಂಪನ್ಮೂಲಗಳ ಲಿಂಕ್ಗಾಗಿ ಹೆಸರನ್ನು ಟೈಪ್ ಮಾಡಿ, ಅದು ಲಿಂಕ್ ಅನ್ನು ರಚಿಸುತ್ತದೆ, ಅದು ಕಡತವನ್ನು ಕಡತವೀಕ್ಷಿಸಲು ವಿದ್ಯಾರ್ಥಿಗಳು ಕ್ಲಿಕ್ ಮಾಡುತ್ತದೆ. ಅದರ ಉದ್ದೇಶ / ವಿಷಯಗಳನ್ನು ಸೂಚಿಸುವ ಹೆಸರನ್ನು ನೀಡಲು ಇದು ಸಹಾಯಕವಾಗಿರುತ್ತದೆ. |
| − | * | + | * ವಿವರಣೆ: ಅಗತ್ಯವಿದ್ದರೆ ನಿಮ್ಮ ಕಡತದ ಕಡತವಿವರಣೆಯನ್ನು ಇಲ್ಲಿ ಸೇರಿಸಿ. |
| − | * | + | * ಅಭ್ಯಾಸಕ್ರಮ ಪುಟದಲ್ಲಿ ವಿವರಣೆಯನ್ನು ಪ್ರದರ್ಶಿಸಿ: ಈ ಪೆಟ್ಟಿಗೆಯನ್ನು ಗುರುತಿಸಿದ್ದರೆ, ವಿವರಣೆಯು ಅಭ್ಯಾಸಕ್ರಮ ಪುಟದಲ್ಲಿ ಕಡತದಕಡತ ಹೆಸರಿನ ಸ್ವಲ್ಪ ಕೆಳಗೆ ಕಾಣಿಸುತ್ತದೆ. |
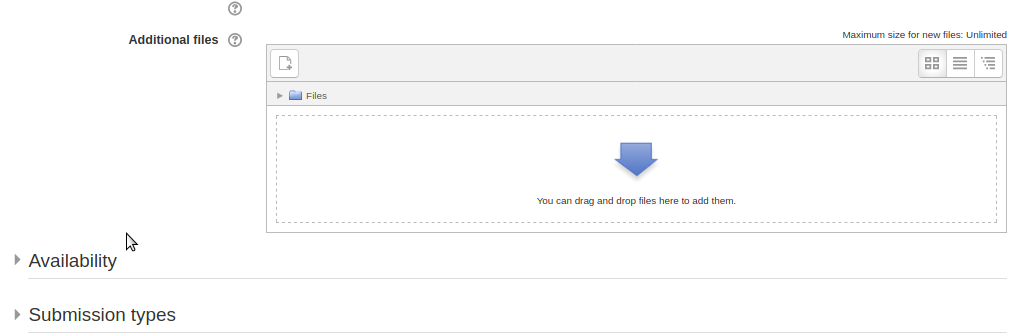
| − | * | + | * ಕಡತಗಳನ್ನು ಆರಿಸಿ: "ಸೇರಿಸು" ಕ್ಲಿಕ್ ಮಾಡಿ ಮತ್ತು ನಿಮ್ಮ ಕಡತ ಅನ್ನು ಅಪ್ಲೋಡ್ ಮಾಡಲು ಕಡತ ಚಿತ್ರ ಬಳಸಿ ಅಥವಾ ನೀವು ಸೂಕ್ತವಾದ ಬ್ರೌಸರ್ ಬಳಸುತ್ತಿದ್ದರೆ ನಿಮ್ಮ ಕಡತವನ್ನು ಬಾಣದ ಮೇಲೆ ಎಳೆಯಿರಿ ಮತ್ತು ಬಿಡಿ. ಇಲ್ಲಿ ನೀವು ಕಡತಕೋಶವನ್ನು ಸಹ ರಚಿಸಬಹುದು ಮತ್ತು ಕಡತಕೋಶಕ್ಕೆ ಬಹು ಸಂಪನ್ಮೂಲ ಕಡತಗಳನ್ನು ಸೇರಿಸಬಹುದು. ವಿಭಾಗಕ್ಕೆ ನೀವು ಹಲವನ್ನು ಒದಗಿಸಲು ಯೋಜಿಸಿದರೆ ನೀವು ವರ್ಗಗಳ ಕಡತಗಳಿಗೆ ಕಡತಕೋಶಗಳನ್ನು ಬಳಸಬಹುದು. <br> |
<gallery mode="packed" heights="250px" caption="Adding resources into the sections"> | <gallery mode="packed" heights="250px" caption="Adding resources into the sections"> | ||
| ೯೨ ನೇ ಸಾಲು: | ೯೧ ನೇ ಸಾಲು: | ||
</gallery> | </gallery> | ||
| − | + | ನಿಮ್ಮ ಕಡತ ಅನ್ನು ಬ್ರೌಸ್ ಮಾಡಿದ ನಂತರ ಪುಟಕ್ಕೆ ಅಪ್ಲೋಡ್ ಮಾಡಲು ಈ ಕಡತ ಅನ್ನು ಅಪ್ಲೋಡ್ ಮಾಡಿ ಕ್ಲಿಕ್ ಮಾಡಿ. ನಿರ್ದಿಷ್ಟಪಡಿಸಿದ ವಿಭಾಗದ ಅಡಿಯಲ್ಲಿ ನಿಮ್ಮ ಸಂಪನ್ಮೂಲಗಳನ್ನು ಪ್ರದರ್ಶಿಸಲು ಅಂತಿಮವಾಗಿ "ಉಳಿಸಿ ಮತ್ತು ಪ್ರದರ್ಶಿಸು" ಕ್ಲಿಕ್ ಮಾಡಿ. | |
| − | ==== | + | ==== ಚಟುವಟಿಕೆಗಳನ್ನು ಸೇರಿಸುವುದು ==== |
| − | + | ಯಾವುದೇ ವಿಭಾಗಕ್ಕೆ ಸೇರಿಸಲು ನಿಮಗೆ ಅನುಮತಿಸುವ ವಿವಿಧ ಚಟುವಟಿಕೆಗಳ ಪ್ರಕಾರಗಳನ್ನು ಮೂಡಲ್ ಬೆಂಬಲಿಸುತ್ತದೆ. ನಿಮ್ಮ ವಿದ್ಯಾರ್ಥಿಗಳಿಗೆ ನೀವು ಸಂವಾದಾತ್ಮಕ ವ್ಯಾಯಾಮಗಳನ್ನು ಸೇರಿಸಬಹುದು. | |
| + | ರಸಪ್ರಶ್ನೆ, ಚರ್ಚಾ ವೇದಿಕೆ, ಹಾಜರಾತಿಗಳು, ನಮೂನೆಗಳು ಮತ್ತು ಸಮೀಕ್ಷೆಗಳಂತಹ ಚಟುವಟಿಕೆಗಳನ್ನು ಸೇರಿಸಲು '''ಕ್ಲಿಕ್ ಮಾಡುವುದರ ಮೂಲಕ ನಿಮ್ಮ ಸಂಪಾದನೆಯನ್ನು ಆನ್ ಮಾಡಿ. ನಿಮ್ಮ ಅಭ್ಯಾಸಕ್ರಮ ಮುಖಪುಟದಲ್ಲಿ ನೀವು ಕಾಣಿಸಿಕೊಳ್ಳಲು ಬಯಸುವ ವಿಭಾಗವನ್ನು ಆರಿಸಿ ಮತ್ತು "ಚಟುವಟಿಕೆ ಅಥವಾ ಸಂಪನ್ಮೂಲವನ್ನು ಸೇರಿಸಿ" ಕ್ಲಿಕ್ ಮಾಡಿ ನಂತರ ನೀವು ಪಟ್ಟಿಯಿಂದ ವಿಭಾಗಕ್ಕೆ ಸೇರಿಸಲು ಹೊರಟಿರುವ ಚಟುವಟಿಕೆಗಳ ಪ್ರಕಾರವನ್ನು ಆಯ್ಕೆ ಮಾಡಿ (ಉದಾಹರಣೆಗೆ: ರಸಪ್ರಶ್ನೆ). | ||
| − | |||
<gallery mode="packed" heights="250px" caption="Adding activities"> | <gallery mode="packed" heights="250px" caption="Adding activities"> | ||
File:Moodle quiz activity_1.png|Select type of activity | File:Moodle quiz activity_1.png|Select type of activity | ||
File:Moodle configuring activity details.png|Configure your activity | File:Moodle configuring activity details.png|Configure your activity | ||
</gallery> | </gallery> | ||
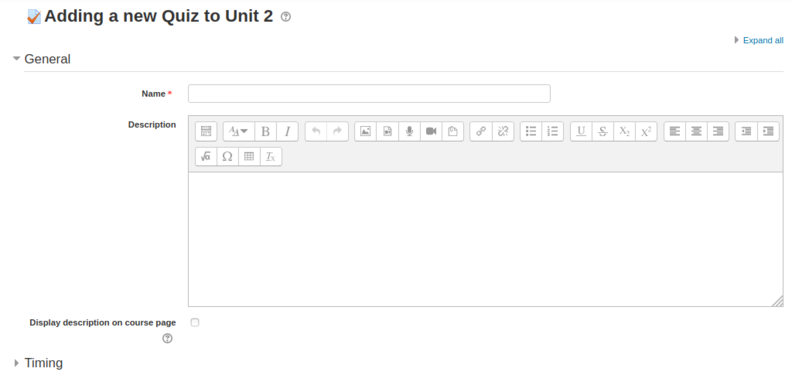
| − | + | ನೀವು ಅದನ್ನು ವಿಭಾಗಕ್ಕೆ ಸೇರಿಸಲು ಹೋಗುವ ಯಾವುದೇ ಚಟುವಟಿಕೆಯನ್ನು ಆಯ್ಕೆ ಮಾಡಿದ ನಂತರ (ಉದಾಹರಣೆಗೆ: ರಸಪ್ರಶ್ನೆ) ನಂತರ "ಸೇರಿಸು" ಕ್ಲಿಕ್ ಮಾಡಿ. ಮುಂದಿನ ಸಂವಾದ ಪೆಟ್ಟಿಗೆಯಲ್ಲಿ ಈ ಕೆಳಗಿನ ಚಟುವಟಿಕೆಗಾಗಿ ಸೆಟ್ಟಿಂಗ್ಗಳ ರೂಪ ಇರುತ್ತದೆ. | |
| − | * ''' | + | * '''ಸಾಮಾನ್ಯ''' |
| − | ** | + | ** ಹೆಸರು: ನಿಮ್ಮ ಚಟುವಟಿಕೆ ಲಿಂಕ್ಗಾಗಿ ಹೆಸರನ್ನು ಟೈಪ್ ಮಾಡಿ, ಅದು ಲಿಂಕ್ ಅನ್ನು ರಚಿಸುತ್ತದೆ, ಅದು ವಿದ್ಯಾರ್ಥಿಗಳು ಕಡತವನ್ನು ವೀಕ್ಷಿಸಲು ಕ್ಲಿಕ್ ಮಾಡುತ್ತದೆ. ಅದರ ಉದ್ದೇಶ / ವಿಷಯಗಳನ್ನು ಸೂಚಿಸುವ ಹೆಸರನ್ನು ನೀಡಲು ಇದು ಸಹಾಯಕವಾಗಿರುತ್ತದೆ. |
| − | ** | + | ** ವಿವರಣೆ: ಅಗತ್ಯವಿದ್ದರೆ ನಿಮ್ಮ ಕಡತದ ವಿವರಣೆಯನ್ನು ಇಲ್ಲಿ ಸೇರಿಸಿ. |
| − | ** | + | ** ಅಭ್ಯಾಸಕ್ರಮ ಪುಟದಲ್ಲಿ ವಿವರಣೆಯನ್ನು ಪ್ರದರ್ಶಿಸಿ: ಈ ಪೆಟ್ಟಿಗೆಯನ್ನು ಗುರುತಿಸಿದರೆ, ವಿವರಣೆಯು ಅಭ್ಯಾಸಕ್ರಮ ಪುಟದಲ್ಲಿ ಕಡತದ ಹೆಸರಿನ ಸ್ವಲ್ಪ ಕೆಳಗೆ ಕಾಣಿಸುತ್ತದೆ. |
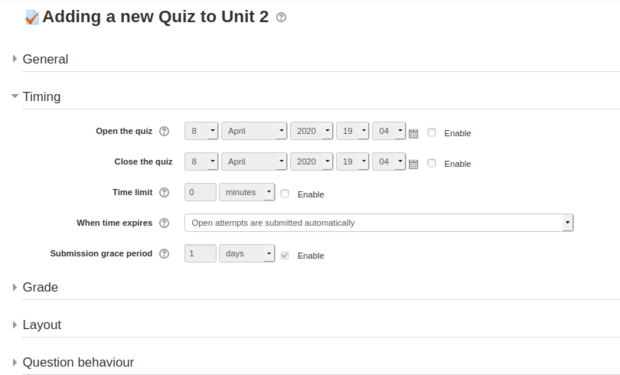
| − | * ''' | + | * '''ಸಮಯ''' |
| − | ** | + | ** ರಸಪ್ರಶ್ನೆ ತೆರೆಯಿರಿ ಮತ್ತು ರಸಪ್ರಶ್ನೆ ಮುಚ್ಚಿ: ವಿದ್ಯಾರ್ಥಿಗಳು ತೆರೆದ ಸಮಯದ ನಂತರ ಮಾತ್ರ ತಮ್ಮ ಪ್ರಯತ್ನವನ್ನು ಪ್ರಾರಂಭಿಸಬಹುದು ಮತ್ತು ಅವರು ತಮ್ಮ ಪ್ರಯತ್ನಗಳನ್ನು ನಿಕಟ ಸಮಯದ ಮೊದಲು ಪೂರ್ಣಗೊಳಿಸಬೇಕು. |
| − | ** | + | ** ಸಮಯ ಮಿತಿ: ಸಕ್ರಿಯಗೊಳಿಸಿದರೆ, ಸಮಯದ ಮಿತಿಯನ್ನು ಆರಂಭಿಕ ರಸಪ್ರಶ್ನೆ ಪುಟದಲ್ಲಿ ತಿಳಿಸಲಾಗುತ್ತದೆ ಮತ್ತು ರಸಪ್ರಶ್ನೆ ನ್ಯಾವಿಗೇಷನ್ ಬ್ಲಾಕ್ನಲ್ಲಿ ಉಳಿದಿರುವ ಸಮಯವನ್ನು ಪ್ರದರ್ಶಿಸಲಾಗುತ್ತದೆ. |
<gallery mode="packed" heights="250px" caption="Configuring activities"> | <gallery mode="packed" heights="250px" caption="Configuring activities"> | ||
File:Moodle adding activity auiz - 3.png|Add basic information about the activities | File:Moodle adding activity auiz - 3.png|Add basic information about the activities | ||
File:Moodle adding activity quiz - 4.png|Setting up display and submitting time | File:Moodle adding activity quiz - 4.png|Setting up display and submitting time | ||
</gallery> | </gallery> | ||
| − | + | ಎಲ್ಲಾ ಸೆಟ್ಟಿಂಗ್ಗಳನ್ನು ಅಗತ್ಯವಿರುವಂತೆ ಭರ್ತಿ ಮಾಡಿದ ನಂತರ ಮತ್ತು ಉಳಿಸಿದ ನಂತರ, ಚಟುವಟಿಕೆಯು ವಿಭಾಗದ ಕೆಳಭಾಗದಲ್ಲಿ ಗೋಚರಿಸುತ್ತದೆ. | |
| − | + | ಅಭ್ಯಾಸಕ್ರಮ ಎಡಿಟ್ ಮೋಡ್ನಲ್ಲಿರುವಾಗ ನೀವು ಯಾವುದೇ ಚಟುವಟಿಕೆಯನ್ನು ಮೂವ್ ಬಟನ್ಗಳೊಂದಿಗೆ ಚಲಿಸಬಹುದು.hile in course edit mode. | |
| − | ===== ''' | + | ===== '''ಕಾರ್ಯ ನಿಯೋಜನೆ''' ===== |
| − | + | ಅಭ್ಯಾಸಕ್ರಮ ಭಾಗವಹಿಸುವವರಿಗೆ ನಿಯೋಜನೆಗಳನ್ನು ನೀಡಲು ಅಭ್ಯಾಸಕ್ರಮ ರಚನೆಕಾರರಿಗೆ ನಿಯೋಜನೆ ಸಹಾಯ ಮಾಡುತ್ತದೆ. ಅವರು ಪಠ್ಯ ಸಂಪಾದಕವನ್ನು ಟೈಪ್ ಮಾಡುವ ಮೂಲಕ ಅಥವಾ ಡಿಜಿಟಲ್ ರೂಪದಲ್ಲಿ ರಚಿಸಿದ ವಿಷಯವನ್ನು ಅಪ್ಲೋಡ್ ಮಾಡುವ ಮೂಲಕ ಪಠ್ಯ ರೂಪದಲ್ಲಿ ಕಾರ್ಯಯೋಜನೆಗಳನ್ನು ಸಲ್ಲಿಸಬಹುದು. ರಚನೆಕಾರರು ಸಲ್ಲಿಕೆಗಳನ್ನು ಡೌನ್ಲೋಡ್ ಮಾಡಬಹುದು. | |
<gallery mode="packed" heights="300px" caption="Configuring Assignment"> | <gallery mode="packed" heights="300px" caption="Configuring Assignment"> | ||
File:Assignment_0.png|Select assignment module from activities list | File:Assignment_0.png|Select assignment module from activities list | ||
File:Assignment_1.png|Participants can upload their files here | File:Assignment_1.png|Participants can upload their files here | ||
</gallery> | </gallery> | ||
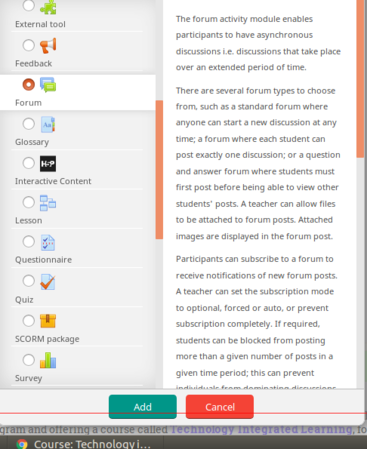
| − | + | ===== '''ವೇದಿಕೆ''' ===== | |
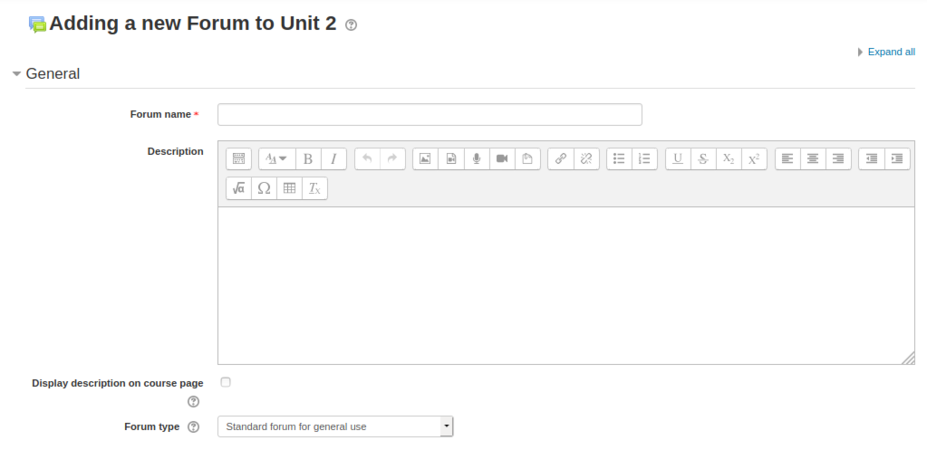
| − | ===== ''' | + | ಭಾಗವಹಿಸುವವರಿಗೆ ಅಭ್ಯಾಸಕ್ರಮ ವಿಷಯ, ಸಂಪನ್ಮೂಲಗಳು ಇತ್ಯಾದಿಗಳ ಬಗ್ಗೆ ಚರ್ಚಿಸಲು ಮತ್ತು ಅವರ ಸಾಮೂಹಿಕ ಜ್ಞಾನವನ್ನು ಹಂಚಿಕೊಳ್ಳಲು ಫೋರಮ್ ಮಾಡ್ಯೂಲ್ ಅಭ್ಯಾಸಕ್ರಮ ರಚನೆಕಾರರಿಗೆ ಸಹಾಯ ಮಾಡುತ್ತದೆ. ಭಾಗವಹಿಸುವವರು ಕೋರ್ಸ್ಗೆ ಚಂದಾದಾರರಾದ ನಂತರ, ಅವನು / ಅವಳು ಈ ವೇದಿಕೆಗಳಲ್ಲಿ ಭಾಗವಹಿಸಬಹುದು. |
| − | |||
<gallery mode="packed" heights="300px" caption="Configuring Forum"> | <gallery mode="packed" heights="300px" caption="Configuring Forum"> | ||
File:Forum_0.png|Select Forum module from activities list | File:Forum_0.png|Select Forum module from activities list | ||
File:Forum_1.png|Edit these menu options to suit course needs | File:Forum_1.png|Edit these menu options to suit course needs | ||
</gallery> | </gallery> | ||
| − | + | ನಿಯಂತ್ರಣ ಮೆನು ಇದ್ದು, ಬಳಕೆದಾರರಿಗೆ ಪದಗಳ ಎಣಿಕೆ ಮತ್ತು ಲಗತ್ತು ಗಾತ್ರದೊಂದಿಗೆ ವೇದಿಕೆಗಳಲ್ಲಿ ಭಾಗವಹಿಸಲು ಅನುವು ಮಾಡಿಕೊಡುತ್ತದೆ. ಇದು ಗರಿಷ್ಠ ಗಾತ್ರದ ಕಡತಗಳೊಂದಿಗೆ ಅಭ್ಯಾಸಕ್ರಮ ಅನ್ನು ನಿರ್ವಹಿಸಲು ಸಹಾಯ ಮಾಡುತ್ತದೆ. | |
[[File:Forum_2.png|center|thumb|300x300px|Choose attachment size for files to be uploaded ]] | [[File:Forum_2.png|center|thumb|300x300px|Choose attachment size for files to be uploaded ]] | ||
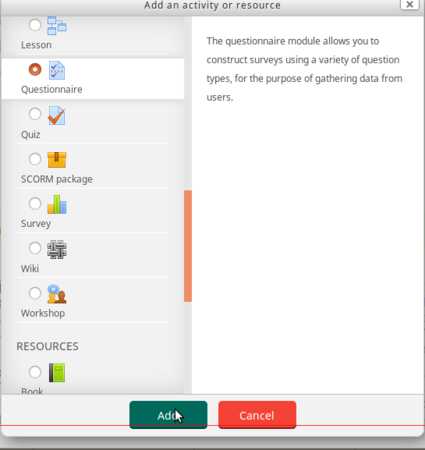
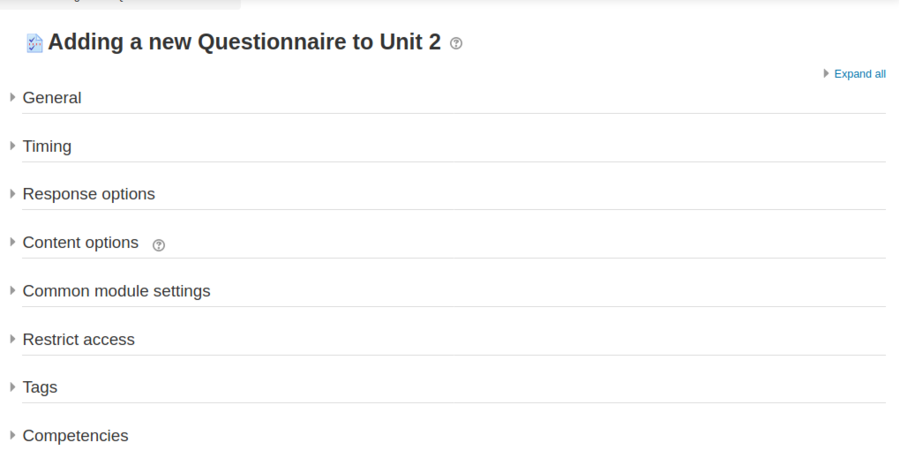
| − | ===== ''' | + | ===== '''ಪ್ರಶ್ನಾವಳಿ''' ===== |
| − | + | ಪ್ರಶ್ನಾವಳಿ ಮಾಡ್ಯೂಲ್ ಅಭ್ಯಾಸಕ್ರಮ ರಚನೆಕಾರರಿಗೆ ರಸಪ್ರಶ್ನೆಗಳು, ದತ್ತಾಂಶ ಸಂಗ್ರಹಣೆ ಇತ್ಯಾದಿಗಳನ್ನು ನೀಡಲು ಸಹಾಯ ಮಾಡುತ್ತದೆ. | |
| − | + | ಪ್ರಶ್ನಾವಳಿಯನ್ನು ಸೇರಿಸಲು, '' 'ಚಟುವಟಿಕೆ / ಸಂಪನ್ಮೂಲವನ್ನು ಸೇರಿಸಿ' 'ಕ್ಲಿಕ್ ಮಾಡಿ ಮತ್ತು ಪ್ರಶ್ನಾವಳಿಯನ್ನು ಆರಿಸಿ | |
<gallery mode="packed" heights="300px" caption="Configuring Questionnaire"> | <gallery mode="packed" heights="300px" caption="Configuring Questionnaire"> | ||
File:Questionnaire_0.png|Select Questionnaire module from activities list | File:Questionnaire_0.png|Select Questionnaire module from activities list | ||
File:Questionnaire_1.png|Edit these menu options to suit course needs | File:Questionnaire_1.png|Edit these menu options to suit course needs | ||
</gallery> | </gallery> | ||
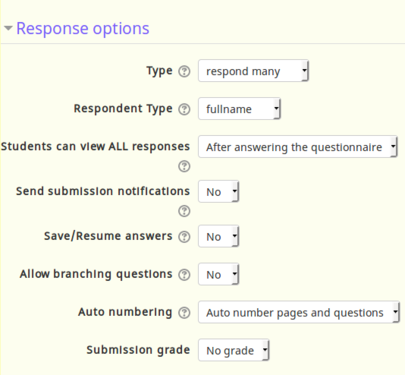
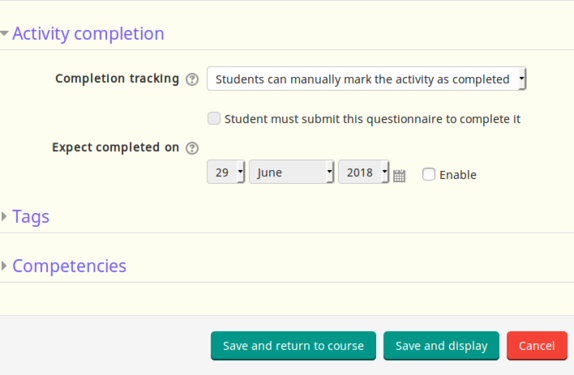
| − | + | ನೀವು ಪ್ರತಿಕ್ರಿಯೆ ಕ್ರಿಯೆಗಳನ್ನು ನಿಯಂತ್ರಿಸಬಹುದು ಮತ್ತು ಚಟುವಟಿಕೆಯನ್ನು ಪೂರ್ಣಗೊಳಿಸಬಹುದು ಅದು ಸೃಷ್ಟಿಕರ್ತ / ಮಾಡರೇಟರ್ಗಳಿಗೆ ಹೆಚ್ಚಿನ ನಿಯಂತ್ರಣವನ್ನು ನೀಡುತ್ತದೆ. | |
<gallery mode="packed" heights="250px" caption="Configuring Questionnaire"> | <gallery mode="packed" heights="250px" caption="Configuring Questionnaire"> | ||
File:Questionnaire_2.png|Helps to design responses better | File:Questionnaire_2.png|Helps to design responses better | ||
File:Questionnaire_3.png|Deadlines also can be set from these menu | File:Questionnaire_3.png|Deadlines also can be set from these menu | ||
</gallery> | </gallery> | ||
| − | + | ನಿಮ್ಮ ಪ್ರಶ್ನಾವಳಿಯನ್ನು ಹೊಂದಿಸಿದ ನಂತರ, ಪ್ರಶ್ನಾವಳಿಯನ್ನು ತೋರಿಸಲು '' ಉಳಿಸಿ ಮತ್ತು ಪ್ರದರ್ಶಿಸು '' ಕ್ಲಿಕ್ ಮಾಡಿ ಅಥವಾ ಉಳಿಸು ಕ್ಲಿಕ್ ಮಾಡಿ ಮತ್ತು ಕೋರ್ಸ್ಗೆ ಹಿಂತಿರುಗಿ. | |
| + | ===== ಹಾಜರಾತಿಯನ್ನು ನಿಭಾಯಿಸುವುದು ===== | ||
| + | ತರಗತಿಯ ಸಮಯದಲ್ಲಿ ಶಿಕ್ಷಕರು ಹಾಜರಾತಿಯನ್ನು ಪಡೆಯಲು ಮತ್ತು ವಿದ್ಯಾರ್ಥಿಗಳಿಗೆ ತಮ್ಮದೇ ಆದ ಹಾಜರಾತಿ ದಾಖಲೆಯನ್ನು ವೀಕ್ಷಿಸಲು ಸಾಧ್ಯವಾಗುವಂತೆ '' 'ಹಾಜರಾತಿ' 'ಮಾಡ್ಯೂಲ್ ಅನ್ನು ವಿನ್ಯಾಸಗೊಳಿಸಲಾಗಿದೆ. | ||
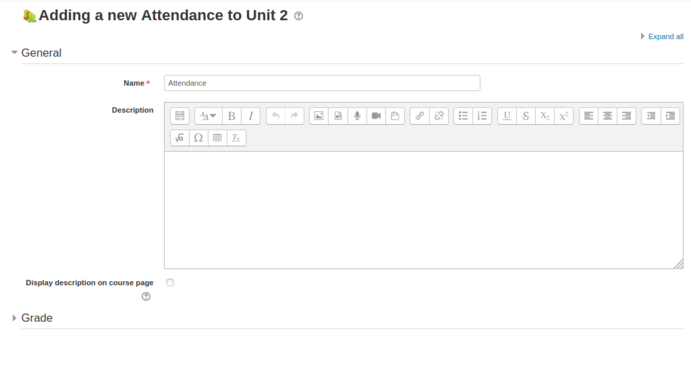
| − | + | ಒಬ್ಬ ಶಿಕ್ಷಕನು ವಿದ್ಯಾರ್ಥಿಯ ಹಾಜರಾತಿ ಸ್ಥಿತಿಯನ್ನು "ಉಪಸ್ಥಿತಿ", "ಅನುಪಸ್ಥಿತಿ", "ತಡವಾಗಿ" ಅಥವಾ "ಕ್ಷಮಿಸಿ" ಎಂದು ಗುರುತಿಸಬಹುದು. ಈ ಸ್ಥಿತಿ ವಿವರಣೆಯನ್ನು ಹೊಂದಿಸಬಹುದಾಗಿದೆ, ಮತ್ತು ಹೆಚ್ಚಿನದನ್ನು ಸೇರಿಸಬಹುದು. ಶಿಕ್ಷಕರು ಹಾಜರಾತಿಯನ್ನು ಕೋರ್ಸ್ನ ಚಟುವಟಿಕೆಯಾಗಿ ಸೇರಿಸುತ್ತಾರೆ, ತದನಂತರ ಹಾಜರಾತಿಯನ್ನು ಪತ್ತೆಹಚ್ಚಬೇಕಾದ ಅವಧಿಗಳನ್ನು ಹೊಂದಿಸುತ್ತಾರೆ. ಅಭ್ಯಾಸಕ್ರಮ ಹಾಜರಾತಿಯನ್ನು ರಚಿಸಲು ಯಾವುದೇ ವಿಭಾಗಕ್ಕೆ ಹೋಗಿ ಮತ್ತು "ಚಟುವಟಿಕೆ ಅಥವಾ ಸಂಪನ್ಮೂಲವನ್ನು ಸೇರಿಸಿ" ಕ್ಲಿಕ್ ಮಾಡಿ | |
| − | |||
| − | |||
| − | |||
<gallery mode="packed" heights="250px" caption="Adding Attendance for the course"> | <gallery mode="packed" heights="250px" caption="Adding Attendance for the course"> | ||
| ೧೫೮ ನೇ ಸಾಲು: | ೧೫೫ ನೇ ಸಾಲು: | ||
File:Adding attendance - 2 .png| Configuring group | File:Adding attendance - 2 .png| Configuring group | ||
</gallery> | </gallery> | ||
| + | ಸಾಮಾನ್ಯ ವಿಭಾಗದಲ್ಲಿ, ಹಾಜರಾತಿಯ ಹೆಸರು ಮತ್ತು ಹಾಜರಾತಿಯ ಬಗ್ಗೆ ವಿವರಣೆಯಂತಹ ಎಲ್ಲಾ ಸಾಮಾನ್ಯ ವಿವರಗಳನ್ನು ನಮೂದಿಸಿ (ನೀವು ಹೊಂದಿದ್ದರೆ). | ||
| − | + | ===== ಚರ್ಚಾ ವೇದಿಕೆಯ ಚಟುವಟಿಕೆ ===== | |
| + | ವೇದಿಕೆಯ ಚಟುವಟಿಕೆಯು ಯಾವುದೇ ವಿಷಯದ ಕುರಿತು ಚರ್ಚೆ ನಡೆಸುವ ಮೂಲಕ ವಿದ್ಯಾರ್ಥಿಗಳು ಮತ್ತು ಶಿಕ್ಷಕರಿಗೆ ವಿಚಾರ ವಿನಿಮಯ ಮಾಡಿಕೊಳ್ಳಲು ಅನುವು ಮಾಡಿಕೊಡುತ್ತದೆ. ಕೋರ್ಸ್ಗೆ ನೋಂದಾಯಿಸಲಾದ ಯಾವುದೇ ಶಿಕ್ಷಕ ಅಥವಾ ವಿದ್ಯಾರ್ಥಿ ಕಾಮೆಂಟ್ಗಳನ್ನು ಪೋಸ್ಟ್ ಮಾಡಬಹುದು, ಹೊಸ ವಿಷಯವನ್ನು ಪ್ರಾರಂಭಿಸಲು ಅಥವಾ ಯಾವುದೇ ವಿಷಯದ ಕುರಿತು ಲಭ್ಯವಿರುವ ಚರ್ಚೆಗಳಿಗೆ ಪ್ರತಿಕ್ರಿಯಿಸಬಹುದು. ಒಂದು ವಿಷಯದ ಚರ್ಚೆಗಳನ್ನು ಮೂಡಲ್ ಅವರ 'ಥ್ರೆಡ್'ನ ಭಾಗವಾಗಿ ಸ್ವಯಂಚಾಲಿತವಾಗಿ ತೋರಿಸಲಾಗುತ್ತದೆ. | ||
| − | + | ಆಯ್ಕೆ ಮಾಡಲು ಹಲವಾರು ವೇದಿಕೆಯ ಪ್ರಕಾರಗಳಿವೆ, ಉದಾಹರಣೆಗೆ ಸ್ಟ್ಯಾಂಡರ್ಡ್ ವೇದಿಕೆ, ಯಾರಾದರೂ ಯಾವುದೇ ಸಮಯದಲ್ಲಿ ಹೊಸ ಚರ್ಚೆಯನ್ನು ಪ್ರಾರಂಭಿಸಬಹುದು; ಪ್ರತಿ ವಿದ್ಯಾರ್ಥಿಯು ನಿಖರವಾಗಿ ಒಂದು ಚರ್ಚೆಯನ್ನು ಪೋಸ್ಟ್ ಮಾಡುವ ವೇದಿಕೆ; ಅಥವಾ ಇತರ ವಿದ್ಯಾರ್ಥಿಗಳ ಪೋಸ್ಟ್ಗಳನ್ನು ವೀಕ್ಷಿಸುವ ಮೊದಲು ವಿದ್ಯಾರ್ಥಿಗಳು ಮೊದಲು ಪೋಸ್ಟ್ ಮಾಡಬೇಕಾದ ಪ್ರಶ್ನೋತ್ತರ ವೇದಿಕೆ. ಫೋರಂ ಪೋಸ್ಟ್ಗಳಿಗೆ ಕಡತಗಳನ್ನು ಲಗತ್ತಿಸಲು ಶಿಕ್ಷಕರು ಅನುಮತಿಸಬಹುದು. ಫೋರಂ ಪೋಸ್ಟ್ನಲ್ಲಿ ಲಗತ್ತಿಸಲಾದ ಯಾವುದೇ ಚಿತ್ರಗಳನ್ನು ಪ್ರದರ್ಶಿಸಲಾಗುತ್ತದೆ. | |
| − | |||
| − | + | ಚರ್ಚಾ ವೇದಿಕೆಗಳು ಅನೇಕ ಉಪಯೋಗಗಳನ್ನು ಹೊಂದಿವೆ, ಉದಾಹರಣೆಗೆ | |
| − | + | * ವಿದ್ಯಾರ್ಥಿಗಳು ಪರಸ್ಪರ ತಿಳಿದುಕೊಳ್ಳಲು ಸಾಮಾಜಿಕ ಸ್ಥಳ | |
| − | + | * ಅಭ್ಯಾಸಕ್ರಮ ಪ್ರಕಟಣೆಗಳಿಗಾಗಿ (ಬಲವಂತದ ಚಂದಾದಾರಿಕೆಯೊಂದಿಗೆ ಸುದ್ದಿ ವೇದಿಕೆಯನ್ನು ಬಳಸುವುದು, ಅಲ್ಲಿ ಅಧ್ಯಾಪಕರು ಮಾತ್ರ ಪೋಸ್ಟ್ ಮಾಡಬಹುದು) | |
| − | * | + | * ಅಭ್ಯಾಸಕ್ರಮ ವಿಷಯ ಅಥವಾ ಓದುವ ಸಾಮಗ್ರಿಗಳನ್ನು ಚರ್ಚಿಸಲು |
| − | * | + | * ಮುಖಾಮುಖಿ ಅಧಿವೇಶನದಲ್ಲಿ ಈ ಹಿಂದೆ ಎದ್ದಿರುವ ಸಮಸ್ಯೆಯನ್ನು ಆನ್ಲೈನ್ನಲ್ಲಿ ಮುಂದುವರಿಸಲು |
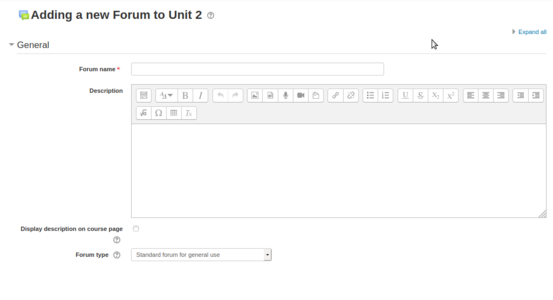
| − | * | + | * ಚರ್ಚೆಯ ವಿಷಯವನ್ನು ಸೇರಿಸಲು "ಚಟುವಟಿಕೆ ಅಥವಾ ಸಂಪನ್ಮೂಲ" ಸೇರಿಸು ಆಯ್ಕೆಯ ಮೇಲೆ ಕ್ಲಿಕ್ ಮಾಡಿ ಮತ್ತು ಚಟುವಟಿಕೆಗಳ ಪಟ್ಟಿಯಿಂದ ವೇದಿಕೆ ಆಯ್ಕೆಯನ್ನು ಆರಿಸಿ. |
| − | * | ||
| − | * | ||
| − | |||
<gallery mode="packed" heights="200px"> | <gallery mode="packed" heights="200px"> | ||
File:Moodle discussion topics 1.png|Enter the discussion topic and summary | File:Moodle discussion topics 1.png|Enter the discussion topic and summary | ||
File:Moodle discussion topics 2.png|Restricting attachment size and text length | File:Moodle discussion topics 2.png|Restricting attachment size and text length | ||
</gallery> | </gallery> | ||
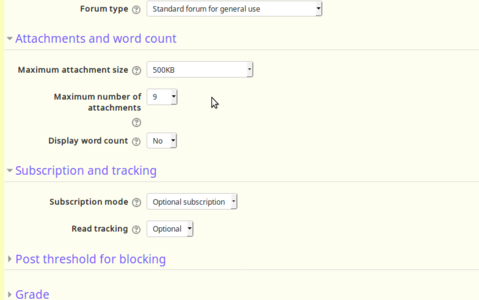
| + | "ಸಾಮಾನ್ಯ" ವಿಭಾಗದ ಅಡಿಯಲ್ಲಿ ನಿಮ್ಮ ಚರ್ಚೆಯ ವಿಷಯವನ್ನು ಟೈಪ್ ಮಾಡಿ ಮತ್ತು "ಲಗತ್ತುಗಳು ಮತ್ತು ಪದಗಳ ಎಣಿಕೆ" ಅಡಿಯಲ್ಲಿ ನೀವು ಲಗತ್ತಿನ ಗಾತ್ರ ಮತ್ತು ಪದ ಎಣಿಕೆಗಳು ಮತ್ತು ಲಗತ್ತುಗಳ ಸಂಖ್ಯೆಯನ್ನು ಮಿತಿಗೊಳಿಸಬಹುದು. | ||
| + | ನೀವು ಸಂಪಾದನೆಯನ್ನು ಪೂರ್ಣಗೊಳಿಸಿದ ನಂತರ, ನಿಮ್ಮ ಆಯ್ದ ವಿಭಾಗದ ಅಡಿಯಲ್ಲಿ ಮೂರನೇ ಚರ್ಚೆಯ ಎಳೆಯನ್ನು ಪ್ರದರ್ಶಿಸಲು "ಉಳಿಸಿ ಮತ್ತು ಪ್ರದರ್ಶಿಸಿ" ಕ್ಲಿಕ್ ಮಾಡಿ. | ||
| + | 'ಪ್ರತ್ಯುತ್ತರ' ಆಯ್ಕೆಯನ್ನು ಕ್ಲಿಕ್ ಮಾಡುವುದರ ಮೂಲಕ ವಿದ್ಯಾರ್ಥಿಗಳು ವಿಷಯ / ಚರ್ಚೆಗೆ ಉತ್ತರಿಸಲು ಪ್ರಾರಂಭಿಸಬಹುದು. | ||
| − | + | ==== ಸುಧಾರಿತ ಚಟುವಟಿಕೆಗಳು ==== | |
| + | # ತಪಶೀಲ ಪಟ್ಟಿಯನ್ನು ಪರಿಶೀಲಿಸಿ | ||
| + | # ಚಾಟ್ | ||
| + | # ಪಾಠ | ||
| + | # ಕಾರ್ಯಾಗಾರ | ||
| − | + | ==== ಕೋರ್ಸ್ಗಳ ಬಹುಭಾಷಾ ಕೊಡುಗೆ ==== | |
| + | ಬಹು ಭಾಷಾ ವಿಷಯ ಫಿಲ್ಟರ್ ಸಂಪನ್ಮೂಲಗಳನ್ನು ಬಹು ಭಾಷೆಗಳಲ್ಲಿ ರಚಿಸಲು ಶಕ್ತಗೊಳಿಸುತ್ತದೆ. ಪೂರ್ವನಿಯೋಜಿತ ಭಾಷೆಯ ಮೂಡಲ್ ಇಂಗ್ಲಿಷ್ನಲ್ಲಿರುತ್ತದೆ ಮತ್ತು ಯಾವುದೇ ಸ್ಥಳೀಯ ಭಾಷೆಗಳನ್ನು ಚಲಾಯಿಸಲು, ಭಾಷಾ ಪ್ಯಾಕೇಜ್ಗಳನ್ನು ನಿಮ್ಮ ಸರ್ವರ್ನಲ್ಲಿ ಸ್ಥಾಪಿಸಬೇಕಾಗುತ್ತದೆ (ಇದನ್ನು ನಿಮ್ಮ ಅಂತರ್ಜಾಲನಿರ್ವಾಹಕರಿಂದ ಮಾಡಲಾಗುತ್ತದೆ). | ||
| − | + | [[File:Moodle Multi-lingual.png|none|thumb|600x600px|Use the Moodle in multi-language model]] | |
| − | + | ನಿಮ್ಮ ಕೋರ್ಸ್ಗೆ ಲಾಗಿನ್ ಮಾಡಿ ಮತ್ತು ಪರದೆಯ ಮೇಲಿನ ಬಲಭಾಗದಲ್ಲಿ ನಿಮ್ಮ ಅಭ್ಯಾಸಕ್ರಮವನ್ನು ನೋಡಲು ಬಯಸುವ ಭಾಷೆಯನ್ನು ನೀವು ಆಯ್ಕೆ ಮಾಡಬಹುದು. | |
| − | |||
| − | |||
| − | |||
| − | |||
| − | ==== | + | ===== ಅಭ್ಯಾಸಕ್ರಮ ಪುಟದಲ್ಲಿ ವಿಷಯವನ್ನು ಸೇರಿಸುವುದು ===== |
| − | + | ಯಾವುದೇ ವಿಭಾಗಕ್ಕೆ ಇತರ ಭಾಷೆಯ ವಿಷಯವನ್ನು ಸೇರಿಸಲು, ನೀವು ಸಂಪಾದನೆ ಆಯ್ಕೆಯನ್ನು ಸಕ್ರಿಯಗೊಳಿಸಿದ ನಂತರ ಮತ್ತು ಸಂಪಾದನೆ -> ಸಂಪಾದನೆ ವಿಷಯದ ಮೇಲೆ ಕ್ಲಿಕ್ ಮಾಡಿ. | |
| − | |||
| − | |||
| − | |||
| − | |||
| − | |||
[[File:Moodle mult-lingual content .png|left|thumb|500x500px|Adding content in multiple language]] | [[File:Moodle mult-lingual content .png|left|thumb|500x500px|Adding content in multiple language]] | ||
| − | + | ವಿಭಾಗವನ್ನು ಸಂಪಾದನೆ ಆಯ್ಕೆಯೊಂದಿಗೆ ತೆರೆದ ನಂತರ, ಕನ್ನಡ ಪಠ್ಯವನ್ನು ವಿಭಾಗಕ್ಕೆ ಸೇರಿಸಲು ನಿಮ್ಮ ಪಠ್ಯ ಪ್ರಾರಂಭವಾಗುವ ಮೊದಲು ಮತ್ತು ಕೊನೆಯಲ್ಲಿ '' '{mlang kn}' '' ('kn' ಎಂದರೆ ಕನ್ನಡ, ಇದನ್ನು ನಿಮ್ಮ ಭಾಷೆಯೊಂದಿಗೆ ಬದಲಾಯಿಸಿ) ಸೇರಿಸಿ. ನಿಮ್ಮ ಪಠ್ಯವು '' '{mlang}' '' ಅನ್ನು ಸೇರಿಸಿ. ನಿಮ್ಮ ಮೂಡಲ್ ಸರ್ವರ್ನಲ್ಲಿ ಈಗಾಗಲೇ ಸ್ಥಾಪಿಸಲಾದ ಯಾವುದೇ ಭಾಷೆಗೆ ಅದೇ ಹಂತಗಳನ್ನು ಅನುಸರಿಸಿ. | |
{{Clear}} | {{Clear}} | ||
| − | ==== | + | ==== ಸುಧಾರಿತ ವೈಶಿಷ್ಟ್ಯಗಳು ==== |
| − | # | + | # ವಿದ್ಯಾರ್ಥಿಗಳ ಟ್ರ್ಯಾಕಿಂಗ್ ಚಟುವಟಿಕೆಗಳು |
| − | # | + | # ಮೌಲ್ಯಮಾಪನಗಳನ್ನು ಅನುಸರಿಸಿ ಮತ್ತು ಮೌಲ್ಯಮಾಪನಗಳ ಶ್ರೇಣಿಕರಣ |
| − | # | + | # ನಡೆಯುತ್ತಿರುವ ಮೌಲ್ಯಮಾಪನಕ್ಕಾಗಿ ರಸಪ್ರಶ್ನೆಗಳು |
| − | # | + | # ಪಂಚಾಂಗ ಬಳಸಿ ಘಟನೆಗಳ ಅನುಸರಣೆ |
| + | |||
| + | === ಮೂಡಲ್ನಲ್ಲಿ ವಿದ್ಯಾರ್ಥಿಗಳ ನೋಟ === | ||
| − | + | ವಿದ್ಯಾರ್ಥಿಯಾಗಿ ನಿಮ್ಮ ಅಭ್ಯಾಸಕ್ರಮವನ್ನು ನೋಡಲು ಮಾಡಲು ಈ ಪುಟವು ನಿಮಗೆ ಸಹಾಯ ಮಾಡುತ್ತದೆ. ಅಧ್ಯಾಪಕರು ನಿಮ್ಮನ್ನು ಕೋರ್ಸ್ಗೆ ದಾಖಲಿಸಿದ ನಂತರ, ನೀವು ಮೂಡಲ್ ಸೈಟ್ನಿಂದ ಎಲ್ಲಾ ಅಭ್ಯಾಸಕ್ರಮ ವಿಷಯವನ್ನು ಬ್ರೌಸ್ ಮಾಡಬಹುದು. | |
| − | |||
| − | ==== | + | ==== ನಿಮ್ಮ ಫೋನ್ನಲ್ಲಿ ಮೂಡಲ್ ತಂತ್ರಾಂಶವನ್ನು ಅನುಸ್ಥಾಪಿಸಿ ==== |
[https://drive.google.com/drive/u/1/search?q=moodle%20mobile Click here] to go through step by procedure to install Moodle mobile app in your phone. | [https://drive.google.com/drive/u/1/search?q=moodle%20mobile Click here] to go through step by procedure to install Moodle mobile app in your phone. | ||
| − | ==== | + | ==== ವಿದ್ಯಾರ್ಥಿ / ಬಳಕೆದಾರರ ಮಾಹಿತಿ ==== |
[[File:1. Edit profile - moodle.png|left|thumb|Edit user profile]] | [[File:1. Edit profile - moodle.png|left|thumb|Edit user profile]] | ||
| − | + | ಹೆಚ್ಚಿನ ಅಭ್ಯಾಸಕ್ರಮ ಗಳು ವಿದ್ಯಾರ್ಥಿಗೆ ಲಾಗಿನ್ ಬಳಕೆದಾರರ ಪ್ರೊಫೈಲ್ ಅನ್ನು ಮೇಲಿನ ಬಲಭಾಗದಿಂದ ನೋಡಲು ಅನುಮತಿಸುತ್ತದೆ. ಈ ಬ್ಲಾಕ್ ವಿದ್ಯಾರ್ಥಿಗೆ ತಮ್ಮ ಬಗ್ಗೆ ಮಾಹಿತಿಯನ್ನು ಕೋರ್ಸ್ನಲ್ಲಿ ನೋಡಲು ಅನುಮತಿಸುತ್ತದೆ. | |
{{Clear}} | {{Clear}} | ||
| − | ==== | + | ==== ಅಭ್ಯಾಸಕ್ರಮ ಸಂರಚನೆ ==== |
| − | + | ಮುಖ್ಯ ಪುಟದಲ್ಲಿ, ನೀವು ಎರಡು ಕಾಲಮ್ಗಳನ್ನು ನೋಡಬಹುದು: ಸಂರಚನೆ, ಅಭ್ಯಾಸಕ್ರಮ ವಿಭಾಗಗಳು ಮತ್ತು ಸುದ್ದಿಗಳೊಂದಿಗೆ ಅಭ್ಯಾಸಕ್ರಮ ವಿಷಯಗಳು ಮತ್ತು ಮುಂಬರುವ ಘಟನೆಗಳು. ಹೆಚ್ಚಿನ ಮಾಹಿತಿಯನ್ನು ನೋಡಲು ನೀವು ಪ್ರತಿ ಟ್ಯಾಬ್ ಅನ್ನು ಕ್ಲಿಕ್ ಮಾಡಬೇಕಾಗುತ್ತದೆ. | |
| + | [[File:2. Course lists.png|thumb|See the list of course you are registered|none]] | ||
| + | ನೀವು ಅಭ್ಯಾಸಕ್ರಮ ಅನ್ನು ಕ್ಲಿಕ್ ಮಾಡಿದ ನಂತರ, ಅಭ್ಯಾಸಕ್ರಮ ತೆರೆಯುತ್ತದೆ ಮತ್ತು ಎಡಭಾಗದ ಅಭ್ಯಾಸಕ್ರಮ ನ್ಯಾವಿಗೇಷನ್ ಆಯ್ಕೆಯಿಂದ, ನೇರವಾಗಿ ನೀವು ಕೋರ್ಸ್ನ ಯಾವುದೇ ವಿಭಾಗಕ್ಕೆ ಹೋಗಬಹುದು. | ||
[https://youtu.be/TPRHv0-_Ebg Click here] to see the tutorial on how access course content from moodle mobile app. | [https://youtu.be/TPRHv0-_Ebg Click here] to see the tutorial on how access course content from moodle mobile app. | ||
| − | ==== | + | ==== ಚರ್ಚಾ ವೇದಿಕೆಯಲ್ಲಿ ಭಾಗವಹಿಸಿ ==== |
| − | + | ಮೊದಲ ಸಾಮಾನ್ಯ ವಿಭಾಗದ ಅಡಿಯಲ್ಲಿ ನೀವು ಎಲ್ಲಾ ಚರ್ಚಾ ವಿಷಯಗಳನ್ನು ನೋಡಲು "ಬೋಧಕವರ್ಗ ಮತ್ತು ವಿದ್ಯಾರ್ಥಿಗಳಿಗೆ ಸಾಮಾನ್ಯ ಚರ್ಚಾ ವೇದಿಕೆ" ಲಿಂಕ್ ಅನ್ನು ಕ್ಲಿಕ್ ಮಾಡಬೇಕು. ಯಾವುದೇ ವಿಷಯಕ್ಕೆ ಪ್ರತ್ಯುತ್ತರಿಸಲು, ವಿಷಯದ ಮೇಲೆ ಕ್ಲಿಕ್ ಮಾಡಿ ಮತ್ತು ಇತರರ ಪ್ರತ್ಯುತ್ತರಗಳ ಅಡಿಯಲ್ಲಿ ಪ್ರತ್ಯುತ್ತರ ಲಿಂಕ್ ಅನ್ನು ಕ್ಲಿಕ್ ಮಾಡುವ ಮೂಲಕ ನಿಮ್ಮ ಉತ್ತರವನ್ನು ಟೈಪ್ ಮಾಡಿ. ಪ್ರತಿ ಪ್ರತ್ಯುತ್ತರ ಪಠ್ಯ ಇನ್ಪುಟ್ ಪೆಟ್ಟಿಗೆಯ ಅಡಿಯಲ್ಲಿ, ಅಗತ್ಯವಿದ್ದರೆ ನಿಮ್ಮ ಕಡತಗಳನ್ನು ಅಪ್ಲೋಡ್ ಮಾಡಲು ಸಹ ಇದು ನಿಮ್ಮನ್ನು ಅನುಮತಿಸುತ್ತದೆ. <br> | |
[[File:3. Course assignments Moodle .png|350px|Participate in the discussion topics]] <br> | [[File:3. Course assignments Moodle .png|350px|Participate in the discussion topics]] <br> | ||
| − | + | ಅಸ್ತಿತ್ವದಲ್ಲಿರುವ ವಿಷಯಕ್ಕೆ ಹೆಚ್ಚುವರಿಯಾಗಿ, "ಹೊಸ ಚರ್ಚಾ ವಿಷಯವನ್ನು ಸೇರಿಸಿ" ಕ್ಲಿಕ್ ಮಾಡುವ ಮೂಲಕ ನೀವು ಹೊಸ ಚರ್ಚಾ ವಿಷಯವನ್ನು ರಚಿಸಬಹುದು. <br> | |
| − | + | ||
| + | ಅಲ್ಲದೆ, ಮೊಬೈಲ್ ಅಪ್ಲಿಕೇಶನ್ನಲ್ಲಿ ಚರ್ಚಾ ವೇದಿಕೆಯಲ್ಲಿ ಹೇಗೆ ಭಾಗವಹಿಸಬೇಕು ಎಂಬ ವೀಡಿಯೊ ಟ್ಯುಟೋರಿಯಲ್ ನೋಡಲು [https://youtu.be/rRaNAdpPJFY ಇಲ್ಲಿ ಕ್ಲಿಕ್ ಮಾಡಿ]. | ||
| − | ==== | + | ==== ಚಟುವಟಿಕೆಗಳಲ್ಲಿ ಭಾಗವಹಿಸುವುದು ==== |
| − | + | ಕೋರ್ಸ್ಗಳ ಪ್ರತಿಯೊಂದು ವಿಭಾಗದ ಅಡಿಯಲ್ಲಿ, ಬೋಧಕವರ್ಗವು ವಿದ್ಯಾರ್ಥಿಗಳಿಗೆ ಪೂರ್ಣಗೊಳಿಸಲು ಕೆಲವು ಚಟುವಟಿಕೆಗಳನ್ನು ನೀಡುತ್ತದೆ. ಚಟುವಟಿಕೆಗಳು ರಸಪ್ರಶ್ನೆಗಳು, ಕಾರ್ಯಯೋಜನೆಗಳು, ಪರಿಶೀಲನಾಪಟ್ಟಿಗಳು ಮತ್ತು ಚರ್ಚಾ ವಿಷಯಗಳಾಗಿರಬಹುದು. ಅದರಲ್ಲಿ ಭಾಗವಹಿಸಲು ಚಟುವಟಿಕೆಯ ಮೇಲೆ ಕ್ಲಿಕ್ ಮಾಡಿ. | |
| − | ===== ''' | + | ===== '''ಕಾರ್ಯಯೋಜನೆಗಳ ಚಟುವಟಿಕೆಯಲ್ಲಿ ಭಾಗವಹಿಸುವುದು''' ===== |
| − | + | ಚಟುವಟಿಕೆಯು ಕಾರ್ಯಯೋಜನೆಯಾಗಿದ್ದರೆ, ಪೂರ್ಣ ನಿಯೋಜನೆಯನ್ನು ಓದಲು ನೀವು ಚಟುವಟಿಕೆಯ ಶೀರ್ಷಿಕೆಯ ಮೇಲೆ ಕ್ಲಿಕ್ ಮಾಡಿ ಮತ್ತು "ಸಲ್ಲಿಕೆ ಸೇರಿಸಿ" ಕ್ಲಿಕ್ ಮಾಡಿ ಅದು "ಆನ್ಲೈನ್ ಪಠ್ಯ ವಿಭಾಗ" ಮತ್ತು "ಕಡತ ಸಲ್ಲಿಕೆ" ವಿಭಾಗಗಳನ್ನು ತೆರೆಯುತ್ತದೆ, ಆನ್ಲೈನ್ ಪಠ್ಯ ವಿಭಾಗದ ಅಡಿಯಲ್ಲಿ ನೀವು ನೇರವಾಗಿ ನೀಡಬಹುದು ನಿಮ್ಮ ನಿಯೋಜನೆಯ ಪಠ್ಯ ಇನ್ಪುಟ್. ಕಡತ ಸಲ್ಲಿಕೆ ವಿಭಾಗದಲ್ಲಿ ನೀವು ಚಿತ್ರಗಳು, ಪಠ್ಯ ಕಡತಗಳು, ಆಡಿಯೊ ಇತ್ಯಾದಿಗಳಂತಹ ಯಾವುದೇ ಕಡತಗಳನ್ನು ಅಪ್ಲೋಡ್ ಮಾಡಬಹುದು. | |
<gallery mode="packed" heights="250px" caption="Participating in assignment submission activity"> | <gallery mode="packed" heights="250px" caption="Participating in assignment submission activity"> | ||
File:3. Course assignments Moodle 2 .png| Participate in assignment activity | File:3. Course assignments Moodle 2 .png| Participate in assignment activity | ||
| ೨೪೧ ನೇ ಸಾಲು: | ೨೩೯ ನೇ ಸಾಲು: | ||
File:Assignment submission 2.png | File submission section | File:Assignment submission 2.png | File submission section | ||
</gallery> | </gallery> | ||
| − | + | ಈ ಪಠ್ಯದಲ್ಲಿ ನೀವು 500 ಕೆಬಿ ಕಡತ ಅನ್ನು ನಿಯೋಜನೆಯಂತೆ ಅಪ್ಲೋಡ್ ಮಾಡಬಹುದು, ನೀವು 500 ಕೆಬಿಗಿಂತ ಹೆಚ್ಚಿನ ಕಡತಗಳನ್ನು ಅಪ್ಲೋಡ್ ಮಾಡಲು ಬಯಸಿದರೆ, ನಿಮ್ಮ ಕಡತ ಅನ್ನು ಅಪ್ಲೋಡ್ ಮಾಡಲು ಮತ್ತು ನೀಡಲು [[ಗೂಗಲ್ ಡ್ರೈವ್ ಕಲಿಯಿರಿ | '' 'ಗೂಗಲ್ ಡ್ರೈವ್ ಬಳಸಿ' '' ]] ಆನ್ಲೈನ್ ಪಠ್ಯ ಇನ್ಪುಟ್ ವಿಭಾಗದ ಅಡಿಯಲ್ಲಿ ಇಲ್ಲಿ ಲಿಂಕ್. ನಿಮ್ಮ ಇನ್ಪುಟ್ಗಳು ಮುಗಿದ ನಂತರ ನಿಮ್ಮ ನಿಯೋಜನೆಯನ್ನು ಸಲ್ಲಿಸಲು "ಬದಲಾವಣೆಗಳನ್ನು ಉಳಿಸು" ಕ್ಲಿಕ್ ಮಾಡಿ. | |
| − | + | ಗಮನಿಸಿ: - ನೀವು ರಚಿಸಿದ ಯಾವುದೇ ವೀಡಿಯೊವನ್ನು ಸಲ್ಲಿಸಲು ನೀವು ಬಯಸಿದರೆ, ಅದನ್ನು ಅಪ್ಲೋಡ್ ಮಾಡಲು [[ಯುಟ್ಯೂಬ್ ಕಲಿಯಿರಿ | '' 'ಯುಟ್ಯೂಬ್' ''] ಅನ್ನು ಬಳಸಿ ಮತ್ತು ಆನ್ಲೈನ್ ಪಠ್ಯ ಇನ್ಪುಟ್ ವಿಭಾಗದ ಅಡಿಯಲ್ಲಿ ವೀಡಿಯೊ ಲಿಂಕ್ ನೀಡಿ. | |
[https://youtu.be/MBfFEuWCX20 '''Click here'''] to see video about assignment submission on moodle mobile app. | [https://youtu.be/MBfFEuWCX20 '''Click here'''] to see video about assignment submission on moodle mobile app. | ||
| − | === | + | === ಆಕರಗಳು === |
* [https://moodle.org/ Moodle] | * [https://moodle.org/ Moodle] | ||
* [https://docs.moodle.org/34/en/Main_page Moodle handout] | * [https://docs.moodle.org/34/en/Main_page Moodle handout] | ||
[[ವರ್ಗ:ಅನ್ವಯಕಗಳನ್ನು ಅನ್ವೇಷಿಸಿ]] | [[ವರ್ಗ:ಅನ್ವಯಕಗಳನ್ನು ಅನ್ವೇಷಿಸಿ]] | ||
೦೫:೩೬, ೬ ಮೇ ೨೦೨೦ ದ ಇತ್ತೀಚಿನ ಆವೃತ್ತಿ
ಪರಿಚಯ
ಮೂಲ ಮಾಹಿತಿ
| ಐಸಿಟಿ ಸಾಮರ್ಥ್ಯಗಳು | ಮೂಡಲ್ ಎನ್ನುವುದು ಕಲಿಕೆ ನಿರ್ವಹಣಾ ವ್ಯವಸ್ಥೆ (ಎಲ್ಎಂಎಸ್), ಇದು ಶಿಕ್ಷಣತಜ್ಞರು, ನಿರ್ವಾಹಕರು ಮತ್ತು ಕಲಿಯುವವರಿಗೆ ವೈಯಕ್ತಿಕ ಮತ್ತು ಸಹಕಾರಿ ಕಲಿಕಾ ಪರಿಸರವನ್ನು ರಚಿಸಲು ದೃಢವಾದ, ಸುರಕ್ಷಿತ ಮತ್ತು ಸಂಯೋಜಿತ ವ್ಯವಸ್ಥೆಯನ್ನು ಒದಗಿಸಲು ವಿನ್ಯಾಸಗೊಳಿಸಲಾಗಿದೆ. |
| ಶೈಕ್ಷಣಿಕ ಅನ್ವಯ ಮತ್ತು ಪ್ರಸ್ತುತತೆ | ಸಹಕಾರಿ ಕಲಿಕೆಗಾಗಿ ಮೂಡಲ್ ಒಂದು ಆನ್ಲೈನ್ ವೇದಿಕೆಯನ್ನು ಒದಗಿಸುತ್ತದೆ . ಇದು ಕೋರ್ಸ್ಗಳನ್ನು ಹೊಂದಿಸಲು, ಕೋರ್ಸ್ಗೆ ಕಲಿಕಾ ಸಂಪನ್ಮೂಲಗಳು ಮತ್ತು ಚಟುವಟಿಕೆಗಳನ್ನು ಒದಗಿಸಲು ಮತ್ತು ಕಲಿಯುವವರನ್ನು ಮೌಲ್ಯಮಾಪನ ಮಾಡಲು ಶಿಕ್ಷಕರಿಗೆ ಅಧಿಕಾರ ನೀಡುತ್ತದೆ. ಶಿಕ್ಷಕರು ಮತ್ತು ಕಲಿಯುವವರು ಮೂಡಲ್ನಲ್ಲಿನ ಆನ್ಲೈನ್ ಚರ್ಚಾ ವೇದಿಕೆಗಳನ್ನು ಬಳಸಿಕೊಂಡು ವಿಚಾರಗಳನ್ನು ಮತ್ತು ಅನುಭವಗಳನ್ನು ಹಂಚಿಕೊಳ್ಳಬಹುದು. |
| ಆವೃತ್ತಿ | ಪ್ರಸ್ತುತ 3.4 ಬಳಸುತ್ತಿದೆ |
| ಇದೇ ರೀತಿಯ ಇತರ ಅಪ್ಲಿಕೇಶನ್ಗಳು | ಟ್ಯಾಲೆಂಟ್ ಎಲ್ಎಂಎಸ್ |
| ಮೊಬೈಲ್ ಮತ್ತು ಟ್ಯಾಬ್ಲೆಟ್ಗಳಲ್ಲಿನ ಅಪ್ಲಿಕೇಶನ್ | ಇದು ವೆಬ್ ಆಧಾರಿತ ಅಪ್ಲಿಕೇಶನ್ ಆಗಿದೆ, ಮತ್ತು ಬ್ರೌಸಿಂಗ್ ಅನ್ನು ಬೆಂಬಲಿಸುವ ಯಾವುದೇ ಸಾಧನದಲ್ಲಿ ಬ್ರೌಸರ್ ಮೂಲಕ ಪ್ರವೇಶಿಸಬಹುದು. |
| ಅಭಿವೃದ್ಧಿ ಮತ್ತು ಸಮುದಾಯದ ಸಹಾಯ | Moodle |
ಮೂಡಲ್ ಜೊತೆ ಕಾರ್ಯನಿರ್ವಹಣೆ
ಮೂಡಲ್ ಉಚಿತ ಮತ್ತು ಮುಕ್ತ ಕಲಿಕೆ ನಿರ್ವಹಣಾ ವ್ಯವಸ್ಥೆ (ಎಲ್ಎಂಎಸ್). ಮೂಡಲ್ನಲ್ಲಿ ನೀವು ಯಾವುದೇ ಸಂಖ್ಯೆಯ ಕೋರ್ಸ್ಗಳನ್ನು ಹೊಂದಿಸಬಹುದು. ನೀವು ಅಗತ್ಯವಿರುವಂತೆ ಕೋರ್ಸ್ಗಳನ್ನು ವರ್ಗೀಕರಿಸಬಹುದು.
ಅಭ್ಯಾಸಕ್ರಮ ಎನ್ನುವುದು ಮೂಡಲ್ ಸೈಟ್ನಲ್ಲಿ ಒಂದು ಸ್ಥಳವಾಗಿದ್ದು, ಅಲ್ಲಿ ಶಿಕ್ಷಕರು ತಮ್ಮ ವಿದ್ಯಾರ್ಥಿಗಳಿಗೆ ವಿಷಯ (ಕಲಿಕಾ ಸಾಮಗ್ರಿಗಳು) ಮತ್ತು ಚಟುವಟಿಕೆಗಳನ್ನು (ಶಿಕ್ಷಣಶಾಸ್ತ್ರ) ಸೇರಿಸಬಹುದು. ಒಬ್ಬ ಶಿಕ್ಷಕರು ಒಂದಕ್ಕಿಂತ ಹೆಚ್ಚು ಕೋರ್ಸ್ಗಳಿಗೆ ಅಧ್ಯಾಪಕರಾಗಿರಬಹುದು, ಒಂದು ಕೋರ್ಸ್ನಲ್ಲಿ ಒಂದಕ್ಕಿಂತ ಹೆಚ್ಚು ಶಿಕ್ಷಕರು ಮತ್ತು ಒಂದಕ್ಕಿಂತ ಹೆಚ್ಚು ಕಲಿಯುವವರು ಇರಬಹುದು.
ಶಿಕ್ಷಕರು ಮತ್ತು ವಿದ್ಯಾರ್ಥಿಗಳು ಇಬ್ಬರೂ ಕೋರ್ಸ್ಗೆ 'ನೋಂದಾಯಿಸಿಕೊಳ್ಳಬೇಕು' ('ಶಿಕ್ಷಕ' ಅಥವಾ 'ವಿದ್ಯಾರ್ಥಿ'), ಈ ಪಾತ್ರ ಸಂರಚನೆಯನ್ನು ಮೂಡಲ್ ನಿರ್ವಾಹಕರು ಮಾಡುತ್ತಾರೆ.
ಮೂಡಲ್ ಅಭ್ಯಾಸಕ್ರಮ ಪುಟಕ್ಕೆ ಲಾಗ್ ಇನ್ ಆಗುವುದು
ಅಭ್ಯಾಸಕ್ರಮ ವಿಷಯವನ್ನು ವೀಕ್ಷಿಸಲು ಅಥವಾ ಸಂಪಾದಿಸಲು ನಿಮ್ಮ ಮೂಡಲ್ ಅಭ್ಯಾಸಕ್ರಮ ಲಿಂಕ್ ಅನ್ನು ಕ್ಲಿಕ್ ಮಾಡಿ ಮತ್ತು ಲಾಗಿನ್ ಕ್ಲಿಕ್ ಮಾಡಿ. ಇಲ್ಲಿ ಕ್ಲಿಕ್ ಮಾಡಿ ಸೆಂಟರ್ ಫಾರ್ ಎಜುಕೇಶನ್ ಅಂಡ್ ಟೆಕ್ನಾಲಜಿ, ಐಟಿ ಫಾರ್ ಚೇಂಜ್ ನಿರ್ವಹಿಸುವ ಮೂಡಲ್ ಸ್ಥಾಪನೆಯನ್ನು ವೀಕ್ಷಿಸಲು.
- Moodle - Login to the course
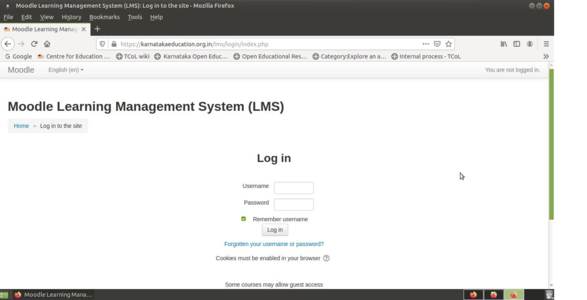
ಮೂಡಲ್ ಲಾಗಿನ್ ಪರದೆ
ಅಭ್ಯಾಸಕ್ರಮದ ಪ್ರವೇಶದ್ವಾರ


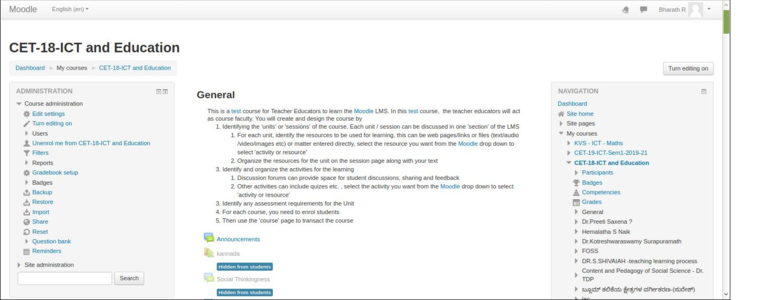
ಒಮ್ಮೆ ನೀವು ಲಾಗಿನ್ ಮಾಡಿದ ನಂತರ, ನೀವು ಅಭ್ಯಾಸಕ್ರಮ ವಿಷಯವನ್ನು ನೋಡಬಹುದು ಮತ್ತು ನಿಮ್ಮ ಲಾಗಿನ್ ಹೆಸರನ್ನು ಪರದೆಯ ಮೇಲಿನ ಬಲ ಮೂಲೆಯಲ್ಲಿ ನೋಡುತ್ತೀರಿ.
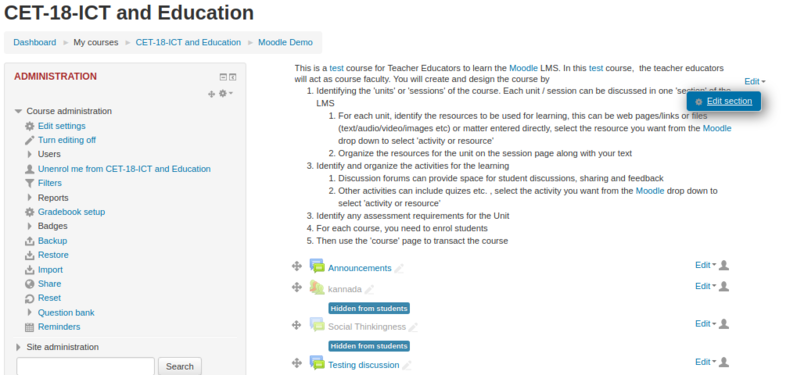
ಸಂಪಾದನೆಯ ವಿಭಾಗ
ನೀವು ಹೊಸ ಖಾಲಿ ಅಭ್ಯಾಸಕ್ರಮ ಅನ್ನು ಹೊಂದಿದ ನಂತರ, ನೀವು '' ಸಂಪಾದನೆಯನ್ನು ಆನ್ ಮಾಡುವ ಮೂಲಕ '' ಸಂಪಾದನೆಯನ್ನು ಆನ್ ಮಾಡಿ 'ಕ್ಲಿಕ್ ಮಾಡುವ ಮೂಲಕ ಅದರ ಕೆಲಸವನ್ನು ಪ್ರಾರಂಭಿಸಬಹುದು. ಪರದೆಯ ಮೇಲ್ಭಾಗದಲ್ಲಿರುವ 'ಬಟನ್. ಸಂಪನ್ಮೂಲಗಳು ಮತ್ತು ಚಟುವಟಿಕೆಗಳನ್ನು ಸೇರಿಸುವುದು ಸೇರಿದಂತೆ ಅಭ್ಯಾಸಕ್ರಮ ವಿಷಯಗಳನ್ನು ಸಂಪಾದಿಸಲು ಅಧ್ಯಾಪಕರಿಗೆ ಮಾತ್ರ ಹಕ್ಕುಗಳಿವೆ. ಇದು ವಿದ್ಯಾರ್ಥಿಗಳಿಗೆ ಲಭ್ಯವಿಲ್ಲ.
'ಸಂಪಾದನೆ' ಆಯ್ಕೆಯನ್ನು 'ಆನ್' ಮಾಡಿದಾಗ, ನಿಮ್ಮ ಅಭ್ಯಾಸಕ್ರಮ ಮುಖಪುಟದಲ್ಲಿನ ಪ್ರತಿಯೊಂದು ಐಟಂ ಮತ್ತು ಪ್ರತಿ ವಿಭಾಗ / ಬ್ಲಾಕ್ 'ಸಂಪಾದಿಸು' ಆಯ್ಕೆಯನ್ನು ಪ್ರದರ್ಶಿಸುತ್ತದೆ, ಇದು ಸಂಪಾದನೆ / ಸರಿಸಲು / ನಕಲಿಸಿ / ಅಳಿಸಿ / ಮರೆಮಾಡು ಮುಂತಾದ ವಿಭಿನ್ನ ಕಾರ್ಯಗಳನ್ನು ನಿರ್ವಹಿಸಲು ನಿಮಗೆ ಅನುವು ಮಾಡಿಕೊಡುತ್ತದೆ. 'ಗಮನಿಸಿ:' ನಿಮ್ಮ ಥೀಮ್ನಲ್ಲಿ ಐಕಾನ್ಗಳು ವಿಭಿನ್ನವಾಗಿರಬಹುದು. ಆದಾಗ್ಯೂ, ಮೂಡಲ್ನ ವಿಭಿನ್ನ ವಿಷಯಗಳಿಗೆ ಕ್ರಿಯಾತ್ಮಕತೆಯು ಒಂದೇ ಆಗಿರುತ್ತದೆ.
ಒಮ್ಮೆ ನೀವು ಸಂಪಾದನೆ - ಸಂಪಾದನೆ ವಿಷಯಗಳ ಮೇಲೆ ಕ್ಲಿಕ್ ಮಾಡಿದರೆ, ಅದು ಪುಟವನ್ನು ಸಂಪಾದಿಸಲು ನಮ್ಮನ್ನು ಕರೆದೊಯ್ಯುತ್ತದೆ (ಕೆಳಗಿನ ಸ್ಕ್ರೀನ್ ಶಾಟ್ಗಳನ್ನು ನೋಡಿ).
- Moodle - editing course content sections
Click 'edit topics' option to start editing section
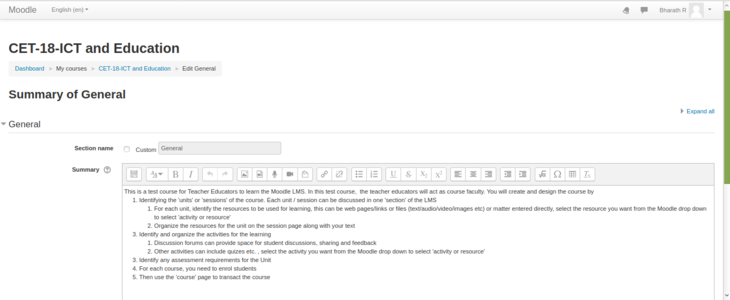
Uncheck 'Use default section name' for custom title name


ಕಡತವನ್ನು ಸಾರಾಂಶ ವಿಭಾಗಕ್ಕೆ ಎಳೆಯುವ ಮತ್ತು ಬಿಡುವ ಮೂಲಕ ನಿಮ್ಮ ಕಡತಗಳನ್ನು ಚಿತ್ರಗಳು ಅಥವಾ ವೀಡಿಯೊಗಳಂತೆ ಎಂಬೆಡ್ ಮಾಡಬಹುದು. ನೀವು ಕಡತಗಳ ಗಾತ್ರವನ್ನು ಸಹ ಹೊಂದಿಸಬಹುದು.
ನಿಮ್ಮ ವಿಭಾಗಕ್ಕೆ ನಿಮ್ಮ ಸ್ವಂತ ಶೀರ್ಷಿಕೆಯನ್ನು ನೀಡಲು "ಡೀಫಾಲ್ಟ್ ವಿಭಾಗದ ಹೆಸರನ್ನು ಬಳಸಿ" ಅನ್ನು ಪರಿಶೀಲಿಸಿ.
ಸಾರಾಂಶ ಪೆಟ್ಟಿಗೆಯ ಅಡಿಯಲ್ಲಿ ವಿಭಾಗದ ಸಾರಾಂಶವನ್ನು ಸೇರಿಸಲು ಪ್ರಾರಂಭಿಸಿ (ನೀವು ಅಸ್ತಿತ್ವದಲ್ಲಿರುವ ಪಠ್ಯ ದಸ್ತಾವೇಜಿನಿಂದ ನಕಲಿಸಬಹುದು). ನಿಮ್ಮ ಪಠ್ಯವನ್ನು ಫಾರ್ಮ್ಯಾಟ್ ಮಾಡಲು ಉನ್ನತ 'ಮೂಲ ಫಾರ್ಮ್ಯಾಟಿಂಗ್' ಟೂಲ್ಬಾರ್ ಬಳಸಿ, ನಿಮ್ಮ ಪಠ್ಯವನ್ನು ನೀವು 'ದಪ್ಪಕ್ಷರ' 'ಅಥವಾ' 'ಇಟಾಲಿಸೈಸ್' 'ಮಾಡಬಹುದು ಮತ್ತು ಮೂಲ ಪಠ್ಯ ಸಂಪಾದನೆ ಕಾರ್ಯಗಳನ್ನು ಮಾಡಬಹುದು.
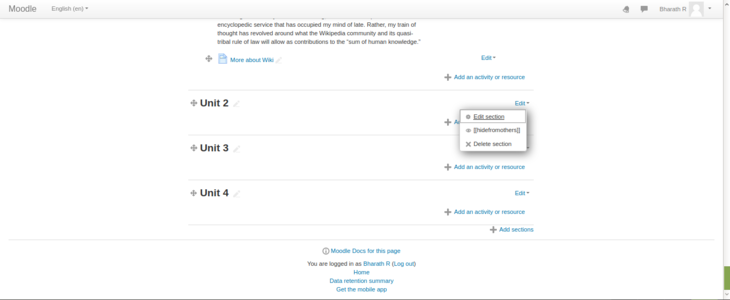
ನಿರ್ಬಂಧಿಸುವ ವಿಭಾಗದ ಅಡಿಯಲ್ಲಿ, ಕೆಳಗಿನ ಸ್ಕ್ರೀನ್ ಶಾಟ್ನಲ್ಲಿರುವಂತೆ ನೀವು ಪುಟವನ್ನು ಪ್ರವೇಶಿಸಲು ನಿರ್ಬಂಧಿಸಬಹುದು.
- Moodle - editing course content sections
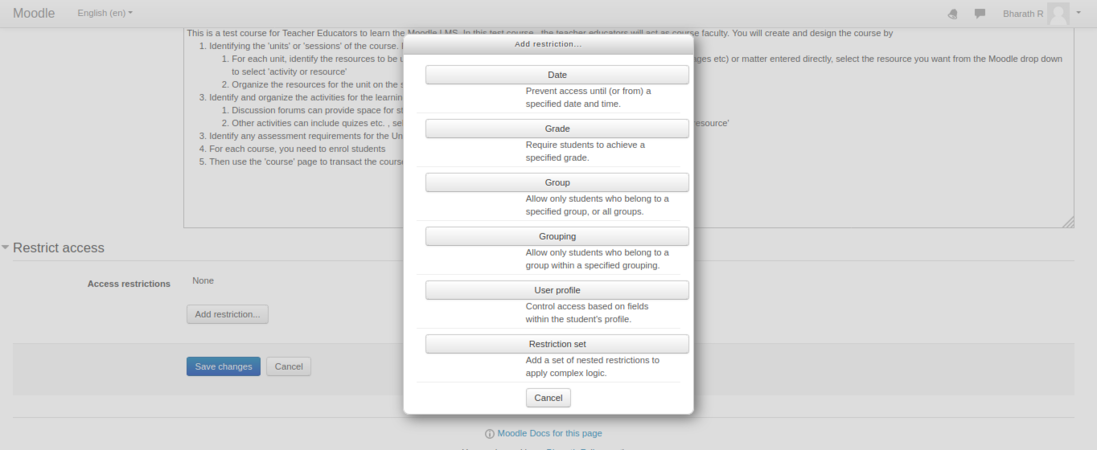
Set restrictions to access the section
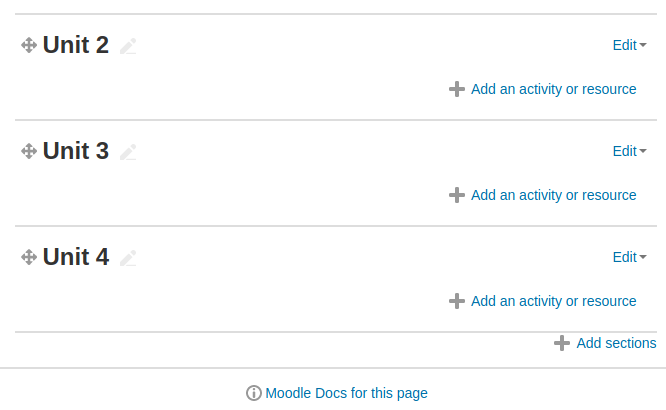
To add or remove sections


ನಿಮ್ಮ ಸಂಪಾದನೆಯನ್ನು ಪೂರ್ಣಗೊಳಿಸಿದ ನಂತರ ಮತ್ತು ವಿಭಾಗದಲ್ಲಿ ಪಠ್ಯ, ಚಿತ್ರಗಳು, ವೀಡಿಯೊಗಳನ್ನು ಸೇರಿಸಿದ ನಂತರ, ಆ ವಿಭಾಗದ ಅಡಿಯಲ್ಲಿ ನಿಮ್ಮ ವಿಷಯವನ್ನು ಉಳಿಸಲು ನೀವು "ಬದಲಾವಣೆಗಳನ್ನು ಉಳಿಸು" ಗುಂಡಿಯನ್ನು ಕ್ಲಿಕ್ ಮಾಡಬೇಕು. ಅಭ್ಯಾಸಕ್ರಮ ಮುಖ್ಯ ಪುಟದ ಕೆಳಕ್ಕೆ ಸ್ಕ್ರಾಲ್ ಮಾಡಿ ಮತ್ತು ಕೊನೆಯ ವಿಭಾಗದ ಕೆಳಗೆ, ಸಣ್ಣ '+ ' 'ಮತ್ತು' - ಐಕಾನ್ಗಳನ್ನು ನೋಡಿ (ಬಲಭಾಗದಲ್ಲಿ). ವಿಭಾಗಗಳನ್ನು ಸೇರಿಸಲು ಮತ್ತು ತೆಗೆದುಹಾಕಲು 'ಜೊತೆಗೆ' ( '+' ) / 'ಮೈನಸ್ (-)' ಕ್ಲಿಕ್ ಮಾಡಿ.
ಸಂಪನ್ಮೂಲಗಳನ್ನು ಸೇರಿಸುವುದು
ಸಂಪನ್ಮೂಲವು ಶಿಕ್ಷಕನು ಕಡತ ಅಥವಾ ವೆಬ್ ಲಿಂಕ್ನಂತಹ ಕಲಿಕೆಯನ್ನು ಬೆಂಬಲಿಸಲು ಬಳಸಬಹುದಾದ ಒಂದು ವಸ್ತು ಆಗಿದೆ. ಅಭ್ಯಾಸಕ್ರಮ ಪುಟಕ್ಕೆ ನೀವು ಸಂಪನ್ಮೂಲಗಳನ್ನು ಸೇರಿಸಲು ಎರಡು ಮಾರ್ಗಗಳಿವೆ
ನೇರವಾಗಿ ವಿಭಾಗದಲ್ಲಿ ಸಂಪನ್ಮೂಲವನ್ನು ಸಿದ್ಧವಾಗಿ ತೋರುವಂತೆ (ಎಂಬೆಡ್) ಮಾಡುವುದು
ವೆಬ್ ಲಿಂಕ್ಗಳನ್ನು ನೇರವಾಗಿ ವಿಭಾಗದಲ್ಲಿಯೇ ಒದಗಿಸಬಹುದು. ನೀವು ಲಿಂಕ್ ಅನ್ನು ನೇರವಾಗಿ ನೀಡಬಹುದು ಅಥವಾ ಅಸ್ತಿತ್ವದಲ್ಲಿರುವ ಪಠ್ಯಕ್ಕೆ ಲಿಂಕ್ ಅನ್ನು 'ಎಂಬೆಡ್' ಮಾಡಬಹುದು (ಅದು ಹೈಪರ್ ಲಿಂಕ್ ಆಗಿ ತೋರಿಸುತ್ತದೆ). ಮೂಡಲ್ನಲ್ಲಿ ಚಿತ್ರ ಅಥವಾ ವೀಡಿಯೊ ಕಡತ ಸಂಗ್ರಹವಾಗಿರುವ URL ಅನ್ನು ಒದಗಿಸುವ ಮೂಲಕ ನೀವು ವಿಭಾಗ ಮತ್ತು ಪುಟಗಳನ್ನು ನೇರವಾಗಿ ವಿಭಾಗ ಪುಟದಲ್ಲಿ ಎಂಬೆಡ್ ಮಾಡಬಹುದು (ಇನ್ಸರ್ಟ್ -> ಮೀಡಿಯಾ ಆಯ್ಕೆಯನ್ನು ಬಳಸಿ).
ವಿಭಾಗಕ್ಕೆ ಸಂಪನ್ಮೂಲವನ್ನು ಸೇರಿಸಲಾಗುತ್ತಿದೆ
ಕಡತಕಡತಗಳು, ಕಡತಕೋಶ , URL ಗಳಂತಹ ಸಂಪನ್ಮೂಲಗಳನ್ನು ಸೇರಿಸಲು ಅಥವಾ ಪುಸ್ತಕವನ್ನು ರಚಿಸಲು, ನಿಮ್ಮ ಅಭ್ಯಾಸಕ್ರಮ ಮುಖಪುಟದಲ್ಲಿ ನೀವು ಕಾಣಿಸಿಕೊಳ್ಳಲು ಬಯಸುವ ವಿಭಾಗವನ್ನು ಆರಿಸಿ ಮತ್ತು ಆ ವಿಭಾಗದಲ್ಲಿ ಲಭ್ಯವಿರುವ "ಚಟುವಟಿಕೆ ಅಥವಾ ಸಂಪನ್ಮೂಲವನ್ನು ಸೇರಿಸಿ" ಕ್ಲಿಕ್ ಮಾಡಿ ನಂತರ ಆಯ್ಕೆಮಾಡಿ ಡ್ರಾಪ್ ಡೌನ್ ಪಟ್ಟಿಯಿಂದ ನೀವು ಸೇರಿಸಲು ಬಯಸುವ ಸಂಪನ್ಮೂಲಗಳ ಪ್ರಕಾರ. ಇದು ನಿಮ್ಮಲ್ಲಿರುವ ಯಾವುದೇ ಕಡತ ಆಗಿರಬಹುದು, ಅದನ್ನು ನೀವು ಮೂಡಲ್ಗೆ ಅಪ್ಲೋಡ್ ಮಾಡುತ್ತೀರಿ ಮತ್ತು ಈ ವಿಭಾಗದಲ್ಲಿ ಸಂಪನ್ಮೂಲವಾಗಿ ಒದಗಿಸುತ್ತೀರಿ.
ನೀವು ಪಟ್ಟಿಯಿಂದ ಯಾವುದೇ ಸಂಪನ್ಮೂಲ ಪ್ರಕಾರವನ್ನು ಆಯ್ಕೆ ಮಾಡಿದ ನಂತರ, 'ಸೇರಿಸು' ಕ್ಲಿಕ್ ಮಾಡಿ. ಮುಂದಿನ ಸಂವಾದ ಪೆಟ್ಟಿಗೆಯಲ್ಲಿ ನೀವು ಅಗತ್ಯ ಮಾಹಿತಿಯನ್ನು ನಮೂದಿಸಿದ್ದೀರಿ. ವಿವರಗಳಿಗಾಗಿ ಕೆಳಗಿನ ಸ್ಕ್ರೀನ್ ಶಾಟ್ ನೋಡಿ.
- Adding resources into the sections
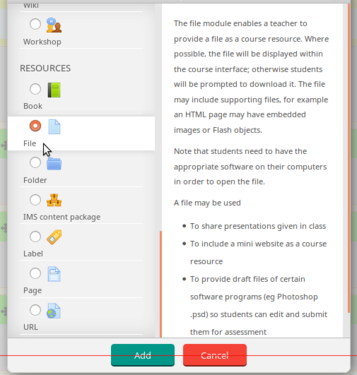
Selecting a type of resources from the list
Entering basic information about the resources


- ಹೆಸರು: ನಿಮ್ಮ ಸಂಪನ್ಮೂಲಗಳ ಲಿಂಕ್ಗಾಗಿ ಹೆಸರನ್ನು ಟೈಪ್ ಮಾಡಿ, ಅದು ಲಿಂಕ್ ಅನ್ನು ರಚಿಸುತ್ತದೆ, ಅದು ಕಡತವನ್ನು ಕಡತವೀಕ್ಷಿಸಲು ವಿದ್ಯಾರ್ಥಿಗಳು ಕ್ಲಿಕ್ ಮಾಡುತ್ತದೆ. ಅದರ ಉದ್ದೇಶ / ವಿಷಯಗಳನ್ನು ಸೂಚಿಸುವ ಹೆಸರನ್ನು ನೀಡಲು ಇದು ಸಹಾಯಕವಾಗಿರುತ್ತದೆ.
- ವಿವರಣೆ: ಅಗತ್ಯವಿದ್ದರೆ ನಿಮ್ಮ ಕಡತದ ಕಡತವಿವರಣೆಯನ್ನು ಇಲ್ಲಿ ಸೇರಿಸಿ.
- ಅಭ್ಯಾಸಕ್ರಮ ಪುಟದಲ್ಲಿ ವಿವರಣೆಯನ್ನು ಪ್ರದರ್ಶಿಸಿ: ಈ ಪೆಟ್ಟಿಗೆಯನ್ನು ಗುರುತಿಸಿದ್ದರೆ, ವಿವರಣೆಯು ಅಭ್ಯಾಸಕ್ರಮ ಪುಟದಲ್ಲಿ ಕಡತದಕಡತ ಹೆಸರಿನ ಸ್ವಲ್ಪ ಕೆಳಗೆ ಕಾಣಿಸುತ್ತದೆ.
- ಕಡತಗಳನ್ನು ಆರಿಸಿ: "ಸೇರಿಸು" ಕ್ಲಿಕ್ ಮಾಡಿ ಮತ್ತು ನಿಮ್ಮ ಕಡತ ಅನ್ನು ಅಪ್ಲೋಡ್ ಮಾಡಲು ಕಡತ ಚಿತ್ರ ಬಳಸಿ ಅಥವಾ ನೀವು ಸೂಕ್ತವಾದ ಬ್ರೌಸರ್ ಬಳಸುತ್ತಿದ್ದರೆ ನಿಮ್ಮ ಕಡತವನ್ನು ಬಾಣದ ಮೇಲೆ ಎಳೆಯಿರಿ ಮತ್ತು ಬಿಡಿ. ಇಲ್ಲಿ ನೀವು ಕಡತಕೋಶವನ್ನು ಸಹ ರಚಿಸಬಹುದು ಮತ್ತು ಕಡತಕೋಶಕ್ಕೆ ಬಹು ಸಂಪನ್ಮೂಲ ಕಡತಗಳನ್ನು ಸೇರಿಸಬಹುದು. ವಿಭಾಗಕ್ಕೆ ನೀವು ಹಲವನ್ನು ಒದಗಿಸಲು ಯೋಜಿಸಿದರೆ ನೀವು ವರ್ಗಗಳ ಕಡತಗಳಿಗೆ ಕಡತಕೋಶಗಳನ್ನು ಬಳಸಬಹುದು.
- Adding resources into the sections
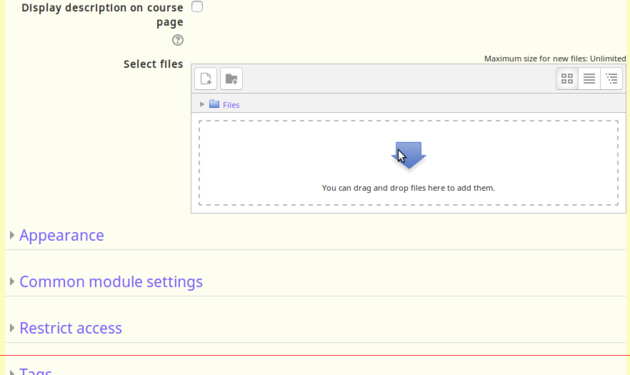
Upload files under the select file section
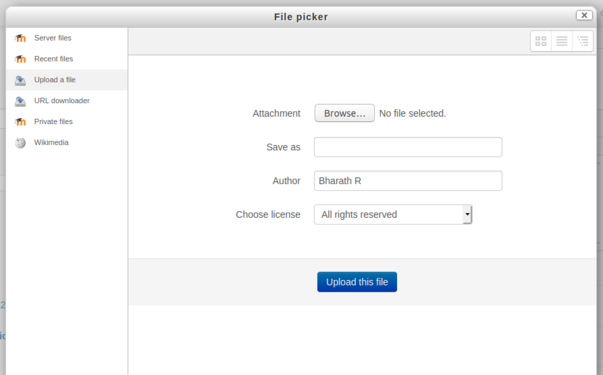
Browse your local file location


ನಿಮ್ಮ ಕಡತ ಅನ್ನು ಬ್ರೌಸ್ ಮಾಡಿದ ನಂತರ ಪುಟಕ್ಕೆ ಅಪ್ಲೋಡ್ ಮಾಡಲು ಈ ಕಡತ ಅನ್ನು ಅಪ್ಲೋಡ್ ಮಾಡಿ ಕ್ಲಿಕ್ ಮಾಡಿ. ನಿರ್ದಿಷ್ಟಪಡಿಸಿದ ವಿಭಾಗದ ಅಡಿಯಲ್ಲಿ ನಿಮ್ಮ ಸಂಪನ್ಮೂಲಗಳನ್ನು ಪ್ರದರ್ಶಿಸಲು ಅಂತಿಮವಾಗಿ "ಉಳಿಸಿ ಮತ್ತು ಪ್ರದರ್ಶಿಸು" ಕ್ಲಿಕ್ ಮಾಡಿ.
ಚಟುವಟಿಕೆಗಳನ್ನು ಸೇರಿಸುವುದು
ಯಾವುದೇ ವಿಭಾಗಕ್ಕೆ ಸೇರಿಸಲು ನಿಮಗೆ ಅನುಮತಿಸುವ ವಿವಿಧ ಚಟುವಟಿಕೆಗಳ ಪ್ರಕಾರಗಳನ್ನು ಮೂಡಲ್ ಬೆಂಬಲಿಸುತ್ತದೆ. ನಿಮ್ಮ ವಿದ್ಯಾರ್ಥಿಗಳಿಗೆ ನೀವು ಸಂವಾದಾತ್ಮಕ ವ್ಯಾಯಾಮಗಳನ್ನು ಸೇರಿಸಬಹುದು. ರಸಪ್ರಶ್ನೆ, ಚರ್ಚಾ ವೇದಿಕೆ, ಹಾಜರಾತಿಗಳು, ನಮೂನೆಗಳು ಮತ್ತು ಸಮೀಕ್ಷೆಗಳಂತಹ ಚಟುವಟಿಕೆಗಳನ್ನು ಸೇರಿಸಲು ಕ್ಲಿಕ್ ಮಾಡುವುದರ ಮೂಲಕ ನಿಮ್ಮ ಸಂಪಾದನೆಯನ್ನು ಆನ್ ಮಾಡಿ. ನಿಮ್ಮ ಅಭ್ಯಾಸಕ್ರಮ ಮುಖಪುಟದಲ್ಲಿ ನೀವು ಕಾಣಿಸಿಕೊಳ್ಳಲು ಬಯಸುವ ವಿಭಾಗವನ್ನು ಆರಿಸಿ ಮತ್ತು "ಚಟುವಟಿಕೆ ಅಥವಾ ಸಂಪನ್ಮೂಲವನ್ನು ಸೇರಿಸಿ" ಕ್ಲಿಕ್ ಮಾಡಿ ನಂತರ ನೀವು ಪಟ್ಟಿಯಿಂದ ವಿಭಾಗಕ್ಕೆ ಸೇರಿಸಲು ಹೊರಟಿರುವ ಚಟುವಟಿಕೆಗಳ ಪ್ರಕಾರವನ್ನು ಆಯ್ಕೆ ಮಾಡಿ (ಉದಾಹರಣೆಗೆ: ರಸಪ್ರಶ್ನೆ).
- Adding activities
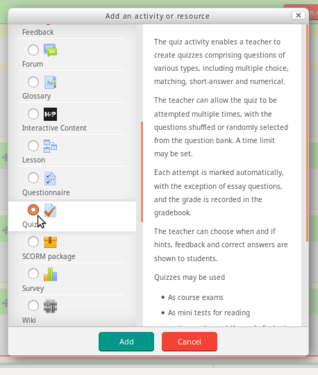
Select type of activity
Configure your activity


ನೀವು ಅದನ್ನು ವಿಭಾಗಕ್ಕೆ ಸೇರಿಸಲು ಹೋಗುವ ಯಾವುದೇ ಚಟುವಟಿಕೆಯನ್ನು ಆಯ್ಕೆ ಮಾಡಿದ ನಂತರ (ಉದಾಹರಣೆಗೆ: ರಸಪ್ರಶ್ನೆ) ನಂತರ "ಸೇರಿಸು" ಕ್ಲಿಕ್ ಮಾಡಿ. ಮುಂದಿನ ಸಂವಾದ ಪೆಟ್ಟಿಗೆಯಲ್ಲಿ ಈ ಕೆಳಗಿನ ಚಟುವಟಿಕೆಗಾಗಿ ಸೆಟ್ಟಿಂಗ್ಗಳ ರೂಪ ಇರುತ್ತದೆ.
- ಸಾಮಾನ್ಯ
- ಹೆಸರು: ನಿಮ್ಮ ಚಟುವಟಿಕೆ ಲಿಂಕ್ಗಾಗಿ ಹೆಸರನ್ನು ಟೈಪ್ ಮಾಡಿ, ಅದು ಲಿಂಕ್ ಅನ್ನು ರಚಿಸುತ್ತದೆ, ಅದು ವಿದ್ಯಾರ್ಥಿಗಳು ಕಡತವನ್ನು ವೀಕ್ಷಿಸಲು ಕ್ಲಿಕ್ ಮಾಡುತ್ತದೆ. ಅದರ ಉದ್ದೇಶ / ವಿಷಯಗಳನ್ನು ಸೂಚಿಸುವ ಹೆಸರನ್ನು ನೀಡಲು ಇದು ಸಹಾಯಕವಾಗಿರುತ್ತದೆ.
- ವಿವರಣೆ: ಅಗತ್ಯವಿದ್ದರೆ ನಿಮ್ಮ ಕಡತದ ವಿವರಣೆಯನ್ನು ಇಲ್ಲಿ ಸೇರಿಸಿ.
- ಅಭ್ಯಾಸಕ್ರಮ ಪುಟದಲ್ಲಿ ವಿವರಣೆಯನ್ನು ಪ್ರದರ್ಶಿಸಿ: ಈ ಪೆಟ್ಟಿಗೆಯನ್ನು ಗುರುತಿಸಿದರೆ, ವಿವರಣೆಯು ಅಭ್ಯಾಸಕ್ರಮ ಪುಟದಲ್ಲಿ ಕಡತದ ಹೆಸರಿನ ಸ್ವಲ್ಪ ಕೆಳಗೆ ಕಾಣಿಸುತ್ತದೆ.
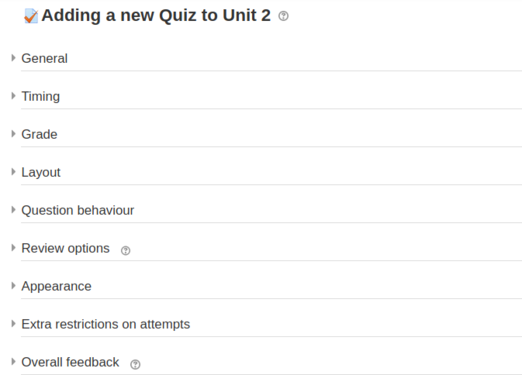
- ಸಮಯ
- ರಸಪ್ರಶ್ನೆ ತೆರೆಯಿರಿ ಮತ್ತು ರಸಪ್ರಶ್ನೆ ಮುಚ್ಚಿ: ವಿದ್ಯಾರ್ಥಿಗಳು ತೆರೆದ ಸಮಯದ ನಂತರ ಮಾತ್ರ ತಮ್ಮ ಪ್ರಯತ್ನವನ್ನು ಪ್ರಾರಂಭಿಸಬಹುದು ಮತ್ತು ಅವರು ತಮ್ಮ ಪ್ರಯತ್ನಗಳನ್ನು ನಿಕಟ ಸಮಯದ ಮೊದಲು ಪೂರ್ಣಗೊಳಿಸಬೇಕು.
- ಸಮಯ ಮಿತಿ: ಸಕ್ರಿಯಗೊಳಿಸಿದರೆ, ಸಮಯದ ಮಿತಿಯನ್ನು ಆರಂಭಿಕ ರಸಪ್ರಶ್ನೆ ಪುಟದಲ್ಲಿ ತಿಳಿಸಲಾಗುತ್ತದೆ ಮತ್ತು ರಸಪ್ರಶ್ನೆ ನ್ಯಾವಿಗೇಷನ್ ಬ್ಲಾಕ್ನಲ್ಲಿ ಉಳಿದಿರುವ ಸಮಯವನ್ನು ಪ್ರದರ್ಶಿಸಲಾಗುತ್ತದೆ.
- Configuring activities
Add basic information about the activities
Setting up display and submitting time


ಎಲ್ಲಾ ಸೆಟ್ಟಿಂಗ್ಗಳನ್ನು ಅಗತ್ಯವಿರುವಂತೆ ಭರ್ತಿ ಮಾಡಿದ ನಂತರ ಮತ್ತು ಉಳಿಸಿದ ನಂತರ, ಚಟುವಟಿಕೆಯು ವಿಭಾಗದ ಕೆಳಭಾಗದಲ್ಲಿ ಗೋಚರಿಸುತ್ತದೆ.
ಅಭ್ಯಾಸಕ್ರಮ ಎಡಿಟ್ ಮೋಡ್ನಲ್ಲಿರುವಾಗ ನೀವು ಯಾವುದೇ ಚಟುವಟಿಕೆಯನ್ನು ಮೂವ್ ಬಟನ್ಗಳೊಂದಿಗೆ ಚಲಿಸಬಹುದು.hile in course edit mode.
ಕಾರ್ಯ ನಿಯೋಜನೆ
ಅಭ್ಯಾಸಕ್ರಮ ಭಾಗವಹಿಸುವವರಿಗೆ ನಿಯೋಜನೆಗಳನ್ನು ನೀಡಲು ಅಭ್ಯಾಸಕ್ರಮ ರಚನೆಕಾರರಿಗೆ ನಿಯೋಜನೆ ಸಹಾಯ ಮಾಡುತ್ತದೆ. ಅವರು ಪಠ್ಯ ಸಂಪಾದಕವನ್ನು ಟೈಪ್ ಮಾಡುವ ಮೂಲಕ ಅಥವಾ ಡಿಜಿಟಲ್ ರೂಪದಲ್ಲಿ ರಚಿಸಿದ ವಿಷಯವನ್ನು ಅಪ್ಲೋಡ್ ಮಾಡುವ ಮೂಲಕ ಪಠ್ಯ ರೂಪದಲ್ಲಿ ಕಾರ್ಯಯೋಜನೆಗಳನ್ನು ಸಲ್ಲಿಸಬಹುದು. ರಚನೆಕಾರರು ಸಲ್ಲಿಕೆಗಳನ್ನು ಡೌನ್ಲೋಡ್ ಮಾಡಬಹುದು.
- Configuring Assignment

Select assignment module from activities list
Participants can upload their files here


ವೇದಿಕೆ
ಭಾಗವಹಿಸುವವರಿಗೆ ಅಭ್ಯಾಸಕ್ರಮ ವಿಷಯ, ಸಂಪನ್ಮೂಲಗಳು ಇತ್ಯಾದಿಗಳ ಬಗ್ಗೆ ಚರ್ಚಿಸಲು ಮತ್ತು ಅವರ ಸಾಮೂಹಿಕ ಜ್ಞಾನವನ್ನು ಹಂಚಿಕೊಳ್ಳಲು ಫೋರಮ್ ಮಾಡ್ಯೂಲ್ ಅಭ್ಯಾಸಕ್ರಮ ರಚನೆಕಾರರಿಗೆ ಸಹಾಯ ಮಾಡುತ್ತದೆ. ಭಾಗವಹಿಸುವವರು ಕೋರ್ಸ್ಗೆ ಚಂದಾದಾರರಾದ ನಂತರ, ಅವನು / ಅವಳು ಈ ವೇದಿಕೆಗಳಲ್ಲಿ ಭಾಗವಹಿಸಬಹುದು.
- Configuring Forum
Select Forum module from activities list
Edit these menu options to suit course needs


ನಿಯಂತ್ರಣ ಮೆನು ಇದ್ದು, ಬಳಕೆದಾರರಿಗೆ ಪದಗಳ ಎಣಿಕೆ ಮತ್ತು ಲಗತ್ತು ಗಾತ್ರದೊಂದಿಗೆ ವೇದಿಕೆಗಳಲ್ಲಿ ಭಾಗವಹಿಸಲು ಅನುವು ಮಾಡಿಕೊಡುತ್ತದೆ. ಇದು ಗರಿಷ್ಠ ಗಾತ್ರದ ಕಡತಗಳೊಂದಿಗೆ ಅಭ್ಯಾಸಕ್ರಮ ಅನ್ನು ನಿರ್ವಹಿಸಲು ಸಹಾಯ ಮಾಡುತ್ತದೆ.

ಪ್ರಶ್ನಾವಳಿ
ಪ್ರಶ್ನಾವಳಿ ಮಾಡ್ಯೂಲ್ ಅಭ್ಯಾಸಕ್ರಮ ರಚನೆಕಾರರಿಗೆ ರಸಪ್ರಶ್ನೆಗಳು, ದತ್ತಾಂಶ ಸಂಗ್ರಹಣೆ ಇತ್ಯಾದಿಗಳನ್ನು ನೀಡಲು ಸಹಾಯ ಮಾಡುತ್ತದೆ.
ಪ್ರಶ್ನಾವಳಿಯನ್ನು ಸೇರಿಸಲು, 'ಚಟುವಟಿಕೆ / ಸಂಪನ್ಮೂಲವನ್ನು ಸೇರಿಸಿ' 'ಕ್ಲಿಕ್ ಮಾಡಿ ಮತ್ತು ಪ್ರಶ್ನಾವಳಿಯನ್ನು ಆರಿಸಿ
- Configuring Questionnaire
Select Questionnaire module from activities list
Edit these menu options to suit course needs


ನೀವು ಪ್ರತಿಕ್ರಿಯೆ ಕ್ರಿಯೆಗಳನ್ನು ನಿಯಂತ್ರಿಸಬಹುದು ಮತ್ತು ಚಟುವಟಿಕೆಯನ್ನು ಪೂರ್ಣಗೊಳಿಸಬಹುದು ಅದು ಸೃಷ್ಟಿಕರ್ತ / ಮಾಡರೇಟರ್ಗಳಿಗೆ ಹೆಚ್ಚಿನ ನಿಯಂತ್ರಣವನ್ನು ನೀಡುತ್ತದೆ.
- Configuring Questionnaire
Helps to design responses better
Deadlines also can be set from these menu


ನಿಮ್ಮ ಪ್ರಶ್ನಾವಳಿಯನ್ನು ಹೊಂದಿಸಿದ ನಂತರ, ಪ್ರಶ್ನಾವಳಿಯನ್ನು ತೋರಿಸಲು ಉಳಿಸಿ ಮತ್ತು ಪ್ರದರ್ಶಿಸು ಕ್ಲಿಕ್ ಮಾಡಿ ಅಥವಾ ಉಳಿಸು ಕ್ಲಿಕ್ ಮಾಡಿ ಮತ್ತು ಕೋರ್ಸ್ಗೆ ಹಿಂತಿರುಗಿ.
ಹಾಜರಾತಿಯನ್ನು ನಿಭಾಯಿಸುವುದು
ತರಗತಿಯ ಸಮಯದಲ್ಲಿ ಶಿಕ್ಷಕರು ಹಾಜರಾತಿಯನ್ನು ಪಡೆಯಲು ಮತ್ತು ವಿದ್ಯಾರ್ಥಿಗಳಿಗೆ ತಮ್ಮದೇ ಆದ ಹಾಜರಾತಿ ದಾಖಲೆಯನ್ನು ವೀಕ್ಷಿಸಲು ಸಾಧ್ಯವಾಗುವಂತೆ 'ಹಾಜರಾತಿ' 'ಮಾಡ್ಯೂಲ್ ಅನ್ನು ವಿನ್ಯಾಸಗೊಳಿಸಲಾಗಿದೆ.
ಒಬ್ಬ ಶಿಕ್ಷಕನು ವಿದ್ಯಾರ್ಥಿಯ ಹಾಜರಾತಿ ಸ್ಥಿತಿಯನ್ನು "ಉಪಸ್ಥಿತಿ", "ಅನುಪಸ್ಥಿತಿ", "ತಡವಾಗಿ" ಅಥವಾ "ಕ್ಷಮಿಸಿ" ಎಂದು ಗುರುತಿಸಬಹುದು. ಈ ಸ್ಥಿತಿ ವಿವರಣೆಯನ್ನು ಹೊಂದಿಸಬಹುದಾಗಿದೆ, ಮತ್ತು ಹೆಚ್ಚಿನದನ್ನು ಸೇರಿಸಬಹುದು. ಶಿಕ್ಷಕರು ಹಾಜರಾತಿಯನ್ನು ಕೋರ್ಸ್ನ ಚಟುವಟಿಕೆಯಾಗಿ ಸೇರಿಸುತ್ತಾರೆ, ತದನಂತರ ಹಾಜರಾತಿಯನ್ನು ಪತ್ತೆಹಚ್ಚಬೇಕಾದ ಅವಧಿಗಳನ್ನು ಹೊಂದಿಸುತ್ತಾರೆ. ಅಭ್ಯಾಸಕ್ರಮ ಹಾಜರಾತಿಯನ್ನು ರಚಿಸಲು ಯಾವುದೇ ವಿಭಾಗಕ್ಕೆ ಹೋಗಿ ಮತ್ತು "ಚಟುವಟಿಕೆ ಅಥವಾ ಸಂಪನ್ಮೂಲವನ್ನು ಸೇರಿಸಿ" ಕ್ಲಿಕ್ ಮಾಡಿ
- Adding Attendance for the course
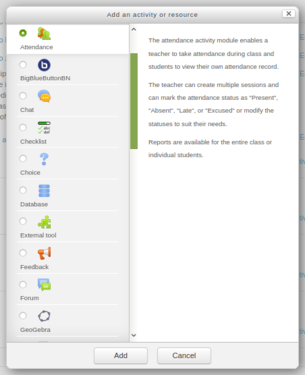
Select attendance option from the list
Configuring group


ಸಾಮಾನ್ಯ ವಿಭಾಗದಲ್ಲಿ, ಹಾಜರಾತಿಯ ಹೆಸರು ಮತ್ತು ಹಾಜರಾತಿಯ ಬಗ್ಗೆ ವಿವರಣೆಯಂತಹ ಎಲ್ಲಾ ಸಾಮಾನ್ಯ ವಿವರಗಳನ್ನು ನಮೂದಿಸಿ (ನೀವು ಹೊಂದಿದ್ದರೆ).
ಚರ್ಚಾ ವೇದಿಕೆಯ ಚಟುವಟಿಕೆ
ವೇದಿಕೆಯ ಚಟುವಟಿಕೆಯು ಯಾವುದೇ ವಿಷಯದ ಕುರಿತು ಚರ್ಚೆ ನಡೆಸುವ ಮೂಲಕ ವಿದ್ಯಾರ್ಥಿಗಳು ಮತ್ತು ಶಿಕ್ಷಕರಿಗೆ ವಿಚಾರ ವಿನಿಮಯ ಮಾಡಿಕೊಳ್ಳಲು ಅನುವು ಮಾಡಿಕೊಡುತ್ತದೆ. ಕೋರ್ಸ್ಗೆ ನೋಂದಾಯಿಸಲಾದ ಯಾವುದೇ ಶಿಕ್ಷಕ ಅಥವಾ ವಿದ್ಯಾರ್ಥಿ ಕಾಮೆಂಟ್ಗಳನ್ನು ಪೋಸ್ಟ್ ಮಾಡಬಹುದು, ಹೊಸ ವಿಷಯವನ್ನು ಪ್ರಾರಂಭಿಸಲು ಅಥವಾ ಯಾವುದೇ ವಿಷಯದ ಕುರಿತು ಲಭ್ಯವಿರುವ ಚರ್ಚೆಗಳಿಗೆ ಪ್ರತಿಕ್ರಿಯಿಸಬಹುದು. ಒಂದು ವಿಷಯದ ಚರ್ಚೆಗಳನ್ನು ಮೂಡಲ್ ಅವರ 'ಥ್ರೆಡ್'ನ ಭಾಗವಾಗಿ ಸ್ವಯಂಚಾಲಿತವಾಗಿ ತೋರಿಸಲಾಗುತ್ತದೆ.
ಆಯ್ಕೆ ಮಾಡಲು ಹಲವಾರು ವೇದಿಕೆಯ ಪ್ರಕಾರಗಳಿವೆ, ಉದಾಹರಣೆಗೆ ಸ್ಟ್ಯಾಂಡರ್ಡ್ ವೇದಿಕೆ, ಯಾರಾದರೂ ಯಾವುದೇ ಸಮಯದಲ್ಲಿ ಹೊಸ ಚರ್ಚೆಯನ್ನು ಪ್ರಾರಂಭಿಸಬಹುದು; ಪ್ರತಿ ವಿದ್ಯಾರ್ಥಿಯು ನಿಖರವಾಗಿ ಒಂದು ಚರ್ಚೆಯನ್ನು ಪೋಸ್ಟ್ ಮಾಡುವ ವೇದಿಕೆ; ಅಥವಾ ಇತರ ವಿದ್ಯಾರ್ಥಿಗಳ ಪೋಸ್ಟ್ಗಳನ್ನು ವೀಕ್ಷಿಸುವ ಮೊದಲು ವಿದ್ಯಾರ್ಥಿಗಳು ಮೊದಲು ಪೋಸ್ಟ್ ಮಾಡಬೇಕಾದ ಪ್ರಶ್ನೋತ್ತರ ವೇದಿಕೆ. ಫೋರಂ ಪೋಸ್ಟ್ಗಳಿಗೆ ಕಡತಗಳನ್ನು ಲಗತ್ತಿಸಲು ಶಿಕ್ಷಕರು ಅನುಮತಿಸಬಹುದು. ಫೋರಂ ಪೋಸ್ಟ್ನಲ್ಲಿ ಲಗತ್ತಿಸಲಾದ ಯಾವುದೇ ಚಿತ್ರಗಳನ್ನು ಪ್ರದರ್ಶಿಸಲಾಗುತ್ತದೆ.
ಚರ್ಚಾ ವೇದಿಕೆಗಳು ಅನೇಕ ಉಪಯೋಗಗಳನ್ನು ಹೊಂದಿವೆ, ಉದಾಹರಣೆಗೆ
- ವಿದ್ಯಾರ್ಥಿಗಳು ಪರಸ್ಪರ ತಿಳಿದುಕೊಳ್ಳಲು ಸಾಮಾಜಿಕ ಸ್ಥಳ
- ಅಭ್ಯಾಸಕ್ರಮ ಪ್ರಕಟಣೆಗಳಿಗಾಗಿ (ಬಲವಂತದ ಚಂದಾದಾರಿಕೆಯೊಂದಿಗೆ ಸುದ್ದಿ ವೇದಿಕೆಯನ್ನು ಬಳಸುವುದು, ಅಲ್ಲಿ ಅಧ್ಯಾಪಕರು ಮಾತ್ರ ಪೋಸ್ಟ್ ಮಾಡಬಹುದು)
- ಅಭ್ಯಾಸಕ್ರಮ ವಿಷಯ ಅಥವಾ ಓದುವ ಸಾಮಗ್ರಿಗಳನ್ನು ಚರ್ಚಿಸಲು
- ಮುಖಾಮುಖಿ ಅಧಿವೇಶನದಲ್ಲಿ ಈ ಹಿಂದೆ ಎದ್ದಿರುವ ಸಮಸ್ಯೆಯನ್ನು ಆನ್ಲೈನ್ನಲ್ಲಿ ಮುಂದುವರಿಸಲು
- ಚರ್ಚೆಯ ವಿಷಯವನ್ನು ಸೇರಿಸಲು "ಚಟುವಟಿಕೆ ಅಥವಾ ಸಂಪನ್ಮೂಲ" ಸೇರಿಸು ಆಯ್ಕೆಯ ಮೇಲೆ ಕ್ಲಿಕ್ ಮಾಡಿ ಮತ್ತು ಚಟುವಟಿಕೆಗಳ ಪಟ್ಟಿಯಿಂದ ವೇದಿಕೆ ಆಯ್ಕೆಯನ್ನು ಆರಿಸಿ.
Enter the discussion topic and summary
Restricting attachment size and text length


"ಸಾಮಾನ್ಯ" ವಿಭಾಗದ ಅಡಿಯಲ್ಲಿ ನಿಮ್ಮ ಚರ್ಚೆಯ ವಿಷಯವನ್ನು ಟೈಪ್ ಮಾಡಿ ಮತ್ತು "ಲಗತ್ತುಗಳು ಮತ್ತು ಪದಗಳ ಎಣಿಕೆ" ಅಡಿಯಲ್ಲಿ ನೀವು ಲಗತ್ತಿನ ಗಾತ್ರ ಮತ್ತು ಪದ ಎಣಿಕೆಗಳು ಮತ್ತು ಲಗತ್ತುಗಳ ಸಂಖ್ಯೆಯನ್ನು ಮಿತಿಗೊಳಿಸಬಹುದು. ನೀವು ಸಂಪಾದನೆಯನ್ನು ಪೂರ್ಣಗೊಳಿಸಿದ ನಂತರ, ನಿಮ್ಮ ಆಯ್ದ ವಿಭಾಗದ ಅಡಿಯಲ್ಲಿ ಮೂರನೇ ಚರ್ಚೆಯ ಎಳೆಯನ್ನು ಪ್ರದರ್ಶಿಸಲು "ಉಳಿಸಿ ಮತ್ತು ಪ್ರದರ್ಶಿಸಿ" ಕ್ಲಿಕ್ ಮಾಡಿ. 'ಪ್ರತ್ಯುತ್ತರ' ಆಯ್ಕೆಯನ್ನು ಕ್ಲಿಕ್ ಮಾಡುವುದರ ಮೂಲಕ ವಿದ್ಯಾರ್ಥಿಗಳು ವಿಷಯ / ಚರ್ಚೆಗೆ ಉತ್ತರಿಸಲು ಪ್ರಾರಂಭಿಸಬಹುದು.
ಸುಧಾರಿತ ಚಟುವಟಿಕೆಗಳು
- ತಪಶೀಲ ಪಟ್ಟಿಯನ್ನು ಪರಿಶೀಲಿಸಿ
- ಚಾಟ್
- ಪಾಠ
- ಕಾರ್ಯಾಗಾರ
ಕೋರ್ಸ್ಗಳ ಬಹುಭಾಷಾ ಕೊಡುಗೆ
ಬಹು ಭಾಷಾ ವಿಷಯ ಫಿಲ್ಟರ್ ಸಂಪನ್ಮೂಲಗಳನ್ನು ಬಹು ಭಾಷೆಗಳಲ್ಲಿ ರಚಿಸಲು ಶಕ್ತಗೊಳಿಸುತ್ತದೆ. ಪೂರ್ವನಿಯೋಜಿತ ಭಾಷೆಯ ಮೂಡಲ್ ಇಂಗ್ಲಿಷ್ನಲ್ಲಿರುತ್ತದೆ ಮತ್ತು ಯಾವುದೇ ಸ್ಥಳೀಯ ಭಾಷೆಗಳನ್ನು ಚಲಾಯಿಸಲು, ಭಾಷಾ ಪ್ಯಾಕೇಜ್ಗಳನ್ನು ನಿಮ್ಮ ಸರ್ವರ್ನಲ್ಲಿ ಸ್ಥಾಪಿಸಬೇಕಾಗುತ್ತದೆ (ಇದನ್ನು ನಿಮ್ಮ ಅಂತರ್ಜಾಲನಿರ್ವಾಹಕರಿಂದ ಮಾಡಲಾಗುತ್ತದೆ).

ನಿಮ್ಮ ಕೋರ್ಸ್ಗೆ ಲಾಗಿನ್ ಮಾಡಿ ಮತ್ತು ಪರದೆಯ ಮೇಲಿನ ಬಲಭಾಗದಲ್ಲಿ ನಿಮ್ಮ ಅಭ್ಯಾಸಕ್ರಮವನ್ನು ನೋಡಲು ಬಯಸುವ ಭಾಷೆಯನ್ನು ನೀವು ಆಯ್ಕೆ ಮಾಡಬಹುದು.
ಅಭ್ಯಾಸಕ್ರಮ ಪುಟದಲ್ಲಿ ವಿಷಯವನ್ನು ಸೇರಿಸುವುದು
ಯಾವುದೇ ವಿಭಾಗಕ್ಕೆ ಇತರ ಭಾಷೆಯ ವಿಷಯವನ್ನು ಸೇರಿಸಲು, ನೀವು ಸಂಪಾದನೆ ಆಯ್ಕೆಯನ್ನು ಸಕ್ರಿಯಗೊಳಿಸಿದ ನಂತರ ಮತ್ತು ಸಂಪಾದನೆ -> ಸಂಪಾದನೆ ವಿಷಯದ ಮೇಲೆ ಕ್ಲಿಕ್ ಮಾಡಿ.

ವಿಭಾಗವನ್ನು ಸಂಪಾದನೆ ಆಯ್ಕೆಯೊಂದಿಗೆ ತೆರೆದ ನಂತರ, ಕನ್ನಡ ಪಠ್ಯವನ್ನು ವಿಭಾಗಕ್ಕೆ ಸೇರಿಸಲು ನಿಮ್ಮ ಪಠ್ಯ ಪ್ರಾರಂಭವಾಗುವ ಮೊದಲು ಮತ್ತು ಕೊನೆಯಲ್ಲಿ '{mlang kn}' ('kn' ಎಂದರೆ ಕನ್ನಡ, ಇದನ್ನು ನಿಮ್ಮ ಭಾಷೆಯೊಂದಿಗೆ ಬದಲಾಯಿಸಿ) ಸೇರಿಸಿ. ನಿಮ್ಮ ಪಠ್ಯವು '{mlang}' ಅನ್ನು ಸೇರಿಸಿ. ನಿಮ್ಮ ಮೂಡಲ್ ಸರ್ವರ್ನಲ್ಲಿ ಈಗಾಗಲೇ ಸ್ಥಾಪಿಸಲಾದ ಯಾವುದೇ ಭಾಷೆಗೆ ಅದೇ ಹಂತಗಳನ್ನು ಅನುಸರಿಸಿ.
ಸುಧಾರಿತ ವೈಶಿಷ್ಟ್ಯಗಳು
- ವಿದ್ಯಾರ್ಥಿಗಳ ಟ್ರ್ಯಾಕಿಂಗ್ ಚಟುವಟಿಕೆಗಳು
- ಮೌಲ್ಯಮಾಪನಗಳನ್ನು ಅನುಸರಿಸಿ ಮತ್ತು ಮೌಲ್ಯಮಾಪನಗಳ ಶ್ರೇಣಿಕರಣ
- ನಡೆಯುತ್ತಿರುವ ಮೌಲ್ಯಮಾಪನಕ್ಕಾಗಿ ರಸಪ್ರಶ್ನೆಗಳು
- ಪಂಚಾಂಗ ಬಳಸಿ ಘಟನೆಗಳ ಅನುಸರಣೆ
ಮೂಡಲ್ನಲ್ಲಿ ವಿದ್ಯಾರ್ಥಿಗಳ ನೋಟ
ವಿದ್ಯಾರ್ಥಿಯಾಗಿ ನಿಮ್ಮ ಅಭ್ಯಾಸಕ್ರಮವನ್ನು ನೋಡಲು ಮಾಡಲು ಈ ಪುಟವು ನಿಮಗೆ ಸಹಾಯ ಮಾಡುತ್ತದೆ. ಅಧ್ಯಾಪಕರು ನಿಮ್ಮನ್ನು ಕೋರ್ಸ್ಗೆ ದಾಖಲಿಸಿದ ನಂತರ, ನೀವು ಮೂಡಲ್ ಸೈಟ್ನಿಂದ ಎಲ್ಲಾ ಅಭ್ಯಾಸಕ್ರಮ ವಿಷಯವನ್ನು ಬ್ರೌಸ್ ಮಾಡಬಹುದು.
ನಿಮ್ಮ ಫೋನ್ನಲ್ಲಿ ಮೂಡಲ್ ತಂತ್ರಾಂಶವನ್ನು ಅನುಸ್ಥಾಪಿಸಿ
Click here to go through step by procedure to install Moodle mobile app in your phone.
ವಿದ್ಯಾರ್ಥಿ / ಬಳಕೆದಾರರ ಮಾಹಿತಿ

ಹೆಚ್ಚಿನ ಅಭ್ಯಾಸಕ್ರಮ ಗಳು ವಿದ್ಯಾರ್ಥಿಗೆ ಲಾಗಿನ್ ಬಳಕೆದಾರರ ಪ್ರೊಫೈಲ್ ಅನ್ನು ಮೇಲಿನ ಬಲಭಾಗದಿಂದ ನೋಡಲು ಅನುಮತಿಸುತ್ತದೆ. ಈ ಬ್ಲಾಕ್ ವಿದ್ಯಾರ್ಥಿಗೆ ತಮ್ಮ ಬಗ್ಗೆ ಮಾಹಿತಿಯನ್ನು ಕೋರ್ಸ್ನಲ್ಲಿ ನೋಡಲು ಅನುಮತಿಸುತ್ತದೆ.
ಅಭ್ಯಾಸಕ್ರಮ ಸಂರಚನೆ
ಮುಖ್ಯ ಪುಟದಲ್ಲಿ, ನೀವು ಎರಡು ಕಾಲಮ್ಗಳನ್ನು ನೋಡಬಹುದು: ಸಂರಚನೆ, ಅಭ್ಯಾಸಕ್ರಮ ವಿಭಾಗಗಳು ಮತ್ತು ಸುದ್ದಿಗಳೊಂದಿಗೆ ಅಭ್ಯಾಸಕ್ರಮ ವಿಷಯಗಳು ಮತ್ತು ಮುಂಬರುವ ಘಟನೆಗಳು. ಹೆಚ್ಚಿನ ಮಾಹಿತಿಯನ್ನು ನೋಡಲು ನೀವು ಪ್ರತಿ ಟ್ಯಾಬ್ ಅನ್ನು ಕ್ಲಿಕ್ ಮಾಡಬೇಕಾಗುತ್ತದೆ.

ನೀವು ಅಭ್ಯಾಸಕ್ರಮ ಅನ್ನು ಕ್ಲಿಕ್ ಮಾಡಿದ ನಂತರ, ಅಭ್ಯಾಸಕ್ರಮ ತೆರೆಯುತ್ತದೆ ಮತ್ತು ಎಡಭಾಗದ ಅಭ್ಯಾಸಕ್ರಮ ನ್ಯಾವಿಗೇಷನ್ ಆಯ್ಕೆಯಿಂದ, ನೇರವಾಗಿ ನೀವು ಕೋರ್ಸ್ನ ಯಾವುದೇ ವಿಭಾಗಕ್ಕೆ ಹೋಗಬಹುದು.
Click here to see the tutorial on how access course content from moodle mobile app.
ಚರ್ಚಾ ವೇದಿಕೆಯಲ್ಲಿ ಭಾಗವಹಿಸಿ
ಮೊದಲ ಸಾಮಾನ್ಯ ವಿಭಾಗದ ಅಡಿಯಲ್ಲಿ ನೀವು ಎಲ್ಲಾ ಚರ್ಚಾ ವಿಷಯಗಳನ್ನು ನೋಡಲು "ಬೋಧಕವರ್ಗ ಮತ್ತು ವಿದ್ಯಾರ್ಥಿಗಳಿಗೆ ಸಾಮಾನ್ಯ ಚರ್ಚಾ ವೇದಿಕೆ" ಲಿಂಕ್ ಅನ್ನು ಕ್ಲಿಕ್ ಮಾಡಬೇಕು. ಯಾವುದೇ ವಿಷಯಕ್ಕೆ ಪ್ರತ್ಯುತ್ತರಿಸಲು, ವಿಷಯದ ಮೇಲೆ ಕ್ಲಿಕ್ ಮಾಡಿ ಮತ್ತು ಇತರರ ಪ್ರತ್ಯುತ್ತರಗಳ ಅಡಿಯಲ್ಲಿ ಪ್ರತ್ಯುತ್ತರ ಲಿಂಕ್ ಅನ್ನು ಕ್ಲಿಕ್ ಮಾಡುವ ಮೂಲಕ ನಿಮ್ಮ ಉತ್ತರವನ್ನು ಟೈಪ್ ಮಾಡಿ. ಪ್ರತಿ ಪ್ರತ್ಯುತ್ತರ ಪಠ್ಯ ಇನ್ಪುಟ್ ಪೆಟ್ಟಿಗೆಯ ಅಡಿಯಲ್ಲಿ, ಅಗತ್ಯವಿದ್ದರೆ ನಿಮ್ಮ ಕಡತಗಳನ್ನು ಅಪ್ಲೋಡ್ ಮಾಡಲು ಸಹ ಇದು ನಿಮ್ಮನ್ನು ಅನುಮತಿಸುತ್ತದೆ.

ಅಸ್ತಿತ್ವದಲ್ಲಿರುವ ವಿಷಯಕ್ಕೆ ಹೆಚ್ಚುವರಿಯಾಗಿ, "ಹೊಸ ಚರ್ಚಾ ವಿಷಯವನ್ನು ಸೇರಿಸಿ" ಕ್ಲಿಕ್ ಮಾಡುವ ಮೂಲಕ ನೀವು ಹೊಸ ಚರ್ಚಾ ವಿಷಯವನ್ನು ರಚಿಸಬಹುದು.
ಅಲ್ಲದೆ, ಮೊಬೈಲ್ ಅಪ್ಲಿಕೇಶನ್ನಲ್ಲಿ ಚರ್ಚಾ ವೇದಿಕೆಯಲ್ಲಿ ಹೇಗೆ ಭಾಗವಹಿಸಬೇಕು ಎಂಬ ವೀಡಿಯೊ ಟ್ಯುಟೋರಿಯಲ್ ನೋಡಲು ಇಲ್ಲಿ ಕ್ಲಿಕ್ ಮಾಡಿ.
ಚಟುವಟಿಕೆಗಳಲ್ಲಿ ಭಾಗವಹಿಸುವುದು
ಕೋರ್ಸ್ಗಳ ಪ್ರತಿಯೊಂದು ವಿಭಾಗದ ಅಡಿಯಲ್ಲಿ, ಬೋಧಕವರ್ಗವು ವಿದ್ಯಾರ್ಥಿಗಳಿಗೆ ಪೂರ್ಣಗೊಳಿಸಲು ಕೆಲವು ಚಟುವಟಿಕೆಗಳನ್ನು ನೀಡುತ್ತದೆ. ಚಟುವಟಿಕೆಗಳು ರಸಪ್ರಶ್ನೆಗಳು, ಕಾರ್ಯಯೋಜನೆಗಳು, ಪರಿಶೀಲನಾಪಟ್ಟಿಗಳು ಮತ್ತು ಚರ್ಚಾ ವಿಷಯಗಳಾಗಿರಬಹುದು. ಅದರಲ್ಲಿ ಭಾಗವಹಿಸಲು ಚಟುವಟಿಕೆಯ ಮೇಲೆ ಕ್ಲಿಕ್ ಮಾಡಿ.
ಕಾರ್ಯಯೋಜನೆಗಳ ಚಟುವಟಿಕೆಯಲ್ಲಿ ಭಾಗವಹಿಸುವುದು
ಚಟುವಟಿಕೆಯು ಕಾರ್ಯಯೋಜನೆಯಾಗಿದ್ದರೆ, ಪೂರ್ಣ ನಿಯೋಜನೆಯನ್ನು ಓದಲು ನೀವು ಚಟುವಟಿಕೆಯ ಶೀರ್ಷಿಕೆಯ ಮೇಲೆ ಕ್ಲಿಕ್ ಮಾಡಿ ಮತ್ತು "ಸಲ್ಲಿಕೆ ಸೇರಿಸಿ" ಕ್ಲಿಕ್ ಮಾಡಿ ಅದು "ಆನ್ಲೈನ್ ಪಠ್ಯ ವಿಭಾಗ" ಮತ್ತು "ಕಡತ ಸಲ್ಲಿಕೆ" ವಿಭಾಗಗಳನ್ನು ತೆರೆಯುತ್ತದೆ, ಆನ್ಲೈನ್ ಪಠ್ಯ ವಿಭಾಗದ ಅಡಿಯಲ್ಲಿ ನೀವು ನೇರವಾಗಿ ನೀಡಬಹುದು ನಿಮ್ಮ ನಿಯೋಜನೆಯ ಪಠ್ಯ ಇನ್ಪುಟ್. ಕಡತ ಸಲ್ಲಿಕೆ ವಿಭಾಗದಲ್ಲಿ ನೀವು ಚಿತ್ರಗಳು, ಪಠ್ಯ ಕಡತಗಳು, ಆಡಿಯೊ ಇತ್ಯಾದಿಗಳಂತಹ ಯಾವುದೇ ಕಡತಗಳನ್ನು ಅಪ್ಲೋಡ್ ಮಾಡಬಹುದು.
- Participating in assignment submission activity

Participate in assignment activity
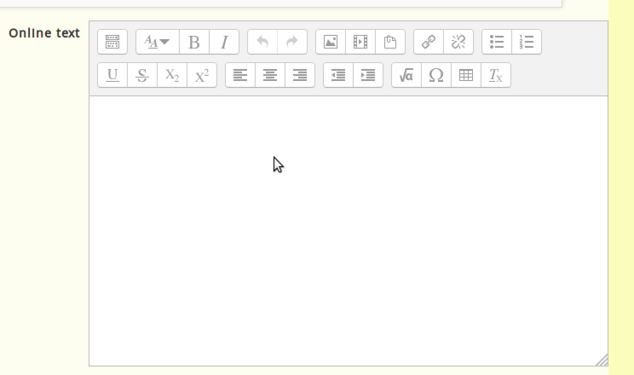
Online text input section
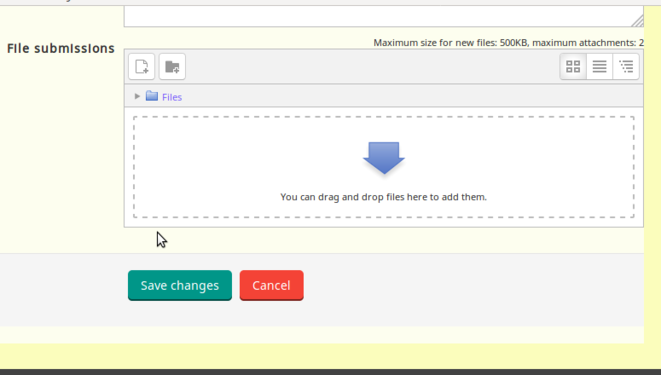
File submission section


ಈ ಪಠ್ಯದಲ್ಲಿ ನೀವು 500 ಕೆಬಿ ಕಡತ ಅನ್ನು ನಿಯೋಜನೆಯಂತೆ ಅಪ್ಲೋಡ್ ಮಾಡಬಹುದು, ನೀವು 500 ಕೆಬಿಗಿಂತ ಹೆಚ್ಚಿನ ಕಡತಗಳನ್ನು ಅಪ್ಲೋಡ್ ಮಾಡಲು ಬಯಸಿದರೆ, ನಿಮ್ಮ ಕಡತ ಅನ್ನು ಅಪ್ಲೋಡ್ ಮಾಡಲು ಮತ್ತು ನೀಡಲು 'ಗೂಗಲ್ ಡ್ರೈವ್ ಬಳಸಿ' ಆನ್ಲೈನ್ ಪಠ್ಯ ಇನ್ಪುಟ್ ವಿಭಾಗದ ಅಡಿಯಲ್ಲಿ ಇಲ್ಲಿ ಲಿಂಕ್. ನಿಮ್ಮ ಇನ್ಪುಟ್ಗಳು ಮುಗಿದ ನಂತರ ನಿಮ್ಮ ನಿಯೋಜನೆಯನ್ನು ಸಲ್ಲಿಸಲು "ಬದಲಾವಣೆಗಳನ್ನು ಉಳಿಸು" ಕ್ಲಿಕ್ ಮಾಡಿ.
ಗಮನಿಸಿ: - ನೀವು ರಚಿಸಿದ ಯಾವುದೇ ವೀಡಿಯೊವನ್ನು ಸಲ್ಲಿಸಲು ನೀವು ಬಯಸಿದರೆ, ಅದನ್ನು ಅಪ್ಲೋಡ್ ಮಾಡಲು [[ಯುಟ್ಯೂಬ್ ಕಲಿಯಿರಿ | 'ಯುಟ್ಯೂಬ್' ] ಅನ್ನು ಬಳಸಿ ಮತ್ತು ಆನ್ಲೈನ್ ಪಠ್ಯ ಇನ್ಪುಟ್ ವಿಭಾಗದ ಅಡಿಯಲ್ಲಿ ವೀಡಿಯೊ ಲಿಂಕ್ ನೀಡಿ.
Click here to see video about assignment submission on moodle mobile app.