Difference between revisions of "Kalpavriksha"
| Line 73: | Line 73: | ||
<br>[[#top|Back to top]]<br/> | <br>[[#top|Back to top]]<br/> | ||
| − | =General | + | =General problems or steps for after Ubuntu Installation= |
==Repairing Grub/Repairing Ubuntu booting Problem(Grub)== | ==Repairing Grub/Repairing Ubuntu booting Problem(Grub)== | ||
'''Boot-Repair''' is a simple tool to repair frequent boot issues you may encounter in Ubuntu like when you can't boot Ubuntu after installing Windows or another Linux distribution, or when you can't boot Windows after installing Ubuntu, or when GRUB is not displayed anymore, some upgrade breaks GRUB, etc. | '''Boot-Repair''' is a simple tool to repair frequent boot issues you may encounter in Ubuntu like when you can't boot Ubuntu after installing Windows or another Linux distribution, or when you can't boot Windows after installing Ubuntu, or when GRUB is not displayed anymore, some upgrade breaks GRUB, etc. | ||
| − | '''1. If you are able to login in | + | '''1. If you are able to login in Ubuntu, Follow the below steps:''' |
| − | #Login in to | + | #Login in to Ubuntu Operating System |
#goto to application==>>System tools==>>Administration==>>Boot repair<br> | #goto to application==>>System tools==>>Administration==>>Boot repair<br> | ||
<li>It will ask your system login password, just type and press '''Enter'''<br> | <li>It will ask your system login password, just type and press '''Enter'''<br> | ||
| Line 88: | Line 88: | ||
# Restart your computer after using the Boot Repair tool. | # Restart your computer after using the Boot Repair tool. | ||
| − | '''2. If you are not able to login Ubuntu and have any loading error, click [http://www.howtogeek.com/114884/how-to-repair-grub2-when- | + | '''2. If you are not able to login Ubuntu and have any loading error, click [http://www.howtogeek.com/114884/how-to-repair-grub2-when-Ubuntu-wont-boot/ here] and follow these steps'''<br> |
<br>[[#top|Back to top]]<br/> | <br>[[#top|Back to top]]<br/> | ||
| − | ==Adding new user account | + | ==Adding new user account == |
#Open system settings (Applications==>>System tools==>>System settings) | #Open system settings (Applications==>>System tools==>>System settings) | ||
#click on User accounts. | #click on User accounts. | ||
[[image:User_accounts.png |400px]] | [[image:User_accounts.png |400px]] | ||
| − | #Click on Unlock button and put a login | + | #Click on Unlock button and put a login Ubuntu password |
#Click on '''Plus(+)'''symbol and fill the your name and new user account name. | #Click on '''Plus(+)'''symbol and fill the your name and new user account name. | ||
#click '''Add'''. | #click '''Add'''. | ||
| Line 104: | Line 104: | ||
<br>[[#top|Back to top]]<br/> | <br>[[#top|Back to top]]<br/> | ||
| − | ==How to add languages in ibus in Ubuntu | + | ==How to add languages in ibus in Ubuntu== |
*Logout from the screen.<br> | *Logout from the screen.<br> | ||
| Line 118: | Line 118: | ||
[[Image: logout2.jpg|400px]]<br> | [[Image: logout2.jpg|400px]]<br> | ||
| − | *Again login to Ubuntu user by using your | + | *Again login to Ubuntu user by using your Ubuntu password.<br> |
*On the top right side of the desktop, click on '''En''' icon(on top of the rightside screen) and goto text entry setting. | *On the top right side of the desktop, click on '''En''' icon(on top of the rightside screen) and goto text entry setting. | ||
| Line 135: | Line 135: | ||
*close all the windows and again logout from this window. | *close all the windows and again logout from this window. | ||
| − | *In the login screen select Gnome classic (Metacity) and Login by using your | + | *In the login screen select Gnome classic (Metacity) and Login by using your Ubuntu password. |
[[Image: login.jpg|400px]]<br> | [[Image: login.jpg|400px]]<br> | ||
| Line 178: | Line 178: | ||
<br>[[#top|Back to top]]<br/> | <br>[[#top|Back to top]]<br/> | ||
| − | ==How to connect Datacards in | + | ==How to connect Datacards in Ubuntu== |
This is by far the simplest way to configure a USB modem to connect to internet. No additional drivers or software are necessary.<br> | This is by far the simplest way to configure a USB modem to connect to internet. No additional drivers or software are necessary.<br> | ||
Revision as of 10:07, 16 May 2017
Introduction
Ubuntu is a ‘Free and Open Source Software’ (called FOSS in short) Operating System. You may be familiar with Microsoft Windows operating system or used an application called Adobe Reader. Windows or Adobe Photoshop are ‘proprietary’ , meaning they cannot be copied or shared or modified by us; FOSS applications are licensed under the ‘General Public License’ which allows all of us to share the software freely, we can also modify the software as per our needs. Hence it is important to use FOSS in our schools. Teachers must learn and teach FOSS and avoid use of proprietary software, since it is not possible for all to access and use proprietary software, and not possible for anyone (other than the vendor) to study or improve the software.
Since all the software like Office suite, web browser, educational software can be bundled with Ubuntu GNU/Linux operating system, all these applications can be installed on the computer at one time. On proprietary software Windows, each software has to be separately installed, which can make it cumbersome and time consuming.
Ubuntu benefits
Hardware requirement for Ubuntu installation
- Dual core processor and above
- 1 GB RAM (2GB for preferable for better performance)
- 30 GB of Separate partition in your hard-drive
- Either a CD/DVD drive or a USB port for the installer media
Installation process
If you are installing in a computer already in use, you should take a back-up of your data before installation.
Installing Ubuntu as a stand-alone Operating System
If your computer does not have any operating system, steps for installation are available in this document
Installing Ubuntu alongside the Microsoft Windows Operating System
You may have bought a new computer with Windows pre-installed, or you may want to install Ubuntu on your existing computer, which already has Windows on it. Steps for the 'side-by-side' installation are available in this document
Using Ubuntu without installation
You may be unable to install Ubuntu on your computer, or you may be using a computer belonging to your institution*, which may not allow you to install Ubuntu. In such a case, you could use still Ubuntu, by connecting your computer to a Ubuntu bootable pen drive or Ubuntu DVD to your computer and using the 'Live' option.
In this method your existing Windows operating system is unaffected. You can use all the installed applications in Ubuntu, but generally these may run slower than if had installed Ubuntu, because of the lower read/write speed in USB sticks or DVD drive. Secondly, in the 'Live' mode, you can not save any working document in the hard disk of your computer.
The method to use live mode is given below:
- Connect your Ubuntu pen drive or DVD
- Restart your computer
- Go to Boot menu and select your bootable device and press Enter.
- In next screen, select 'Live system' option.
- Your system will use Ubuntu system, in the 'Live' mode, without installing it.
- You can close the 'Live' session, by removing the bootable device after shutting down your computer
(*Of course, you should discuss with your institution, the benefits of using FOSS tools and platforms and encourage and persuade them to be open to allowing staff to installing FOSS tools on their systems. Such installation can be done alongside other applications on the computers, so there is no flip side to this. Many institutions across the world have switched completely to FOSS operating systems and applications, and you should persuade your institution as well.)
Using Ubuntu through 'Virtual Machine' option
VirtualBox allows you to run the Ubuntu operating system inside another operating system like Windows.In this method also, your existing Windows system will not be affected. Virtual machine require a good hardware configuration to run smoothly, at least 4GB RAM, 50 GB free space and strong processor. Follow these steps to install Ubuntu in 'Virtual Machine'.
- Open VirtualBox wizard on your computer
- Select 'New' and a new window will open.
- Give a name for your setup, you could use 'Ubuntu'.
- Set your Memory (RAM) (minimum 2GB)
- Click next to get virtual machine storage size window. Put the hard disk space you need for Ubuntu (minimum 35 GB) and complete the steps suggested by wizard after clicking the create button.
- On VirtualBox main window, select start and select your Ubuntu media source (pen drive or DVD drive where you have the Ubuntu software).
- Continue and complete the installation as discussed in this document
- Remove your installation media from the virtual optical disk drive before restarting the Virtual Machine.
Video on installation
| Kannada | Telugu |
|---|
Download video
For watching and downloading this video on youtube Click here
General problems or steps for after Ubuntu Installation
Repairing Grub/Repairing Ubuntu booting Problem(Grub)
Boot-Repair is a simple tool to repair frequent boot issues you may encounter in Ubuntu like when you can't boot Ubuntu after installing Windows or another Linux distribution, or when you can't boot Windows after installing Ubuntu, or when GRUB is not displayed anymore, some upgrade breaks GRUB, etc.
1. If you are able to login in Ubuntu, Follow the below steps:
- Login in to Ubuntu Operating System
- goto to application==>>System tools==>>Administration==>>Boot repair
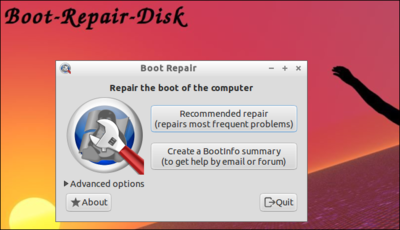
- Once the above window open, click on Recommended repair.
- Now, It will start to repaireing your groub(will take some minute to repair)
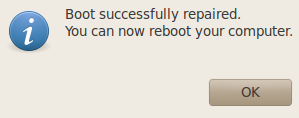
- Restart your computer after using the Boot Repair tool.
Back to top
Adding new user account
- Open system settings (Applications==>>System tools==>>System settings)
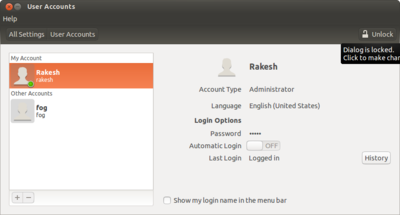
- click on User accounts.
- Click on Unlock button and put a login Ubuntu password
- Click on Plus(+)symbol and fill the your name and new user account name.
- click Add.
- If you want the new user account in Kannada interface select new account you have created and click on langauage, select language kannada.
- Once you restart your computer, you will able to see two user accounts, select and login.
How to add languages in ibus in Ubuntu
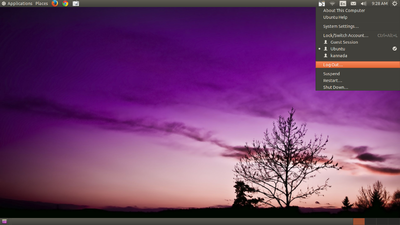
- Logout from the screen.
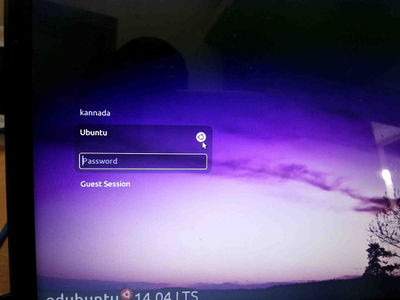
- from login screen Select Ubuntu like below screen.
- Again login to Ubuntu user by using your Ubuntu password.
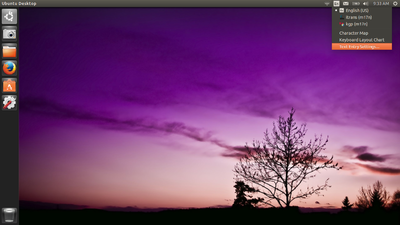
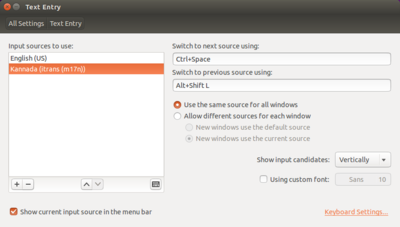
- On the top right side of the desktop, click on En icon(on top of the rightside screen) and goto text entry setting.
- In the text entry window, select Kannada (KaGaPa Phonetic) and click on – (Minus)symbol.
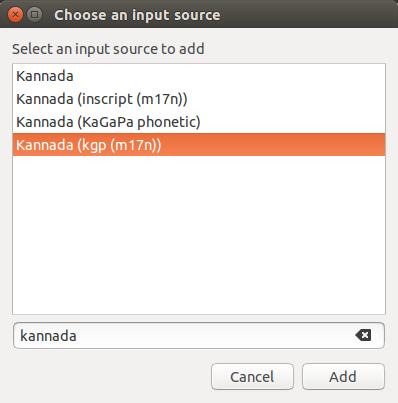
- Then, Click on +(Plus), select kannada(kgp(m17n)) click on add.
(Note : Also in this step you can add other languages to type)
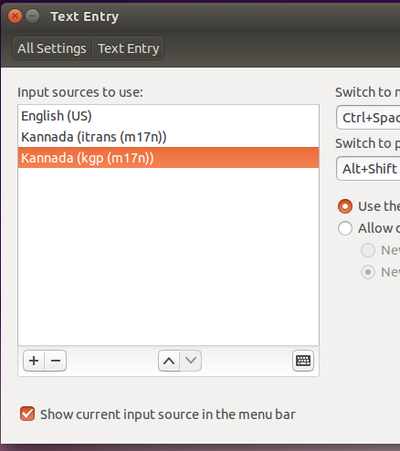
- Now, your select list look like this
- close all the windows and again logout from this window.
- In the login screen select Gnome classic (Metacity) and Login by using your Ubuntu password.
- Now if you want to type kannada by using KGP(Nudi) press ctrl+space key.
How to install tar.gz file on Ubuntu
Open terminal(ctrl+alt+t)
1. The first step to install the file is to change the directory.
cd /Downloads/
2. extract the downloaded tar.gz file
sudo tar -zxvf <example.tar.gz>
3. Change the directory to unzipped folder, i.e.:
cd /download/example
./configure
make
4. And then get into the root i.e.:
sudo su
5. Enter your password.
make install
6. It will start to install.
Back to top
How to connect Datacards in Ubuntu
This is by far the simplest way to configure a USB modem to connect to internet. No additional drivers or software are necessary.
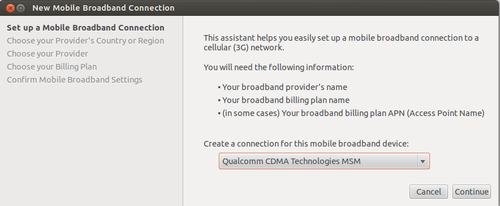
- Plug your USB Modem into an USB port. The LED light starts blinking and in a while once your modem is recognized you will be able to see an option – New Mobile Broadband (CDMA) connection/New Mobile Broadband (GSM) connection on clicking the Network icon just besides the sound icon on top panel.
- Once you click that, you will see this screen which will show your device name. Click ‘Continue’ on the dialog.
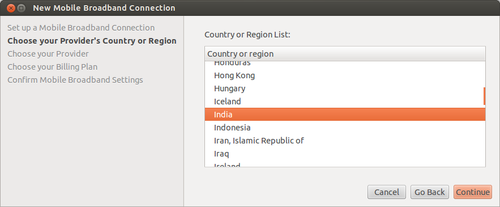
- In the next screen select country as ‘India’. This will help Ubuntu list Indian service providers in the next screen.
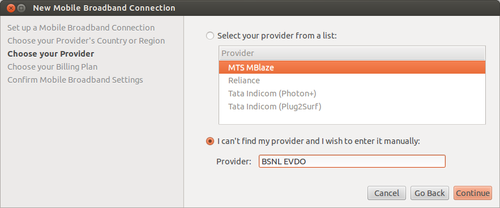
- In the ‘Choose your Provider’ screen select your service provider. In case it is not listed (BSNL EVDO is not listed) enter it manually in the space provided. In case of EDGE/GPRS/3G connection the service providers list will be long.
- The choose your billing plan screen appears only when using a EDGE/GPRS/3G connection. If you are configuring a 3G modem, say BSNL you will be required to select proper zone (Eg. OldSouthZoneA…) to use proper APN settings.
- The last screen is to confirm all the settings and apply them. Click Apply here.
- Connected and now you can browse.
How to connect a printer in ubuntu 14.04 ?
- Applications==>> System tools==>> system settings
- click on printer icon
- "Add" then Select you Printer name then Printer model in the next page and by clicking Add button to complete this process.
How to set up Hp printers through hplip?
- Download hplip from here
- Open a terminal(applications>> accessories>> terminal)
- Type sh hplip-3.14.6.run command/copy+paste in terminal press Enter
- If it asks for a password, please enter your Ubuntu login password
- then follow as it shows.
- Once it complete all the steps, follow the general printer setup steps.
How to connect Canon printers in Ubuntu
1.Click Here to Download the driver.
2. Right click on the downloaded .tar.gz folder and select "extract here" option.
3. Open the extracted folder(Linux_CAPT_PrinterDriver_V260_uk_EN)
4. Find the following folders
a. cndrvcups-common.deb
b. cndrvcups-capt.deb
5. then, double click on each file and click on the "install".
6. Once you done with installation then restart your computer.
7. Connect your printer goto system setting (applications>system tools >system setting).
8. Click on Printers> click add > in the list find your printer > click add.
Back to Top
