Nature of Light
| Philosophy of Science |
While creating a resource page, please click here for a resource creation checklist
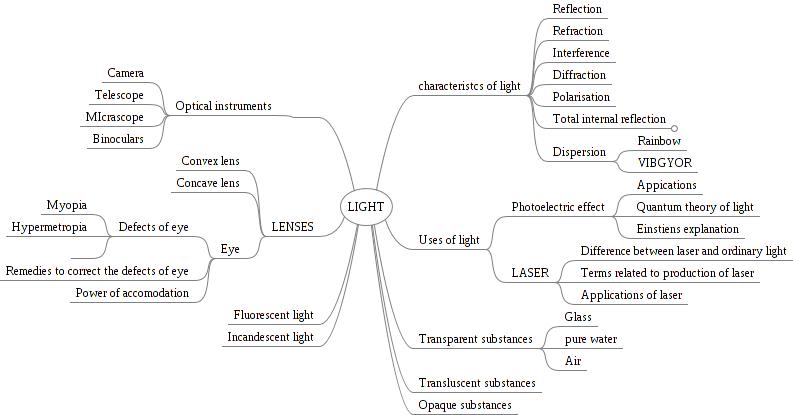
Concept Map
Textbook
To add textbook links, please follow these instructions to: (Click to create the subpage)
Additional information
Useful websites
- Interactive Simulation on Nature of Light

In this simulation, you can explore the history of quantum physics, how the understanding of light was developed and an overview of the theories of light. Source: NSTA - Interactive Simulation on Nature of Light

In this simulation you can explore the behaviour of light as waves. Source: NSTA - Wikipedia article on Wave Particle Duality
- Web interactives and additional information on Physics of Light and Colour; Source: Olympus Microscopy Research
- Physics Classroom-Electromagnetic Waves
- Physics Classroom-Wavelike Properties of Light
- Physics Classroom - Electromagnetic Radiation and Visible Spectra
Reference Books
- E=m by David Bodanis - This book is a very interesting account of how the understanding developed in quantum physics and the theory of light. See Online
- NCERT Textbook Chapter Light
- NCERT Textbook Chapter Reflection and Refraction
- NCERT Textbook Chapter Human Eye and the Colourful World
An image of a concept map of light
Teaching Outlines
Concept #1 - White Light is made up of colours
Learning objectives
- White Light is made up of seven constituent colours
- Introduction to the corpuscular theory of light
Notes for teachers
Reinforce the learning from activity on Recombination of Colours. Also understand the model as proposed by Newton on the nature of light and examine the limitations of this theory.
| LCs8mK1rzc0|150|left}} Primary Additive Colours |
r8ejTUNwgTo|150|left}} Primary Subtractive Colours |
Activity No # 1 - Using a prism to split and combine white light
- Estimated Time - 2 periods of 40 minutes
- Materials/ Resources needed
White paper, Pins, Source of Light, Prisms, Dark room
- Prerequisites/Instructions, if any
- Activity on Recombination of Colours
- Dark room for light experiments
- Multimedia resources
- Website interactives/ links/ simulations
| Newton's Prism Experiment. This is a demonstration of the experiment showing the splitting and recombination of white light. Useful to show the students after the demonstration/ experimentation in class. |
- Process (How to do the activity)
- Demonstrate the dispersion using a prism and recombination of the light
- Students must do this experiment in groups
- The teacher must demonstrate carefully how to position the prism, how to observe rays in light experiments
- Students must be able to draw ray diagrams showing the split of the spectrum
- Developmental Questions (What discussion questions)
- When the light falls on the prism, what did you expect to see? What happened?
- What are the colours you see? What is the order of the colours?
- Evaluation (Questions for assessment of the child)
- From the incoming beam of light, which colour showed the maximum angle of dispersion? (This question can be picked up later to discuss wavelengths and electromagnetic spectrum)
- If you change the direction of the incoming light, what happens to the dispersion?
- Observe the accuracy of the diagrams
- Question Corner
Activity No # 2 -What is colour
The objective is to understand colours as different wavelengths associated with light.
- Estimated Time - 30 minutes
- Materials/ Resources needed
Computer, projector, power
- Prerequisites/Instructions, if any
- Multimedia resources
- Website interactives/ links/ simulations
- Process (How to do the activity)
Watch the video and discuss with the student their understanding.
- Developmental Questions (What discussion questions)
- How does a wave move? The vocabulary is wave propagation)
- What gets transmitted?
- What can you say about the wave when the frequency is high?
- What can you say about the wave when the wavelength is high?
- It is possible to look at light as a wave; the waves are not of material objects but travelling waves changing electric and magnetic fields.
- Different wavelengths are associated with different energy levels and different kind of radiation(light is a form of electromagnetic radiation; there are other electromagnetic radiations)
- The higher the frequency the higher the energy; this is seen as different colours of the visible spectrum
- Can we break down these seven colours more? (No; demonstrate with a prism; these are pure colours)
- Evaluation (Questions for assessment of the child)
Draw a ray diagram to show how this theory explains reflection.
- Question Corner
Concept #2 - Wave Nature of Light
Learning objectives
- Light behaves like waves
- Light undergoes reflection, refraction, interference and diffraction - all those that we associate with waves
- Light is an electromagnetic radiation that travels as a wave and does not need a medium
- As in any other wave, the energy depends on the frequency of the wave
- When light waves are of different wavelengths, they are seen as different colours
Notes for teachers
Studies done on how light travels has helped us visualise it now as changing electrical magnetic fields that interact with other material objects as packets of energy. This radiation can be thought of as waves of different wavelengths. The waves are not of material objects but travelling waves changing electric and magnetic fields. Different wavelengths are associated with different energy levels and different kind of radiation.
Click here for more notes on the nature of light, visible light and colours.
Videos on Nature of Light
The following videos are useful in understanding the nature of light.
Activity No # 1- Reflection, Refraction and Diffraction as waves
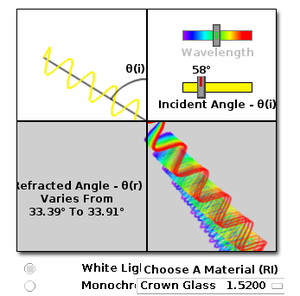
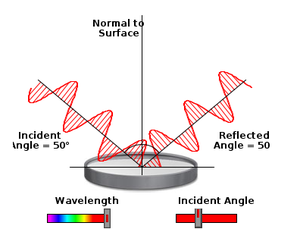
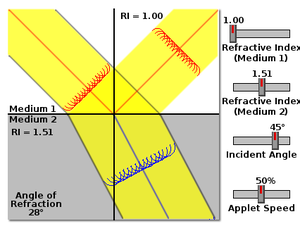
The objective is to demonstrate how we can explain the phenomena of light - reflection, refraction - through the wave model. The teacher must reconcile the rays to the wave model.
- Estimated Time - 40 minutes
- Materials/ Resources needed
Computer, Projector, Blackboard
- Prerequisites/Instructions, if any
Students must have done simple optics experiments on reflection and refraction.
- Multimedia resources
- Website interactives/ links/ simulations
|
|
|
|
Source:Olympus Microscopy Centre
- Process (How to do the activity)
After discussing the simulation, explain the process of reflection and refraction in waves
- Developmental Questions (What discussion questions)
- Have you seen any waves?
- When they encounter an obstruction what do they do? (They bounce back, they bend around, etc_
- In this image, what do you see happening to the wavefronts - they get reflected, they get refracted
- How can we represent this using a ray diagram?
- Evaluation (Questions for assessment of the child)
Observe the student response to above questions
- Question Corner
Activity No # 2 - Simulation of double slit experiment
The objective of this activity is to demonstrate an important experiment from the 18th century that made physicists rethink about the nature of light. Until this time, Newton's corpuscular theory was used to explain light.
- Estimated Time
- Materials/ Resources needed
- Prerequisites/Instructions, if any
- Multimedia resources
- Website interactives/ links/ simulations
- Process (How to do the activity)
- Launch the simulation from the PhET website or download it and run. #Discuss the simulation with the following questions.
- Do the simulation with water and then light. You can do sound if students have been introduced to material waves and understand sound. It is better to do another simulation on wave propagation on sound before doing this simulation.
- Developmental Questions (What discussion questions)
- Let us click on water here. When a drop of water drips in a bucket, what do you expect to see (waves move around)
- If two drops of water drip, what do you expect to see (the patterns the water make will intersect; this is called interference)
- Now let us do a similar thing with light
- What do you see now from the source of the light? (Light emanating)
- If I put one slit, what will I expect to see, according to the ray theory of light? (There will be a dark spot where the slit is but rest of the screen will have light)
- If I have two slits, what will I expect to see?
- What do we really observe? Why would this be?
- Talk about how waves propagate and what happens when there is interference?
- Evaluation (Questions for assessment of the child)
- Question Corner
Activity No # 3- Explain the double slit experiment
- Estimated Time - 40 minutes
- Materials/ Resources needed
Computer, Projector, Blackboard
- Prerequisites/Instructions, if any
Simulation of the double slit experiment
- Multimedia resources
- Website interactives/ links/ simulations
Source:Olympus Microscopy Centre
- Process (How to do the activity)
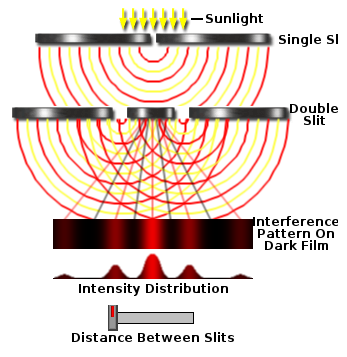
After discussing the simulation, explain the process of interference in waves
- Developmental Questions (What discussion questions)
- What is a wave? (carries energy)
- Can two waves meet? (Water, ropes etc)
- What happens when they meet? The energy increases or decreased
- The interaction between two waves is called interference
- This can be constructive or destructive interference
- Evaluation (Questions for assessment of the child)
Observe the student response to above questions
- Question Corner
Concept #3 - Particle Nature of Light
Learning objectives
- One of the early theories of light was that light is made of particles
- Particle theory explains reflection and refraction; light travels in a straight line of particles
- Particle theory (corpuscular theory) did not explain diffraction especially at small, microscopic scale
- Discovery of photoelectric Effect provided the evidence for particle nature when all evidence was showing that light was a wave
Notes for teachers
The view among scientists on light was split between wave and particle nature of light. Issac Newton proposed his corpuscular theory while Christian Huygens proposed that light is a wave. Reflection and refraction can be explained using particle theory of light and geometric optics supported the particle theory of light.
Click here for more notes on the nature of light, visible light and colours.
Activity No # 1 - Corpsucular Theory of Light
The objective is to study Newton's theory on light
- Estimated Time - 30 minutes
- Materials/ Resources needed
Computer, projector, power
- Prerequisites/Instructions, if any
- Multimedia resources
- Website interactives/ links/ simulations
- Process (How to do the activity)
Watch the video and discuss with the student their understanding.
- Developmental Questions (What discussion questions)
- Can reflection and refraction be explained using this? How?
- Newton said that different colours can be caused by different sizes of particles. Knowing what you know of the eye, explain how this would have worked.
- What do you not understand about this theory based on your observations?
- Evaluation (Questions for assessment of the child)
Draw a ray diagram to show how this theory explains reflection.
- Question Corner
Activity No # 2- Reflection, Refraction and Diffraction as particles
- Estimated Time - 45 minutes
- Materials/ Resources needed
Computer, projector, power
- Prerequisites/Instructions, if any
Students must have done simple optics experiments on reflection and refraction.
- Multimedia resources
- Website interactives/ links/ simulations

Source:Olympus Microscopy Centre
- Process (How to do the activity)
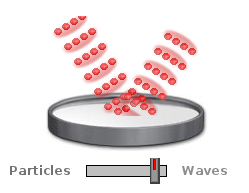
- Demonstrate the tutorial and discuss the following questions 1-5
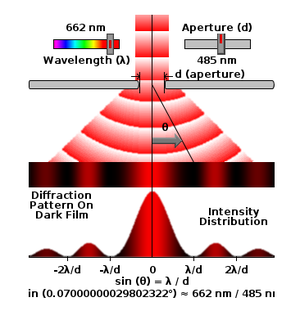
- Show the diffraction tutorial and discuss the other questions
- Developmental Questions (What discussion questions)
- When particles hit a surface, what do you expect to see? (Bounce, reflection)
- When particles enter a surface, what do you expect to see? (They slow down, change direction, etc)
- Can you visualize reflection and refraction as particles?
- If in a dark room there is a single bulb on the wall and we put a partition in front of the light, will the room be completely dark behind the partition?
- What happens in the light bulb case? How is the light getting spread in the room? Can light (travelling in a straight line) bend around the partition?
- If you imagine waves of light, how would you explain this (think of waves of water)?
- Now what is your conclusion about the theory of light?
- Evaluation (Questions for assessment of the child)
- Can you draw a ray diagram for reflection and refraction of light for particles and waves?
- Based on the evidence so far - reflection and refraction, which theory of light better explains the behaviour of light
- Question Corner
Concept # 4- What is Light - Wave particle duality
Learning objectives
- Light is an electromagnetic radiation
- It is possible to look at light and other electro magnetic radiation as a wave or as a particle known as the photon.
- Light travels as electromagnetic radiation; with waves of different wavelengths
- Light interacts with material particles in discrete packets called photons
- Different wavelengths are associated with photons of different energies
Notes for teachers
The objective here is to enable students to understand that light can be thought of as a wave or as particles. Different models of light explain different phenomena. It is important to get a sense of the history of how light was understood, how electromagnetism was understood and how light is the result of continuously oscillating electric and magnetic fields.
Overwhelmingly evidence was in favour of light as a wave until a discovery was made that light could make metals emit electrons. Click here to see about photoelectric effect.
Studies done on how light travels has helped us visualise it now as changing electrical magnetic fields that interact with other material objects as packets of energy. This radiation can be thought of as waves of different wavelengths. The waves are not of material objects but travelling waves changing electric and magnetic fields. Different wavelengths are associated with different energy levels and different kind of radiation. Different wavelengths are associated with different energy levels and different kind of radiation. The electromagnetic spectrum consists of wavelengths varying from hundredths of a nanometre to hundreds of metres. Visible light falls within the wavelength range of 400 to 800 nm (1 nanometre = 10-9 m) and is a small part of the electromagnetic spectrum. Blue light has the smaller wavelength – around 400 nm and red light is around 800 nm. Ultra-violet rays, X rays and gamma rays are more energetic and shorter wavelengths (more later!) and infra red, heat radiation and radio waves are longer wavelengths and lower energy levels.
It is the peculiar nature of sub-atomic particles that they can be treated as particles – in interactions - or as probability waves when we are considering location in space. In the case of light we find that we can associate it with particles – called photons. These are often also known as messenger particles and current theory has it that the movement of energy occurs by the creation and destruction of these virtual particles starting from the source of the energy till the point when it reaches the user of the energy. Different photons have different wavelengths associated with them. Each photon can be treated as a packet of energy and the amount of energy associated with the particle is given by the equation Energy E = hυ where υ is the frequency associated with the wavelength and h is the Planck's Constant. (Remember that the velocity of a wave is given by c = υλ where λ is the wavelength of the associated wave) This means that there is a wavelength associated with the photon particle and this is the wavelength we refer to when talking about the wavelength of light. Since wavelength is inversely proportional to the frequency we can see that the shorter wavelength photon has the greater energy. What this means is that the smallest unit of energy associated with each wavelength is fixed this is the energy of 1 photon of that wavelength. Of course, if there are more photons then there is more energy. But more energetic photons can penetrate matter more than less energetic photons – that is why X rays are not stopped by flesh and muscles but only by bones but light gets bounced off the human body.
Click here for more notes on the nature of light, visible light and colours.
Activity No #1 - Introduce the nature of electromagnetic radiation
- Estimated Time 30 minutes
- Materials/ Resources needed
A voltage source, conducting wires, ammeter, voltmeter, a switch, a magnetic compass, bicycle dynamo, computer, projector, power
- Prerequisites/Instructions, if any
- Familiarity with electric charges, potential, magnetism
- Multimedia resources
- Website interactives/ links/ simulations
Source:Olympus Microscopy Centre
Watch this video - What is Light
- Process (How to do the activity)
- Complete the circuit
- Turn on the potential source and ask the students to bring the compass near the circuit
- Observe the compass
- Operate the bicycle dynamo
- What is resulting in the light?
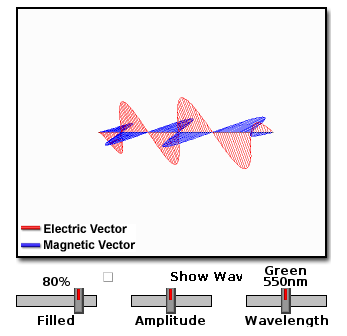
- Demonstrate the simulation and discuss.
- After the discussion, demonstrate the video
- Developmental Questions (What discussion questions)
- What is electricity?
- What is magnetism?
- Both of these are field forces and these constitute a fundamental force called Electromagnetism
- When the circuit was on there was a field generated; we can think of this as information; this resulted in the deflection of the compass (We will see later how the deflection happens - the magnitude and direction)
- In the case of the dynamo, what did we observe? The rotating magnet created a field and this caused a potential difference and resulted in the light
- Electric and magnetic fields thus produce change in each other
- In the simulation what did we see? When the electric field changes, the magnetic field changes avnd this continuous oscillation results in energy being produced which is Electromagnetic Radiation
- This can behave like a wave or particle; light is an electromagnetic radiation
- Evaluation (Questions for assessment of the child)
- How will you describe light?
- Is light produced? How is it produced?
- Question Corner
- Can you see light?
Concept #4 Electromagnetic Spectrum
Learning objectives
- Oscillating electric and magnetic fields produce electromagnetic radiation
- The Sun emits radiation of all wavelengths on the electromagnetic spectrum
- Visible light is only one part of this
Notes for teachers
| CCAYcuCWOnM|150|left}} Introduction |
OzDmEA8x0nQ|150|left}} Radio Waves |
UZeBzTI5Omk|150|left}} Microwaves |
i8caGm9Fmh0|150|left}} Infrared waves |
| PMtC34pzKGc|150|left}} Visible Light Waves |
QW5zeVy8aE0|150|left}} Ultraviolet rays |
CCAYcuCWOnM|150|left}} X Rays |
TA5SLDiIUWs|150|left}} Gamma waves |
Read More on the electromagnetic spectrum on Physics Classroom
Activity No # 1 - Introduction to the electromagnetic spectrum
- Estimated Time - 30 minutes
- Materials/ Resources needed
Computer, projector, power
- Prerequisites/Instructions, if any
- Multimedia resources
- Website interactives/ links/ simulations
- Process (How to do the activity)
- Demonstrate the video and let the students write down their questions
- The video can be shown again and the questions below can be discussed
- Developmental Questions (What discussion questions)
- What is the source of the Sun's energy? (Explain briefly the nuclear energy)
- How does this energy travel? (Electromagnetic Radiation)
- Is this a wave or a particle? (Dual Nature)
- Why would the shorter wavelength carry more energy?
- Can you say which electromagnetic radiation has the highest energy?
- Evaluation (Questions for assessment of the child)
- Question Corner
Activity No # 2 Revision of Electromagnetic Spectrum
- Estimated Time - 30 minutes
- Materials/ Resources needed
- Prerequisites/Instructions, if any
- Multimedia resources
- Website interactives/ links/ simulations
- Click here for an interactive simulation to review the work so far.
- History of Light
- Process (How to do the activity)
- The first simulation is a revision
- The video is to build a theory of how light evolved
- Developmental Questions (What discussion questions)
- This is meant as a review; discuss based on what comes up in class
- Evaluation (Questions for assessment of the child)
- What was the original theory of light?
- How was the wave theory established?
- How was the wave theory challenged?
- What is the current thinking?
- Question Corner
- Why is speed of light constant?
Project Ideas
Fun corner
Usage
Create a new page and type {{subst:Content}} to use this template

