Ubuntu FAQ
Use full Ubuntu website
Ubuntuforums
Needless to say, the best place to go for Ubuntu support is none other than the popular Ubuntu Forums. This is the only place where you can find all kind of advices, tips and tricks, hacks and solutions related to Ubuntu. If there is a Ubuntu-related problem that you can’t solve, most likely it has already been discussed in the forums. Simply do a search in the forums or post your question and you will receive plenty of help from the community.
Ubuntu Guide
As its name implies, UbuntuGuide is a wiki where you can find plenty of guide, tips and tricks for Ubuntu. It covers information from Ubuntu Dapper to Jaunty and is available in multiple languages. While UbuntuForums is a great means to get solutions for your problems, UbuntuGuide is the place to go to find new tricks and apply them in your system.
Ubuntu Hardware Support List
While Ubuntu supports a wide range of devices, there are still times when you can’t get a particular hardware to work. The Hardware Support page shows a hardware compatibility list that you can refer to before you make any hardware purchase. This hardware support page is maintained by the community and anyone can add/modify the entry.
Ubuntu Documentation
It is no doubt that Ubuntu is an easy to use and user-friendly distro. However, if you are still having difficulties navigating around and get it to perform simple daily tasks, you can head on to Ubuntu Documentation and read about everything you need to know about Ubuntu. It won’t make you an expert, but at least it can help you to get started (and perhaps show your friends how geeky you are).
Launchpad
Launchpad is the place for you to discover new open-source applications or retrieve source code/installation instruction for third party apps that are not found in the Ubuntu repositories.
Gnome-look.org
If you love eye-candy, beautiful wallpapers, login screen, splash screen and everything about your Ubuntu system, then gnome-look.org is the place to visit. It contains a great collection of artworks and themes contributed by the community. They are free to download and use.
Ubuntu Brainstorm
Ubuntu Brainstorm is a Digg-like site where you can submit your ideas/suggestions/stuffs to be included in future version of Ubuntu and let others vote for it. Popular ideas (those that received a lot of votes) are reviewed by the Ubuntu team and possibly include them in the future release.
Full Circle Magazine
Full Circle Magazine is the only website that is dedicated to publish a free Ubuntu magazine (in pdf format) every month. Being a loyal subscriber, I have found their magazines very informative, yet doesn’t get too technical in detail. It is great for new users who wanted to learn more about Ubuntu.
Ubuntu Seach Engine
A Google custom search engine dedicated to search only Ubuntu-related stuffs. Currently it indexes 169 Ubuntu-related sites, including UbuntuForums, Ubuntu Wiki and Ubuntu Guide.
Planet Ubuntu
Planet Ubuntu is a blog written and updated regularly by Ubuntu developers and contributors. This is where you can get the latest and updated news about your system.
Differences between Ubuntu (Public software) v/s Proprietary software (Microsoft Windows):
Differences between Windows vs Ubuntu
Source :
http://techluminati.com
http://betanews.com
This article highlights the pros and cons of both the operating systems, given a set of requirements, it also attempts to show you which OS would be best suited for you. Let me begin with an introduction of the Linux operating system as I imagine many of you must be pretty new to this. In fact, a common misconception is that Linux is ‘ridiculously complicated’. While I admit getting used to Linux may take a while for an average windows user, it is definitely easy to use. Linux comes in various flavours, also known as ‘distributions’. The most popular Linux distribution is ‘Ubuntu’, pronounced as ‘oo-boon-tu‘.
- Proprietary software (Microsoft Windows):
By default has very minimal software set, the basic features that we need – word processor, spread sheet and a presentation software are not present. You’ll have to purchase and install the MS Office suite separately, this is something that should be bundled with the operating system. The question I ask is “What good is an operating system, if it doesn’t provide the basic features?”.
- Ubuntu:
comes with the LibreOffice suite (a Microsoft Office Equivalent) pre-installed. It also has F-spot, an image editing program that and an Instant messaging client called Empathy – that has chat provisioning for Facebook, G-Talk, Yahoo, MSN and VOIP capabilities all under a single applications.
- Proprietary software (Microsoft Windows):
One of the biggest advantages of Linux is its built-in driver set, or rather the ability of automatically downloading and installing them. This includes the drivers for your webcam, Wi-Fi, Ethernet Card, even your printer or scanner! We all know drivers is a big pain that comes when completing a fresh install of Windows .
- Ubuntu:
With Linux, there is rarely any need to download the drivers manually. Linux also has the ability to download proprietary drivers (The ones from Nvidia and ATI), unlike windows where we have to manually download and install a driver for everything.
- Proprietary software (Microsoft Windows):
comes with Windows media player, which is pretty much useless without codecs, as majority of the videos/ movies that we watch require codecs like Xvid. So there is a need to download a codec pack before Windows media player becomes fully functional.
- Ubuntu:
is bundled with Movie Player, and also requires downloading codecs.
However, in both the operating systems, it is very easy to watch videos by simply installing VLC media player.
- Proprietary software (Microsoft Windows):
We need to download from there website or from developer website and install. In most of case we need to pay and buy software.
- Ubuntu:
When it comes to installing third party software, the steps required to install a software in Ubuntu is considerably less. An illustration is shown here of installing software in Ubuntu.
Ubuntu has a utility called Ubuntu software centre. This is one of the most loved features by Ubuntu users. It is as simple as installing an app in your phone from iTunes store or Android Market (now rebranded to Google Play). Just select the software that you need, hit install, and the software is ready to use.
It is clear from the screen shots, that installing software in Ubuntu is a lot simpler than it is in windows. Moreover, Ubuntu will check for any dependencies that the software needs and it will be installed automatically.
- Proprietary software (Microsoft Windows):
requires a minimum of 1000 Mhz processor with 2GB of RAM.
- Ubuntu:
requires a minimum of 700 Mhz processor with 1GB RAM. While these are the official requirements, in practice, the requirements are considerably higher. From my experience, If you install both the operating systems on identical hardware, Ubuntu’s performance is significantly higher than that of Windows.
In fact, if you were to pull out a 7 year old computer from a junkyard, Ubuntu will work flawlessly. Moreover, the boot time of Ubuntu is considerably less than its Windows counterpart.
- Proprietary software (Microsoft Windows):
ranges from Rs. 5000 to Rs.15000 depending on the version you are buying.
- Ubuntu:
On the other hand, Ubuntu/Kubuntu is free of cost. You can download it from the official website.
This is the part that worries most users who are used to the Proprietary software User interface. In case you are not pleased with the Ubuntu user interface, there is another distribution of Ubuntu called Kubuntu, which has a marvellous user interface,its very easy to use and is similar to the look and feel of Windows 7 in many aspects.
Is Ubuntu compatible with Windows?
Yes. Installing Ubuntu does not stop you from working with your Microsoft Windows files and applications. Ubuntu can be installed along-side (side-by-side) Windows and also it can be installed within Windows as a program. However if you use Ubuntu you may not need to use Windows since most of the applications on Windows are also available bundled with Ubuntu, like Office, Web browser etc
Why is Linux/Ubuntu less prone to Malware/Viruses?
-
Possible reasons Linux/Ubuntu is less prone to malware:
- Linux is based on UNIX architecture. UNIX is designed as a multi-user operating system and has in-built safeguards to protect user from malware. This includes user permissions definitions, user space distinct from system space etc
- Programs are run as normal user, not Root User.
- Vast diversity makes it difficult to reproduce flaws in a system.
- All software and drivers are frequently updated by Package Managers.
- Software is generally installed from vast Repositories not from unfamiliar websites.
- No-one profits from supplying anti-virus or security products.
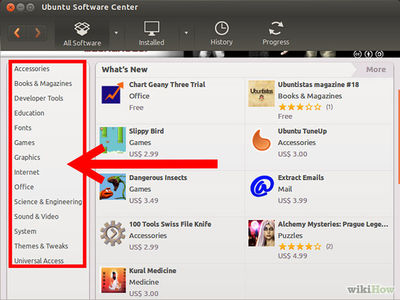
How to Install Software/Applications in Ubuntu 14.04
Want to install programs you want, but because you are new to Linux, don't understand how it works? This article will show you how to install programs in recent versions of Ubuntu.
Steps
- Connect to the internet, unless you are using offline repositories.
Installing Graphically
- Open Ubuntu Software Center (Applications=>Ubuntu SOftware Center)
- On the Left side you can select the category of software you want to install. For example, you'd select Sound & Video to install any sound or video software.
- An alternate way is to use the search function and search for the required software.
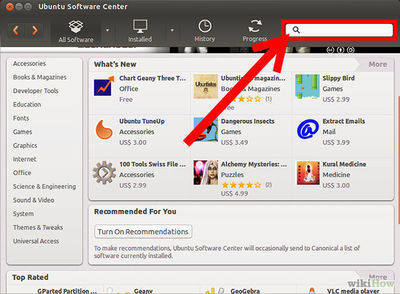
- An alternate way is to use the search function and search for the required software.
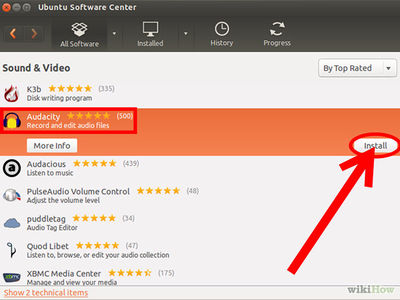
- Select the software you want to install. For example, choose Audacity from the list and click Install.
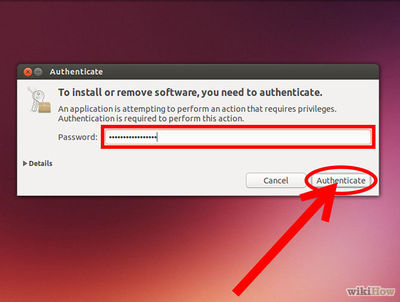
- You will be prompted for the password of that computer. Type it to continue installing the software.


Installing via Terminal
- Open Terminal by typing Ctrl+Alt+T or go to Applications=> Accessories=> Terminal.
- For Example I will try to install firefox in this session and for this type following command

sudo apt-get install firefox

- Now, Enter your ubuntu login password (the password will not be visiable) and press Enter.
- it will start to install firefox.
How to add languages in ibus in Ubuntu 14.04
- Logout from the screen.


- from login screen Select Ubuntu like below screen.


- Again login to Ubuntu user by using your ubuntu password.
- On the top right side of the desktop, click on En icon(on top of the rightside screen) and goto text entry setting.

- In the text entry window, select Kannada (KaGaPa Phonetic) and click on – (Minus)symbol.

- Then, Click on +(Plus), select kannada(kgp(m17n)) click on add.
(Note : Also in this step you can add other languages to type)

- Now, your select list look like this

- close all the windows and again logout from this window.
- In the login screen select Gnome classic (Metacity) and Login by using your ubuntu password.

- Now if you want to type kannada by using KGP(Nudi) press ctrl+space key.
How you compile a program from tar.gz source
- Open terminal ( by pressing ctrl+Alt+t)
- go to .tar.gz/.tar.bz2 downloaded directory, by using the command cd to navigate to the correct folder.
Example : If the tar.gz/bz2 file is in the download folder, then you yave to type like : cd /Downloads/
then
- In that, if there is a README file with installation instructions, use that instead.
- Extract the files with one of the commands,
       If it's tar.gz use tar xvzf PACKAGENAME.tar.gz

       if it's a tar.bz2 use tar xvjf PACKAGENAME.tar.bz2
- sudo ./configure
- sudo make
- sudo make install
How to convert videos from one format to different formats in Openshot video editor
Step 1:Open The openshot video editor by clicking on Applications---->Sound and videos----->Openshot video editor (If openshot video editor is not installed then install it from the Ubuntu software center)

Step 2: After Opening the Openshot video editor Click on “+” mark to import the video files from your computer.

Step3:After importing the video files, to convert the video from one format to another format click on Export video tool which is red Button as shown in the below picture.

Step4:After selecting the export button you will get the below mentioned window.
In File name give the video name and in profile select all format and in Target select the format you want to convert the video file.
And then click on export video to convert.

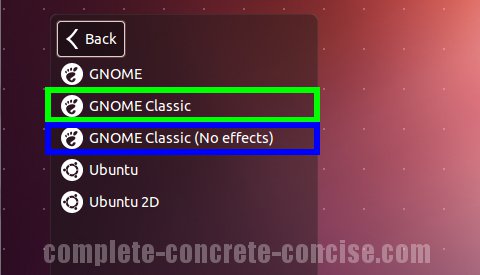
How do I install and switch to the GNOME-Classic desktop?
- To install the Classic desktop on your Ubuntu 12.04 machine, follow the steps below:
- Press Ctrl + Alt + T on your keyboard to open the Terminal.
- When the Terminal opens, type the commands below at the prompt, i.e. after the $ symbol.
- sudo apt-get install gnome-session-fallback
- Press Enter. Enter your password when prompted.
- Note: When you type, your password is not visible.
- Restart your system, and at the log in screen, click on the Ubuntu Greeter icon.
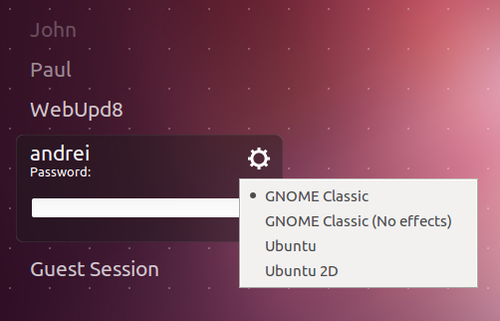
- Select the GNOME-Classic session and login. As shown below.
- This is only a one-time selection. You need not do this everytime you login.
- Your system will now start with Classic Desktop always!


How to connect the Projector in Ubuntu
Basically we need to use two impartent cables for connecting Projector to the computer, they are :-
-
Projector Power cable connection is from power plug to the projector and VGA is from computer to theprojector.
Note : Nowadays VGA port is absolute in the modern laptops, so use HDMI cable for connecting projector.
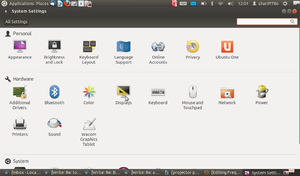
- 1.In Computer go to Applications==>System tool==>System Settings
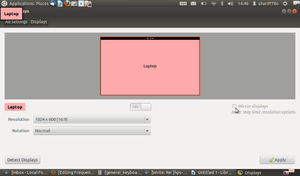
- 2.Click on Display.
- 3. Check mark on Mirror display and click on Detect displays then click on Apply.
It will connects automatically.
- (Note: After following the above steps, still if you are not able connect the projector then only restart your computer and follow the same steps.
Back to top
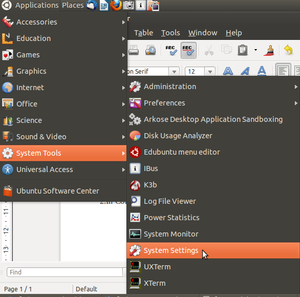
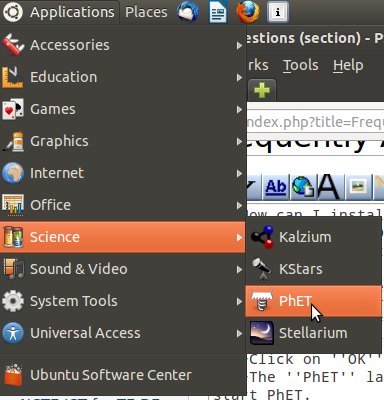
- 1. Applications----->System Tools------->Preferences------>Main menu
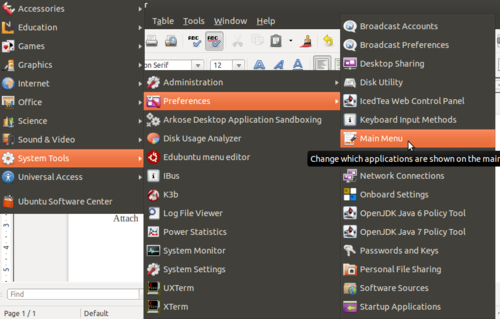
- 2.Select Science from menu, Click on +New Item

- 3.Type as mentioned below without any mistake.
- Name:PhET
- Command: firefox /opt/PhET/index.html
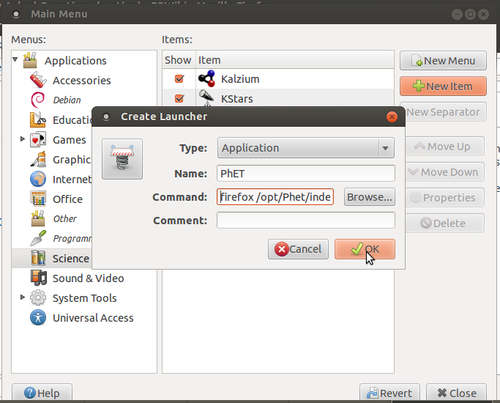
- 4.Click on OK and close all tabs
- 5.To open PhET, go as follows
Applications----->Science----->PhET
Back to topHow do I create desktop shortcuts for applications on Ubuntu?
- Follow the steps to create desktop shortcuts:
- Find the program in the Applications menus and right click.
- Select Add this launcher to desktop.
- A link to the application will now be on your desktop.
How do I remove an application/software on Ubuntu?
- To remove an application:
- Click Applications → Ubuntu Software Center.
- In the Installed Software section, find the application that you want to remove by finding it in the list or by searching for it.
- Select the application and click Remove.
- You may be asked to enter your password. After you have done that, the application will be removed. This should not take very long.
How to recover the missing top panel in Ubuntu (Gnome Desktop)
- Press Alt+F2
- Type 'gnome-terminal'
- Check/tick 'Run in terminal' box
- and type the following command 'gconftool --recursive-unset /apps/panel&& killall gnome-panel'
Alternatively,
You can open the terminal by clicking on Application -> Accessories -> Terminal and type the following command at the $ sign 'gconftool --recursive-unset /apps/panel&& killall gnome-panel'
How to solve System problem detected error
The error "System program problem detected" comes up when a certain application crashes. Ubuntu has a program called Apport that is responsible for detecting such crashes and upon user consent, report these crashes to developers. This process intends to get the problem fixed by the developers.
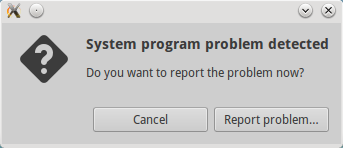
For Solving this error :
- Open your terminal(ctrl+alt+t) and type:
sudo gedit /etc/default/apport
- And Press Enter.
- Enter your ubuntu login password (Password will not appear in the terminal).
- It will open the file and
- Change enabled=1 to enabled=0, then save and exit.
How to add new/recover missing icons on top Panel in Ubuntu (Gnome Desktop)
- Alt+Win+ right click on the top panel to add the applet.
- Then in the list select select indicator applet complete as below.( for time,volume,blutooth and power button)
- click Add
- Then close the window.
- Click on the clock applet and select the ‘Time & Date Settings’ entry
- In the ‘Clock’ tab, check the box next to ‘Time in Other Locations’
- Click the ‘Choose Locations‘ button
- Tap ‘+’ and enter the name of the location
- To re-enable hibernate, run the commands below one by one to edit the config file:
- Copy and paste below lines into the file and save it.
- Restart your computer and done.
- 1.Open firefox, Applications==>Internet==>Firefox Web Browser
- 2.Once it's open click on tools------>add-ons

- 3.In top right side of the screen have search option in that type as you tube video downloader press Enter.
- Now you will get list of all the downloader plugins, in the list select best addon(example : 1-Click youtube video downloader) click on install button.
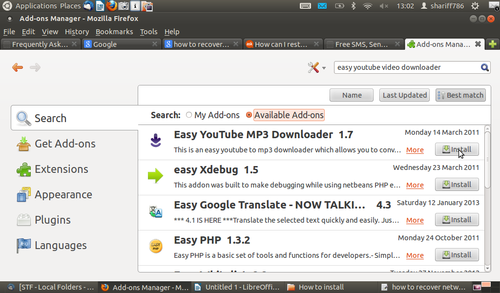
- After the installation, just open any youtube videos you will see the download and click download button and save the video.
Back to top
How to correct, The Ubuntu login split screen or Lower graphics mode
Note:Before following the below mentioned steps please connect the internet(internet should connected) 1: Whenever you get the split ed screen press the keys Ctrl+Alt+(F2 or F3 or F4 or F5 or F6) press any one of the function key f2 to f6 along with the ctrl and alt button till you get terminal (blank screen ended with $ sign).
2:In front of $ sign type the following command without mistake sudo apt-get install gdm press Enter
3: provide the system password (password will not appear)
4:Once the process is complete, type the command sudo reboot
5:Your machine will restarts automatically with good screen display.
Note:-If you Don't have internet follow the below mentioned steps.
1: Whenever you get Lower graphics mode press the keys Ctrl+Alt+(F2 or F3 or F4 or F5 or F6) press any one of the function key f2 to f6 along with the Ctrl and Alt button till you get terminal (blank screen ended with $ sign).
2:In front of $ sign type the following command without mistake sudo rm /etc/X11/xorg.conf press Enter
3: provide the system password (password will not appear)
4:Once the process is complete, type the command sudo service lightdm restart
5:Restart Your machine you will get correct screen display.
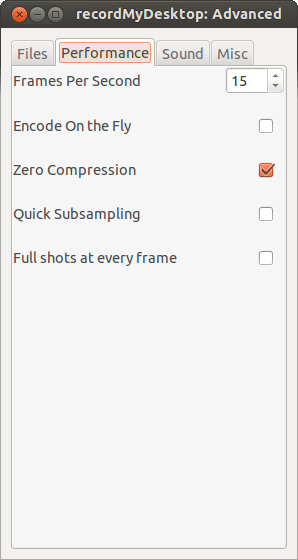
How to use Record my desktop
RecordMyDesktop is one of the few video capture programs available in Ubuntu. Keeping with Linux’s free philosophy, RecordMyDesktop produces Ogg Theora video files out of your entire desktop, or just a selected section. If you haven’t heard of Ogg Theora, don’t worry – any modern video player will play these files, and you can even upload them to YouTube without having to convert them to another format.
*To begin recording video, click on Applications > Sound & Video > recordMyDesktop.
*The main screen has a few common options, and a thumbnail of your desktop.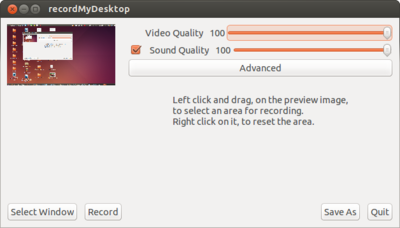
If you want to record sound, ensure that the checkbox beside Sound Quality is checked.
There are some more options that you may want to play with; to access them click the Advanced button.
Most options are specific to your needs, but one common thing that you may want to alter is the frame rate – a higher frame rate will look much smoother, at the cost of additional processing power. Frame rate can be changed in the Performance tab.
Record Your Entire Desktop
- To start recording your desktop, either click the Record button in the main window, or click on the red circle in your system tray (which is in the top-right of the screen by default).

- Once you start recording, the red circle will change to a grey rectangle, the standard symbol for a stop button.
When you are finished recording your video, click on the stop button in the system tray.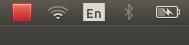
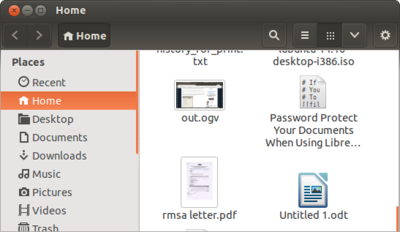
- By default, videos will be stored in your home directory, under the name “out.ogv”. If the file already exists, RecordMyDesktop will not overwrite it, but instead create a new file with a number at the end to differentiate it.
Taking high resolution webpages screenshots in Firefox
For taking high resolution webpages screenshots in Firefox, you can do the following -* For only the visible part of the page in high resolution, go to Responsive Design View(Ctrl+Shift+M shortcut) from the Developer Tools in Firefox menu and then change the resolution at the top left corner. Simply click on camera icon on top right corner to save the image.
- For full web page screenshot, then use an add-on called Nimbus Screen Capture - and this also has option to change image resolution at top left corner and take screenshot of any webpages.
How do I setup my printer on Ubuntu?
-
Before you begin the installation steps below, connect your printer/s. You need to do this prior to turning your system on. This helps to ensure Ubuntu recognizes how the printer is connected to the system, and it allows Ubuntu to identify the specific printer port.
- Starting Ubuntu’s printer tool --- From your Ubuntu main menu, select System, then choose Administration. Under the Administration menu, you will find an icon labeled Printing. Select this tool and within several seconds the Printer Configuration Tool will open.
- Configuring a printer connection --- Now, double click on the New Printer icon. This will bring up the Add a Printer wizard.
- Choosing a printer driver --- Your printer has been detected. Select your printer from the list and click the Forward button to complete the process.
- Testing the printer --- Highlight your new printer icon and press the right mouse button. Now choose the Properties option. This takes you to your specific printer’s properties control. The properties control allows you to not only print a test page, but also to make changes to your printer paper, resolution, color options and ink usage. Your printer is now ready to use.
How to increase battery life in your computer?
- Turn off Wi-Fi and BlueTooth - Most laptops have shortcut keys to instantly disable wireless networking.
- Don't play computer games, music or DVD movies - Multimedia activities drain laptop batteries.
- Adjust your screen brightness - Dimming your display saves battery power.
- Decrease or mute the Laptop Speaker Volume.
- Turn off Auto-save features in Office and other applications.
- If your PC has a built-in wireless card, turn it off or disable it when not in use.
- Programs that are run from a CD or DVD can be copied to and run from the hard drive, which typically consumes less power than an optical drive.
- If you do not use your laptop for extended periods of time (a week or more), remove the battery pack from the laptop.
- Do not expose the battery to high heat or freezing temperatures. Do not leave your battery in your car in the summer. Hot batteries discharge very quickly, and cold ones can't create as much power.
- Make sure to plug your laptop charger adapter into a UPS and not directly into a power outlet or surge protector.
- If you have a nickel-metal hydride battery, completely drain and recharge the battery once a month to maximize its capacity to hold a charge.
- Fully charge new battery packs before use. New pack needs to be fully charged and discharged (cycled) a few times before it can condition to full capacity.Leaving a battery in a laptop while using an electrical outlet for long periods of time will keep the battery in a constant state of charging up and that will reduce the life cycle of the battery.
How to open .jar files in Ubuntu
- Right click on .jar file and goto properties
- Then goto permissions tab right check on Execute: Allow executing file as program then click on close.
- Again click on .jar files open with open with open JDK java 7.
How do I increase the screen brightness on my Samsung N148 Plus Netbook?
- Go to Applications --> Accessories --> Terminal.
- In the terminal window after the $ sign, copy and paste the following command:
- sudo setpci -s 00:02.0 f4.b=ff
- Then press Enter key. It will ask you for your computer password, Type your password and press Enter key(Note:Password will not.
NOTE:The value ff increases your screen brightness to the maximum. One of the following possible values can be entered instead of ff' to adjust your screen to a medium brightness to save battery. 30, 40, 50, 60, 70, 80, 90, 100
To increase the screen brightness in your Netbook follow the below steps:
How to set a root password in ubuntu
1 login to you ubuntu Administration account.
2 Open terminal (ctrl+Alt+T)
3 type sudo passwd root :-

4 Enter your administration password and press Enter.

5 set a new password for root and press Enter.
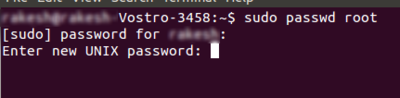
6 re-enter your root password for the confirmation.
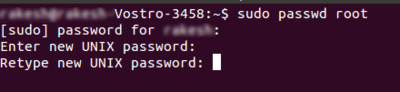
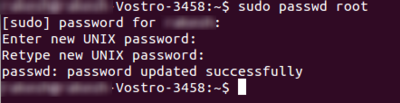
Now you are successfully set up the root password. Now if you want to reset any user account login password through the recovery mode, you need to enter this root password then it will allow you to change it.
For changing user account login password follow the bellow steps in recovery mode.
How to reset the username login password in Ubuntu
1. Boot in a recover mode.
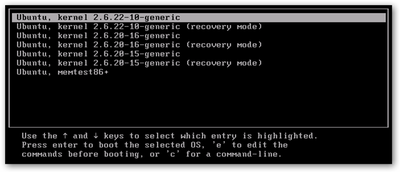
2. Now select "root - Drop to root shell prompt" and it will ask you root password (if you configured root password) then press Enter.

3. Now in front of # symbol type ls /home
4. Type following command :mount -rw -o remount /
5. Then, enter the following command to reset your password:passwd <username>
6. It will ask for new password (2 times) type and press Enter key.
7. reboot the machine using below command : sudo reboot
8. Now, try to login with using a new password.
Ubuntu 14.04 LTS: File Sharing With Samba
In server computer :-
1. Installing samba(GUI) in server :-
Open terminal (Ctrl+Alt+T) and copy paste below command
sudo apt-get install samba samba-common system-config-samba python-glade2 gksu
2. Create folder in server :-
- Create the folder you will be placing your shared files in
- Right-click it, select local network sharing
- Tick share this folder
- Suggest you make the share name the same as the folder name
- Tick allow others to create... if you want clients to be able to put files onto the server
- Tick guest access to create an insecure server that doesn't need a password (not recommended)
- create share
- Again right click on folder >> properties >> click on permission tab :- then change the group permission to your preference (create and delete file or only access files)
3. Open samba configuration tool:-
Application>> system tools >> administration >> samba
4. Configuring samba and sharing folder
Click on + mark and browse your sharing folder location and goto next access tab
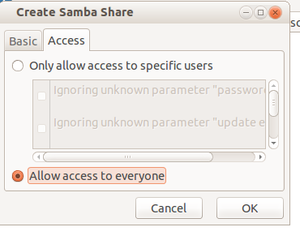
Select "Allow access to everyone" click okay.
Now you your shared folder is shared in the network(LAN).
You have to find out the server system IP address (by click on network icon and connection information example: 192.168.1.150).
Accessing shared folder in Client machines -In Ubuntu
Step 1: Connect to the remote computer
go to places >> connect to server
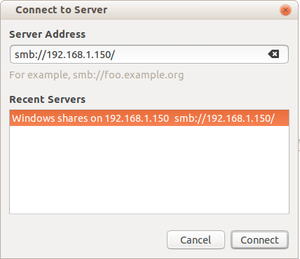
in server address type the IP of the server computer (eg: 192.168.1.150) as shown in above and click connect.Now you can able to see your shared folder.
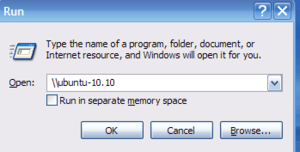
Accessing shared folder in Client machines -In Windows
In a windows machine go to start –>Run and type :
IP adress of your ubuntu server computer (ex:192.168.1.150 or hostname)
And is done. Back to top
How to make a pen drive bootable
-
Note: In order to make a pen drive as ubuntu bootable pen drive, requires the following items:
- a. Empty pendrive with minimum 4GB.
- b. Ubuntu DVD or ISO image of UBUNTU.
- c. Ubuntu installed computer with working DVD drive.
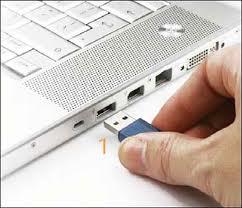
- 1. Insert the pen drive into the USB port of your computer as shown below.
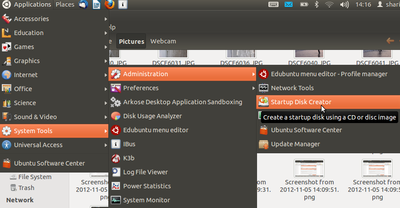
- 2. Go to Applications---->system tools---->Administration---->startup Disk creator,as shown
- 3. Once system detects pen drive, click on other. Show the Ubuntu DVD path (if you are using ubuntu iso image then show the image path).
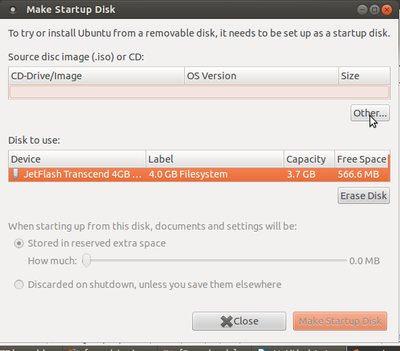
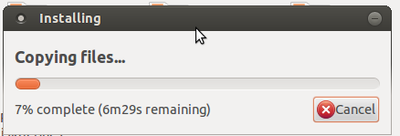
- 4. Click on Make Startup Disk, as shown in the image below.
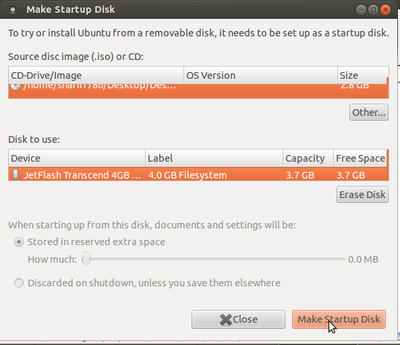
- 5. After clicking, the 'installing' process would begin. Once the installation is complete with the figure showing 100%, click on the quit option.
Your pen drive is ready for installing UBUNTU on your computer.
Back to Top
- To start recording your desktop, either click the Record button in the main window, or click on the red circle in your system tray (which is in the top-right of the screen by default).

Why is GNU/Linux not as popular as Windows though it has so many advantages and benefits
It is known that technology particularly software has an element of addiction and people are unwilling to move to a 'new' environment requiring learning (also Newtons first law :-) ). this also adds to the 'lock-in' of the software. in an environment where proprietary software is pirated, it is already free (mufta) so no immediate economic benefit is seen in adopting public software.
The challenge is to explain to people that this is not about mufta but about mukta - that the learning resources we use (software is a digital tlm) must be publicly owned so that we all have the freedom to share and modify. If a private company owns them then our learning process is under the control of the vendor who can decide the access to the software. Hence this is a philosophical and ethical issue (rather than purely technological or economic) and like any other social change process (like fighting alcoholism for eg - the benefits of avoiding alcohol is known still it is not easy to give it up), change will be slow and gradual.
Also there are strong forces to keep us chained to proprietary software - hardware vendors who get commission on sale of the proprietary software (no commission on public software!!), proprietary software vendors who adopt unethical and illegal practices to push their products. and the willingness of many of us to stay ignorant :-) and avoid this debate/discussion on the ethics of using proprietary software on grounds of "convenience"
Gnu/linux is public software, intended for public use in all areas (not just education). it is our collective responsibility (all of us in society need to come together to insist that we will only use digital resources that are not proprietary), proprietising (privatising) digital resources and preventing their free sharing (which is so simple - copy/paste) is unethical and greatly harmful to society.
But there are many positive examples - in many countries (and states in India like Kerala), once many people start using GNU/Linux, it spreads fast. Specially if teachers use it, they can explain the benefits to students. So let us keep talking about the importance of software freedom, of the need for public software (like public education) for universal access... and supporting people to adopt it.. our efforts will surely give the result
Add World Clocks to Ubuntu Date/Time Applet
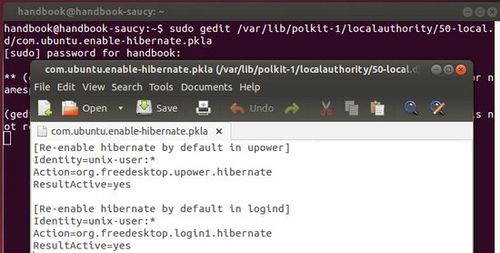
How to Enable Hibernation in Ubuntu 14.04
Hibernate is disabled by default in Ubuntu, when the computer hibernates, all of your applications and documents are stored and the computer completely switches off so it does not use any power, but the applications and documents will still be open when you switch on the computer again.
The indicator-session was updated to use logind instead of upower. Hibernate is disabled by default in both upower and logind.
Open terminal (Ctrl+Alt+T) and run the following commands one by one
   sudo -i
   cd /var/lib/polkit-1/localauthority/50-local.d/
   gedit com.ubuntu.enable-hibernate.pkla
Tip: if the config file does not work for you, try another one by changing /var/lib to /etc in the code.[Re-enable hibernate by default in upower] Identity=unix-user:* Action=org.freedesktop.upower.hibernate ResultActive=yes [Re-enable hibernate by default in logind] Identity=unix-user:* Action=org.freedesktop.login1.hibernate ResultActive=yes Identity=unix-user:* Action=org.freedesktop.login1.hibernate-multiple-sessions ResultActive=yes
How to download youtube videos in mozilla firefox ?
Please follow the below mentioned steps
How do I launch PhET?
The customised DVD that you receive during your training sessions has PhET pre-installed on it. A shortcut or a launcher to PhET can be created as follows:
- 1. Applications----->System Tools------->Preferences------>Main menu

Follow the steps to connect the projector


