Difference between revisions of "Emailing Handout"
| (4 intermediate revisions by 3 users not shown) | |||
| Line 21: | Line 21: | ||
='''Creating an email ID'''= | ='''Creating an email ID'''= | ||
| − | [[File: | + | [[File:step1.png|400px]] |
| − | # | + | #ಮೊದಲಿಗೆ ಯಾವದಾದರು ಬ್ರೌಸರ Mozilla Firefox or Google Chrome ತೆರೆದುಕೊಳ್ಳಬೇಕು ನಂತರ www.gmail.com ಎಂದು address barನಲ್ಲಿ ಟೈಪ ಮಾಡಬೇಕು . <br><br> |
| − | # | + | #ಆಮೇಲೆ ಸರ್ಚ ಬಾರ್ ನಲ್ಲಿ gmail account create ಎಂದು ಟೈಪ್ ಮಾಡಬೇಕು <br><br> |
| − | + | #ಸ್ಕ್ರೀನ ಮೇಲೆ ಹಲವಾರು ಆಯ್ಕೆಗಳು ಕಾಣಿಸಿಕೊಳ್ಳುತ್ತವೆ , ಅದರಲ್ಲಿ ನಾವು create your google account ಆಯ್ಕೆ ಮಾಡಿಕೊಳ್ಳಬೇಕು . <br><br> | |
| − | # | ||
| − | |||
| − | <br><br> | ||
===================================================================<br> | ===================================================================<br> | ||
| − | [[File: | + | [[File:step2.png|400px]] |
| − | # | + | [[File:step3.png|400px]] |
| − | #Enter username and password. User name can be the same as your name. Keep your password simple - so you can remember it. Do not share your password with anyone. | + | #ನಿಮ್ಮ ಹೆಸರನ್ನು ಟೈಮ ಮಾಡಬೇಕು |
| + | #ನಿಮಗೆ ಬೇಕಾಗಿರುವ ಇ-ಮೇಲ ಅಡ್ರಸ್ ನ್ನು ಟೈಪ ಮಾಡಿ - (ಒಂದು ವೇಳೆ ನೀವು ಕೊಟ್ಟಿರುವ ಇ-ಮೇಲ ಅಡ್ರಸ್ ನಲ್ಲಿ ಬೆರೆಯವರು ಬಳಸುತ್ತಿದ್ದರೆ ಆವಾಗ ನೀವು ಬೇರೆ ಇ-ಮೇಲ ಅಡ್ರಸ್ ನ್ನು ಹಾಕಬೇಕಾಗುತ್ತೆ) | ||
| + | #ಪಾಸವರ್ಡ ಮಾತ್ರ ಯಾವತ್ತು ಮರೆಯಬಾರದು . ಹಾಗು 2 ಬಾರಿ ಟೈಪ್ ಮಾಡಬೇಕು . | ||
| + | Enter username and password. User name can be the same as your name. Keep your password simple - so you can remember it. Do not share your password with anyone. Write it down in your diary and keep it safe and private | ||
#Enter your date of birth, gender and phone number. To prove that it is a human being registering, you must enter the code numbers. <br><br> | #Enter your date of birth, gender and phone number. To prove that it is a human being registering, you must enter the code numbers. <br><br> | ||
| − | |||
<br><br> | <br><br> | ||
===================================================================<br> | ===================================================================<br> | ||
| − | [[File: | + | [[File:step4.png|400px]] |
| + | [[File:step5.png|400px]] | ||
#Enter another email address if you have one. <br><br> | #Enter another email address if you have one. <br><br> | ||
#Check the privacy and terms and conditions box. <br><br> | #Check the privacy and terms and conditions box. <br><br> | ||
| + | #Enter any other information that the form wants. The gmail account creation form changes from time to time, hence you need to read this form carefully and give all the information required. | ||
| + | #After giving all the information, you can 'save' or 'submit' so that the email account is opened. | ||
#Click on Next Step and your new gmail account is ready.<br><br> | #Click on Next Step and your new gmail account is ready.<br><br> | ||
| − | + | <br> | |
| − | |||
===================================================================<br> | ===================================================================<br> | ||
| + | |||
='''How to send an email'''= | ='''How to send an email'''= | ||
[[File:Email 4.png|300px|left]] | [[File:Email 4.png|300px|left]] | ||
| Line 105: | Line 107: | ||
[[File:filter8.png|400px|left]] | [[File:filter8.png|400px|left]] | ||
|In the inbox you will see the filter applied to all the mails from htfkarnataka@googlegroups.com | |In the inbox you will see the filter applied to all the mails from htfkarnataka@googlegroups.com | ||
| + | |- | ||
| + | | | ||
| + | [[File:filter9.png|400px]|left] | ||
| + | |Once you have applied the filter you can go to settings, select the filter and choose not to deliver emails with this filter in to your inbox. It will be filed and you can read this later on | ||
|} | |} | ||
| Line 110: | Line 116: | ||
Gmail can sometimes send your mails to Spam; if this happens you will miss important mails, if Gmail marks them as Spam. To avoid this, go to the Spam folder once every week, select the mail that is not a spam and mark it as Not Spam. | Gmail can sometimes send your mails to Spam; if this happens you will miss important mails, if Gmail marks them as Spam. To avoid this, go to the Spam folder once every week, select the mail that is not a spam and mark it as Not Spam. | ||
| − | [[File:spam.png| | + | [[File:spam.png|400px]] |
| − | |||
= '''What you have learnt'''= | = '''What you have learnt'''= | ||
Latest revision as of 12:32, 13 September 2014
Download Handouts
Download as PDF
Download as ODT
Objectives (Emailing and communicating with each other)
ಸೆಷನ್ ಉದ್ದೇಶಗಳು (ಇಮೇಲ್ ಮತ್ತು ಪರಸ್ಪರ ಸಂವಹನ)
- ICTs allow us to create and share. What are the tools and methods for connecting? ICT ನಮಗೆ ರಚಿಸಲು ಮತ್ತು ಹಂಚಿಕೊಳ್ಳಲು ಅವಕಾಶ ನೀಡುತ್ತದೆ. ಸಂಪರ್ಕಿಸುವ ಸಾಧನಗಳು ಯಾವುವು?
- To be able to share using emails ಇಮೇಲ್ ಗಳನ್ನು ಬಳಸಿಕೊಳ್ಳಲು ಹಾಗೂ ಹಂಚಿಕೊಳುವ ಸಾಮರ್ಥ್ಯ
- Participation in an email forum and working together / collaborating ಇಮೇಲ್ ವೇದಿಕೆಯಲ್ಲಿ ಭಾಗವಹಿಸುವಿಕೆ ಮತ್ತು ಒಟ್ಟಿಗೆ ಕೆಲಸ / ಸಹಯೋಗ
- Different teacher communities ವಿವಿಧ ಶಿಕ್ಷಕ ಸಮುದಾಯಗಳು
- Emails and message groups as means of communication and build skills of communicating and networking ಇಮೇಲ್ಗಳು ಮತ್ತು ಸಂದೇಶವನ್ನು ಗುಂಪುಗಳು, ಸಂವಹನ ಮತ್ತು ನೆಟ್ವರ್ಕಿಂಗ್ ಕೌಶಲ್ಯಗಳನ್ನು ನಿರ್ಮಿಸುವುದು
How to create an email id
To create an email id you can go to any of the following websites
- www.gmail.com
- www.yahoomail.com
- www.rediffmail.com
This handout will explain how to do this on www.gmail.com
Creating an email ID
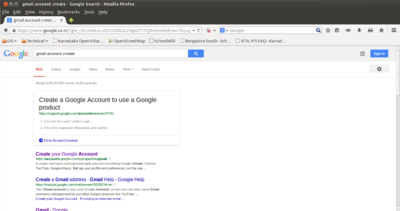
- ಮೊದಲಿಗೆ ಯಾವದಾದರು ಬ್ರೌಸರ Mozilla Firefox or Google Chrome ತೆರೆದುಕೊಳ್ಳಬೇಕು ನಂತರ www.gmail.com ಎಂದು address barನಲ್ಲಿ ಟೈಪ ಮಾಡಬೇಕು .
- ಆಮೇಲೆ ಸರ್ಚ ಬಾರ್ ನಲ್ಲಿ gmail account create ಎಂದು ಟೈಪ್ ಮಾಡಬೇಕು
- ಸ್ಕ್ರೀನ ಮೇಲೆ ಹಲವಾರು ಆಯ್ಕೆಗಳು ಕಾಣಿಸಿಕೊಳ್ಳುತ್ತವೆ , ಅದರಲ್ಲಿ ನಾವು create your google account ಆಯ್ಕೆ ಮಾಡಿಕೊಳ್ಳಬೇಕು .
===================================================================
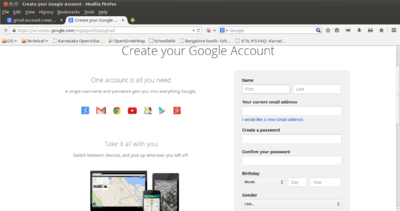
- ನಿಮ್ಮ ಹೆಸರನ್ನು ಟೈಮ ಮಾಡಬೇಕು
- ನಿಮಗೆ ಬೇಕಾಗಿರುವ ಇ-ಮೇಲ ಅಡ್ರಸ್ ನ್ನು ಟೈಪ ಮಾಡಿ - (ಒಂದು ವೇಳೆ ನೀವು ಕೊಟ್ಟಿರುವ ಇ-ಮೇಲ ಅಡ್ರಸ್ ನಲ್ಲಿ ಬೆರೆಯವರು ಬಳಸುತ್ತಿದ್ದರೆ ಆವಾಗ ನೀವು ಬೇರೆ ಇ-ಮೇಲ ಅಡ್ರಸ್ ನ್ನು ಹಾಕಬೇಕಾಗುತ್ತೆ)
- ಪಾಸವರ್ಡ ಮಾತ್ರ ಯಾವತ್ತು ಮರೆಯಬಾರದು . ಹಾಗು 2 ಬಾರಿ ಟೈಪ್ ಮಾಡಬೇಕು .
Enter username and password. User name can be the same as your name. Keep your password simple - so you can remember it. Do not share your password with anyone. Write it down in your diary and keep it safe and private
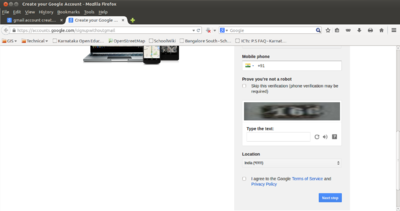
- Enter your date of birth, gender and phone number. To prove that it is a human being registering, you must enter the code numbers.
===================================================================
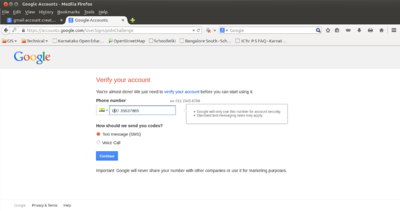
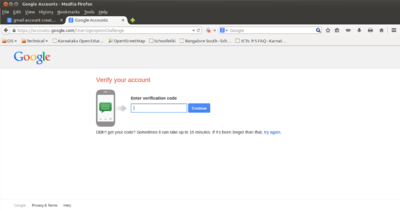
- Enter another email address if you have one.
- Check the privacy and terms and conditions box.
- Enter any other information that the form wants. The gmail account creation form changes from time to time, hence you need to read this form carefully and give all the information required.
- After giving all the information, you can 'save' or 'submit' so that the email account is opened.
- Click on Next Step and your new gmail account is ready.
===================================================================
How to send an email
- Type the website for your mail (www.gmail.com for gmail) in the address bar.
- Enter your username and password without any spelling mistakes.
- Do not check the "Stay Signed In" box.
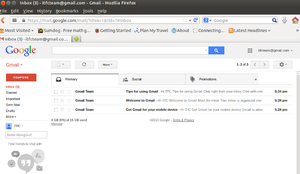
- To check your existing messages, go to Inbox.
- Your new Inbox will look like this with Welcome Message from Gmail
===================================================================
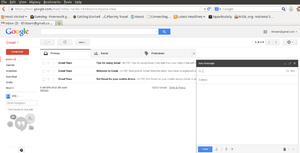
- To compose a new message, go to "Compose". This can be found on the left panel.
- When you click on that you see a panel open for composing a mail.
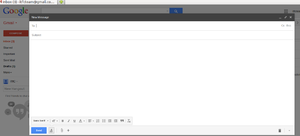
- If you click the double arrow in the right hand corner of this panel, the compose window will pop out
- You can see the bottom panel with formatting options
===================================================================
- Enter the address of the recipient; this can be one recipient or to the mailing forum. You can post to mailing lists by entering the address of the mailing group in the "To" or "Cc" box. For example, if you type mathssciencestf@googlegroups.com, the mail will be delivered to the STF forum.
- You can addess an email to one recipient and copy the mail to others by putting their email IDs in the "cc" box.
- Enter the subject. Type the contents in the box.
- Attach files (if any) by clicking on the image like a clip. Click "Send" to mail.
===================================================================
- If you receive an email in your Inbox you can select Reply or Forward the mail.
- You can also reply to a mailing list. In this image the mail is being replied to the karnatakateachereducators@googlegroups.com
- Remember that if you reply to a list, all members will get the email.
===================================================================
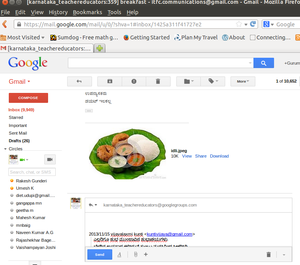
- To download an attachment in an email, scroll down the message and come to the file attached.
- You can either view or download the file.
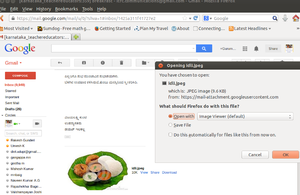
- When you click on dowload, you will get a window like the one shown. If you click OK the file will be saved.
===================================================================
How to create email filters
Creating Labels
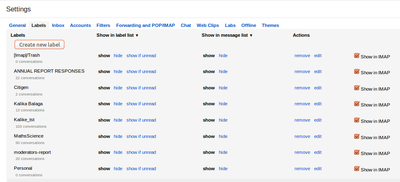
- Go to Settings--->Click on Labels---->Create New Label
Creating Filters
htf
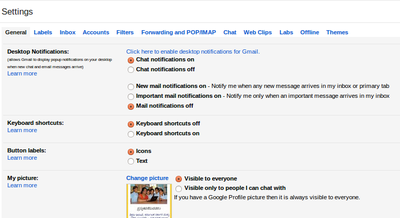
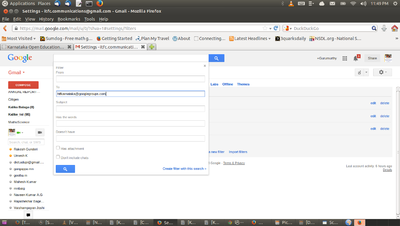
- Go to Settings---->Click on Filters--->Create New Filter
- You will get a box in which you type the filter; you type the email ID that you want to filter in the "To" of "From"
- In this case I am entering the email id htfkarnataka@googlegroups.com
Applying Labels to Filters
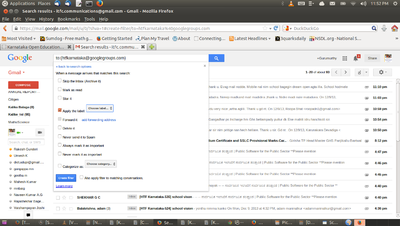
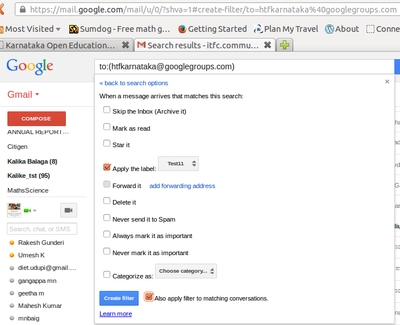
| Once the filter is created, apply the label created before to this filter | |
| Here the label "Test 11" is applied | |
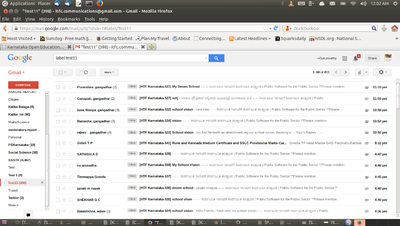
| In the inbox you will see the filter applied to all the mails from htfkarnataka@googlegroups.com | |
|
[[File:filter9.png|400px]|left] |
Once you have applied the filter you can go to settings, select the filter and choose not to deliver emails with this filter in to your inbox. It will be filed and you can read this later on |
Check your spam filter
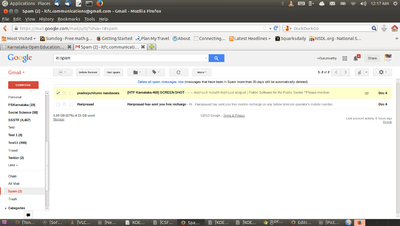
Gmail can sometimes send your mails to Spam; if this happens you will miss important mails, if Gmail marks them as Spam. To avoid this, go to the Spam folder once every week, select the mail that is not a spam and mark it as Not Spam.
What you have learnt
- Creation of an email ID ಇಮೇಲ್ ID ಯ ರಚನೆ
- Username and password privacy ಬಳಕೆದಾರ ಹೆಸರು ಮತ್ತು ಪಾಸ್ವರ್ಡ್ ಗೌಪ್ಯತೆ
- Basic structure of an email window ಇಮೇಲ್ ವಿಂಡೋವಿನ ಮೂಲ ರಚನೆ
- Addressing multiple recipients, how to add "cc", "bcc" and how to forward/ reply/ reply-all
ಒಂದಕ್ಕಿಂತ ಹೆಚ್ಚು ಇಮೇಲ್ ಗಳಿಗೆ ಮೇಲ್ ಮಾಡುವುದು, “cc” “bcc” ಫಾರ್ವರ್ಡ್, ಪ್ರತ್ಯುತ್ತರಿಸುವುದು
- Downloading an attachment and saving - where does the file get saved by default?
ಲಗತ್ತು ಡೌನ್ಲೋಡ್ ಮಾಡುವುದು ಮತ್ತು ಉಳಿಸುವುದು - ಕಡತ ಪೂರ್ವನಿಯೋಜಿತವಾಗಿ ಎಲ್ಲಿ ಉಳಿಸಲಾಗುತ್ತದೆ?
- How to identify fraud in emails? Safety while responding to emails. Malware/ phishing links.
ಇಮೇಲ್ಗಳಲ್ಲಿ ವಂಚನೆ ಗುರುತಿಸುವುದು ಹೇಗೆ? ಸುರಕ್ಷಿತವಾಗಿ ಇಮೇಲ್ಗಳಿಗೆ ಪ್ರತಿಕ್ರಿಯಿಸುವುದು . ಮಾಲ್ವೇರ್ / ಫಿಶಿಂಗ್ ಕೊಂಡಿಗಳು.
- This is a new framework, of interaction; This is a new language; what are the rules?
ಪರಸ್ಪರ ಪ್ರತಿಕ್ರಯಿಸಲು ಒಂದು ಹೊಸ ಚೌಕಟ್ಟು . ಹೊಸ ಭಾಷೆ. ನಿಯಮಗಳು ಯಾವುವು?
- Ease of communication, access. ಸಂವಹನ, ಪ್ರವೇಶ ಸುಲಭ.
- In how many different ways can we connect with one another?
ಎಷ್ಟು ವಿಭಿನ್ನ ರೀತಿಯಲ್ಲಿ ನಾವು ಪರಸ್ಪರ ಸಂಪರ್ಕಿಸಬಹುದು?
- Why should I connect – collaboration and its power
ನಾನು ಏಕೆ ಸಂಪರ್ಕ ಮಾಡಬೇಕು - ಸಹಭಾಗಿತ್ವ ಹಾಗೂ ಅದರ ಶಕ್ತಿ.
Important Points
- Remember to check your spam folder regularly. Sometimes, mails go to spam folder because the email software decides that it is spam. Messages more than 30 days will be deleted and you will lose information.
- Never share password, account information on any email - even if it seems to come from banks, government organization, etc. These are called phishing mails and can lead to fraud.
